Team:Valencia Biocampus/talking
From 2012.igem.org

- The input used is a voice signal (question), which will be collected by our voice recognizer.
- The voice recognizer identifies the question and, through the program in charge of establishing the communication, its corresponding identifier is written in the assigned port of the arduino.
- The software of the arduino reads the written identifier and, according to it, the corresponding port is selected, indicating the flourimeter which wavelength has to be emitted on the culture. There are four possible questions (q), and each of them is associated to a different wavelength.
- The fluorimeter emits light (BioInput), exciting the compound through optic filters.
- Due to the excitation produced, the compound emits fluorescence (BioOutput), which is measured by the fluorimeter with a sensor.
- This fluorescence corresponds to one of the four possible answers (r: response).
- The program of the arduino identifies the answer and writes its identifier in the corresponding port.
- The communication program reads the identifier of the answer from the port.
- "Espeak" emits the answer via a voice signal (Output).
- Acoustic Analysis
Acoustic models take the acoustic properties of the input signal. They acquire a group of vectors of certain characteristics that will later be compared with a group of patterns that represent symbols of a phonetic alphabet and return the symbols which resembles them the most. This is the basis of the mathematical probabilistic process called Hidden Markov Model. The acoustic analysis is based on the extraction of a vector similar to the input acoustic signal with the purpose of applying the theory of pattern recognition. This vector is a parametric representation of the acoustic signal, containing the most relevant information and storing as compressed as possible. In order to obtain a good group of vectors, the signal is pre-processed, reducing background noise and correlation.
- HMM, Hidden Markov Model
Hidden Markov Models (HMMs) provide a simple and effective framework for modelling time-varying spectral vector sequences. As a consequence, almost all present day large vocabulary continuous speech recognition systems are based on HMMs.
The core of all speech recognition systems consists of a set of statistical models representing the various sounds of the language to be recognised. Since speech has temporal structure and can be encoded as a sequence of spectral vectors spanning the audio frequency range, the hidden Markov model (HMM) provides a natural framework for constructing such models.
Basically, the input audio waveform from a microphone is converted into a sequence of fixed size acoustic vectors Y[1:T] = y1, . . . ,yT in a process called feature extraction. The decoder then attempts to find the sequence of words w'[1:L] = w1,...,wL which is most likely to have generated Y , i.e. the decoder tries to find.
w' = argmax{P(w|Y)} for all the words w considered
operating this (Bayes rule) the likelihood p(Y|w) is determined by the acoustic model and the prior P(w) is determined by the language model.
- 1.0 pinout: added SDA and SCL pins that are near to the AREF pin and two other new pins placed near to the RESET pin, the IOREF that allow the shields to adapt to the voltage provided from the board. In future, shields will be compatible both with the board that use the AVR, which operate with 5V and with the Arduino Due that operate with 3.3V. The second one is a not connected pin, that is reserved for future purposes.
- Stronger RESET circuit.
- Atmega 16U2 replace the 8U2.
Talking Interfaces
THE PROCESS
The main objective of our project is to accomplish a verbal communication with our microorganisms.
To do that, we need to establish the following process:

You can see an explicative animation of this process here:
In the following sections we analyse in detail the main elements used in the process:
Voice recognizer
Julius is a continuous speech real-time recongizer engine. It is based on Markov's interpretation of hidden models. It's opensource and distributed with a BSD licence. Its main platfomorm is Linux and other Unix systems, but it also works in Windows. It has been developed as a part of a free software kit for research in large-vocabulary continuous speech recognition (LVCSR) from 1977, and the Kyoto University of Japan has continued the work from 1999 to 2003.
In order to use Julius, it is necessary to create a language model and an acoustic model. Julius adopts the acoustic models and the pronunctiation dictionaries from the HTK software, which is not opensource, but can be used and downloaded for its use and posterior generation of acoustic models.
Acoustic model
An acoustic model is a file which contains an statistical representation of each of the different sounds that form a word (phoneme). Julius allows voice recognition through continuous dictation or by using a previously introduced grammar. However, the use of continuous dictation carries a problem. It requires an acoustic model trained with lots of voice files. As the amount of sound files containing voices and different texts increases, the ratio of good hits of the acoustic model will improve. This implies several variations: the pronunciation of the person training the model, the dialect used, etc. Nowadays, Julius doesn't count with any model good enough for continuous dictation in English.
Due to the different problems presented by this kind of recognition, we chose the second option. We designed a grammar using the Voxforce acoustic model based in Markov's Hidden Models.
To do this, we need the following file:
-file .dict:a list of all the words that we want our culture to recognize and its corresponding decomposition into phonemes.
Language model
Language model refers to the grammar on which the recognizer will work and specify the phrases that it will be able to identify.
In Julius, recognition grammar is composed by two separate files:
- .voca: List of words that the grammar contains.
- .grammar: specifies the grammar of the language to be recognised.
Both files must be converted to .dfa and to .dict using the grammar compilator "mkdfa.pl" The .dfa file generated represents a finite automat. The .dict archive contains the dictionary of words in Julius format.

Once the acoustic language and the language model have been defined, all we need is the implementation of the main program in Python.
Arduino
The Arduino Uno is a microcontroller board based on the ATmega328 (datasheet). It has 14 digital input/output pins (of which 6 can be used as PWM outputs), 6 analog inputs, a 16 MHz crystal oscillator, a USB connection, a power jack, an ICSP header, and a reset button. It contains everything needed to support the microcontroller; simply connect it to a computer with a USB cable or power it with a AC-to-DC adapter or battery to get started.
The Uno differs from all preceding boards in that it does not use the FTDI USB-to-serial driver chip. Instead, it features the Atmega16U2 (Atmega8U2 up to version R2) programmed as a USB-to-serial converter.
Revision 2 of the Uno board has a resistor pulling the 8U2 HWB line to ground, making it easier to put into DFU mode.
Revision 3 of the board has the following new features:
"Uno" means one in Italian and is named to mark the upcoming release of Arduino 1.0. The Uno and version 1.0 will be the reference versions of Arduino, moving forward. The Uno is the latest in a series of USB Arduino boards, and the reference model for the Arduino platform; for a comparison with previous versions, see the index of Arduino boards.
Fluorimeter
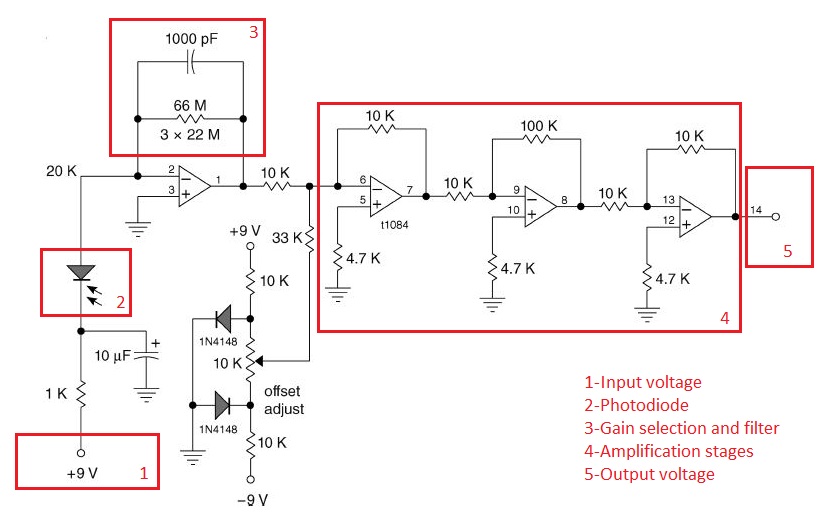
A fluorimeter is an electronic device that can read the light and transform it in an electrical signal. In our project, that light proceeds from a bacterial culture that has been excited.
Its principle of operation is as follows:
First, an electrical signal is sent from Arduino to a LED to activate it. This LED has a specific wavelength to excite the fluorescent protein present in the microbial culture.
When these bacteria are shining, we receive that light intensity with a photodiode, and transform it into electrical current. Now, we have an electrical current that is proportional with the light and therefor to the concentration of fluorescent protein present in the culture. We have to be careful with the orientation between the LED and the photodiode because interferences may occur in the measurement due to light received by photodiode but not emitted by the fluorescence in the culture but scattered light emitted by the LED. Also, a proper band-pass filter has been placed between culture and photodiode to allow only the desired wavelengths to pass through.
The electric current coming from the photodiode has a very small amplitude, thereby we have to amplify it and translate it into a electric voltage with an electronic trans-impedance amplifier. We can choose the gain of this amplification changing the value of resistances of the circuit. The resistances must be properly chosen to select the desired amplification gain. Excessive amplification will not only amplify the signal but also amplify the noise, which is no desired in the measurement.
Finally, the output voltage is sent to Arduino, and it will translate that in a digital signal.
The original idea was taken from [1].
Light Mediated Translator (LMT)
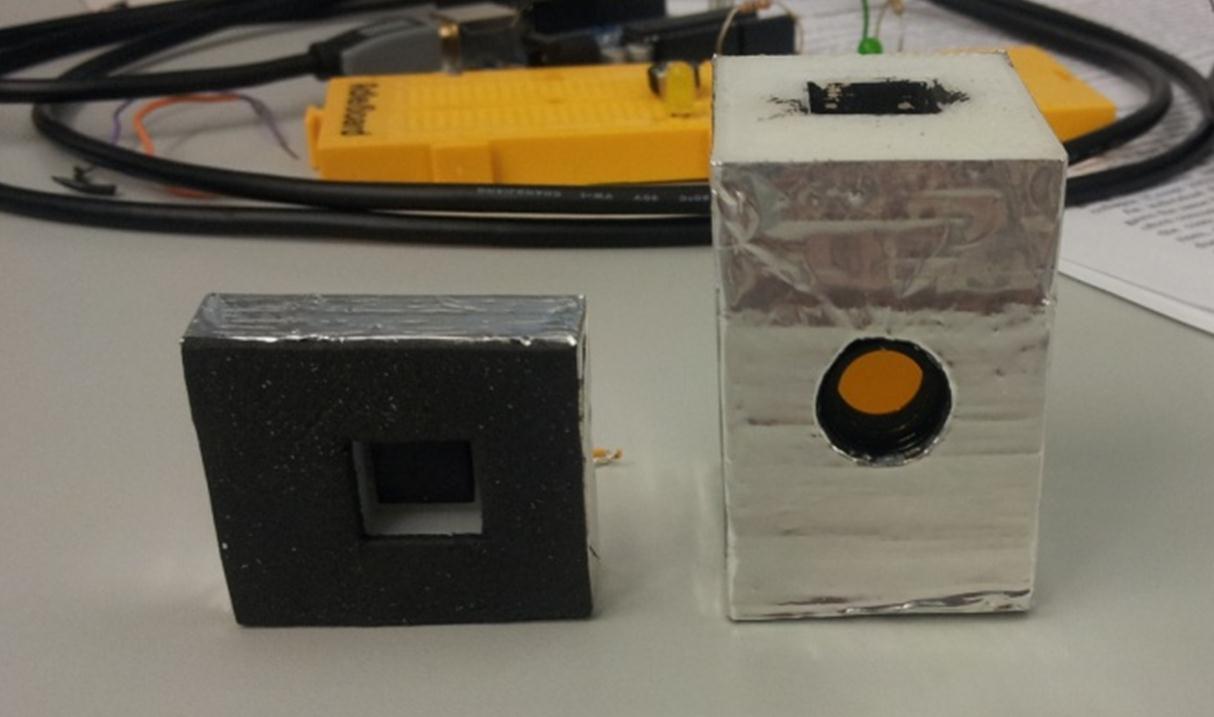
| As a final step, we are working in the design of a humanoid chassis that will friendly mediate the communication between humans and microorganisms. We thought in a C3PO-like bust because it is a universal translator -over 6000 languages- and is a well-known sci-fi character. In the image on the right, you can see some of the elements of the fluorimeter as well as the C3PO mask (on the left) and the mannequin (in the background) we will use to construct the humanoid interface. This chassis will host our home-made fluorimeter (still under construction). When finished, it will allow an easy -and funny- communication with our culture! |
 |
 "
"


