"
"
Team:UNITN-Trento/StatuesApplication
From 2012.igem.org
APPLICATION

In this page you can find about our application results, application method and our DIY black crust!
Crust is definitely Away!
Preliminary evidence show that our engineered E. coli was capable of removing the black crust.
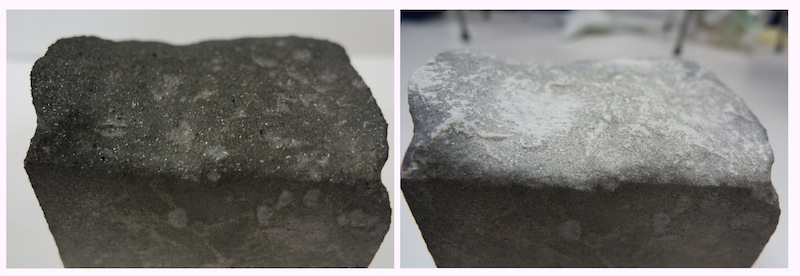
Figure 17: Black crust removal from Carrara marble. Panel A: before treatment. Panel B: after 3 cycles of treatment with NEB10β expressing Parts BBa_K731030 and BBa_K731400. The black crust was reproduced in the laboratory with our Crustonator using a Carrara marble samples of the dimensions of 10 cm x 10 cm. The bacteria were applied on the surface with our Jelly-MOPS for 3 cycles of 12 hours each. After the 3 cycles the gel was removed and the stone was gently tapped with blotting paper and then rinsed with hot water. If you want to know more about the Crustonator and Jelly-MOPS you can find them at the end of this section.
We first tried our bacteria to clean a variety of marble samples. Although the results were very promising it was unclear to us if what we thought was black crust was actually black crust. Therefore, we decided to reproduce the black crust in the laboratory with an acid rain simulator (read more in the Crustonator section).
We applied to a black crust sample reproduced in the laboratory bacteria transformed with CysE and CysDes (Parts BBa_K731030 and BBa_K731400), in addition to control cells that did not carry the enzymes.
The treatment lasted for 3 cycles of 12 hours each. Unfortunately it was difficult to apply the bacteria in one specific spot because the surface of the stone was not flat and the dimensions of the piece were too small to allow for a precise separate spotting. For this reason we currently do not have a good negative control.
Although the removal of the crust was not complete, it was possible to observe a significant change by eye both in the color and the appearance of the surface of the treated stone. It should be kept in mind that the marble pieces exposed in the Crustonator showed a significant thick layer of gypsum crystals, probably because of the aggressive exposure to the acidic atmosphere. With the black crust formed when marble is exposed to the environment, the situation could be completely different. For instance, the gypsum layer is usually less thick, making thus the removal quicker and more efficient.
At this point we had a much cleaner stone and a good feeling that our system was working. However, science is not based upon sensations. To have a less qualitatively analysis we asked the help of Flavio Deflorian, professor in material engineering, that visited our lab a few weeks earlier. Prof. Deflorian opened his lab to us and his staff supported us to collect Scanning Electron Microscopy (SEM) images, to analyze the absence of calcium sulfate crystals, as a confirmation that gypsum was removed by our bacteria.
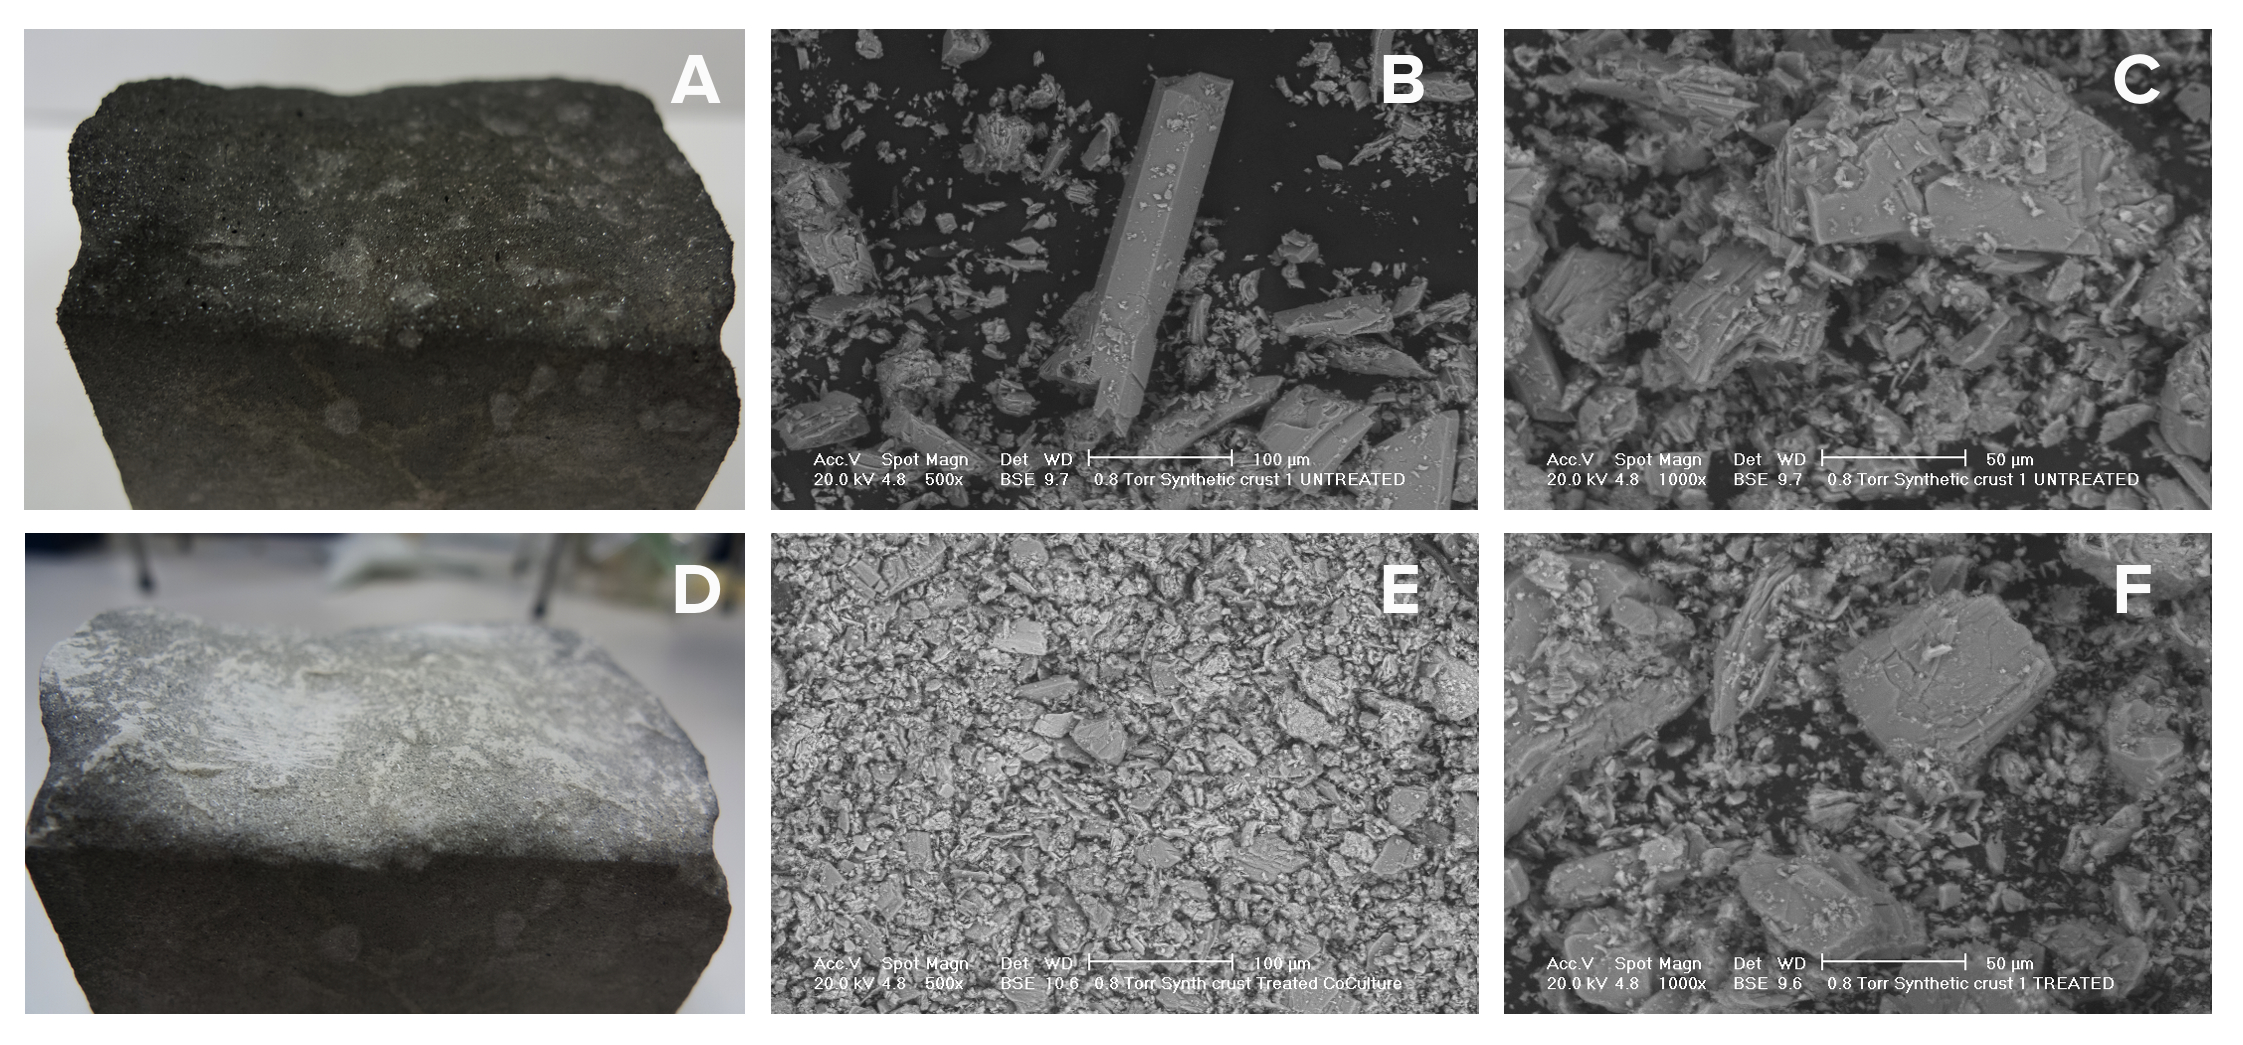
Figure 18: Removal of the black crust from a synthetically generated gypsum layer: Scanning Electron Microscopy analysis of the black crust before and after bacterial treatment. Untreated synthetic crust (A), SEM analysis of material scraped from untreated synthetic crust at 500x (B) and 1000x magnification (C). Synthetic crust treated with NEB10β cells expressing CysE and CysDes (Parts BBa_K731030 and BBa_K731400) (D); SEM analysis of material scraped from treated synthetic crust at 500x (E) and 1000x magnification (F).
The SEM analysis showed changes in the crystal morphology of the stone surface. Before the treatment, calcium sulphate crystals were large (200-300 μm) and well structured, while after the application of our bacteria CaSO4 was still present on the surface but crystals were smaller (20-30 μm) and showed a loss in crystalline organization. We did not find any big and well structured crystal in the sample took after the treatment. Changes in light reflection were even noticeable by eye.
Our preliminary data demonstrate the feasibility of our method and the possibility of using engineered bacteria to clean the black crust from calcareous stones. However, more tests and controls should be performed to address the following points:
in vitro- Optimize the combined expression of CysE and CysDes.
- Place CysDes behind a different promoter to avoid basal expression.
- Optimize method of application
- Have clear negative controls
- Use different kinds of black crust and marble
We hope that another iGEM team will consider this as good starting point for a possible future project!
Our application method.
After characterizing our system in vitro we were ready to apply the bacteria on our collection of stone samples.
The first thing we needed to address is how to apply the bacteria on the stones. We needed a support that would allow for both bacterial survival and adhesion on the surface of the statue.
We developed a soft gel with a modified MOPS recipe and agar (jelly-MOPS), and set up a protocol that allowed the gel to stay in place, to remain wet and to keep bacteria alive through the night. This is all we needed, all the rest was left to the bacteria!
We created an agar matrix with separate wells on the stone surface to allow an easy application of the bacteria. This method simplified the procedure for multiple sequential applications in the same spot.
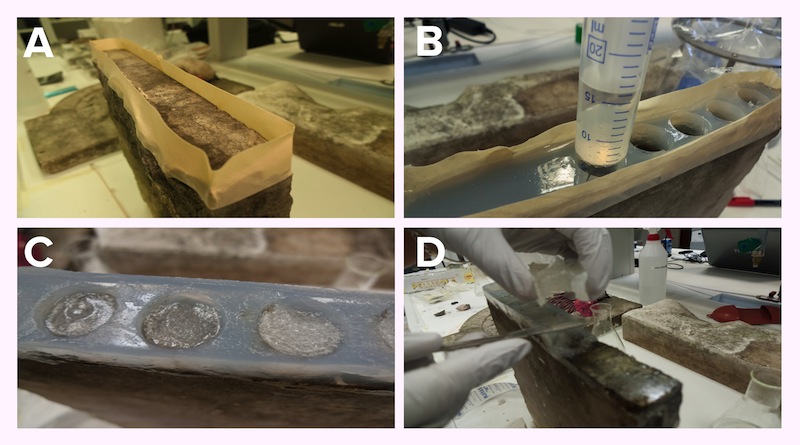
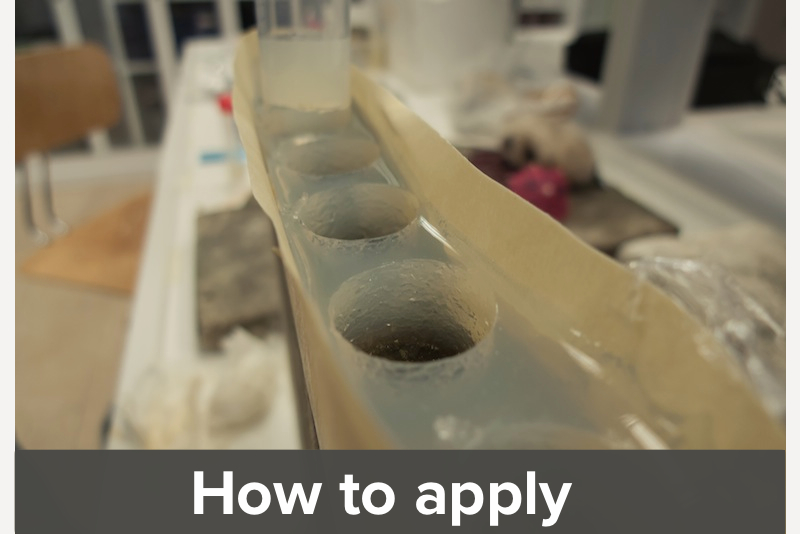
Figure 19: Application steps on a stone sample. Preparation of a scaffold on the surface of the stone (Panel A). Then the matrix gel is poured and left to solidify directly on the surface. When solid, wells are cut out from the matrix (Panel B). Bacteria resuspended in Jelly-MOPS are placed in the wells (Panel C), covered with rice paper wetted in PBS. After three cycles of 12 hours, the gel and the matrix are removed (Panel D).
The bacteria were grown in MOPS with glucose and induced with arabinose +/- IPTG, depending on the parts being expressed. After 4 hours of induction the bacteria were pelleted and resuspended in jelly-MOPS and a 1-2 cm layer of bacterial gel was added inside each well. The matrix was then covered with rice paper wet in PBS to protect and keep hydrated the bacterial gel.
The stone was subjected to 3 application cycles of 12 hours with freshly induced bacteria. At the end of the three applications both the gel and the matrix were removed, and the stone surface was gently tamped with blotting paper. Then hot water was poured gently on the stone to easily remove the remaining part of the gel.
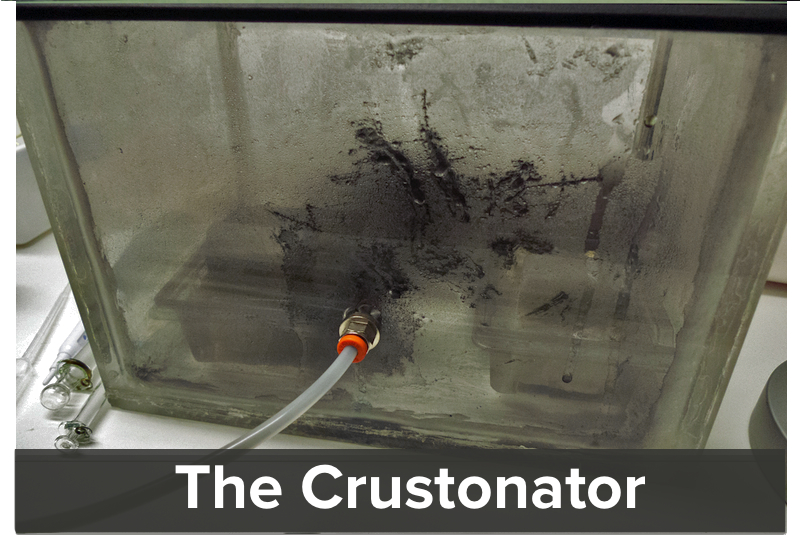
An home made acid rain simulator.
As we started collecting samples of dirty marble we realized that it was important to test our bacteria on an homogenous surface of black crust that was surely composed of a gyspsum layer.
Inspired by the work of a group of researchers at the University of Belfast an at the University of Oxford (M. Gomez-Heras, B.J. Smith and H.A. Viles ) we decided to build our own acid rain simulation chamber. For a detailed protocol on how to build your own Crustonator you can check our protocol section.
By using our labmade acid rain simulator we were able to successfully recreate the black crust on:
- 2 small white marble pieces from Carrara (10x10 cm)
- 2 small yellow marble pieces from Vicenza (10x10 cm)
The pieces were immersed partially in distilled water and subjected to three 72 hours cycles of exposure to a saturated atmosphere of sulfourus acid. At the beginning of each cycle a fine powder of charcoal was injected into the chamber with compressed air.
After the treatment the box was opened and we happily observed the formation of a gypsum layer in top of the stones and on the surface of the water. A small amount of the crust was scratched and looked under the microscope to confirm the presence of gypsum crystals.
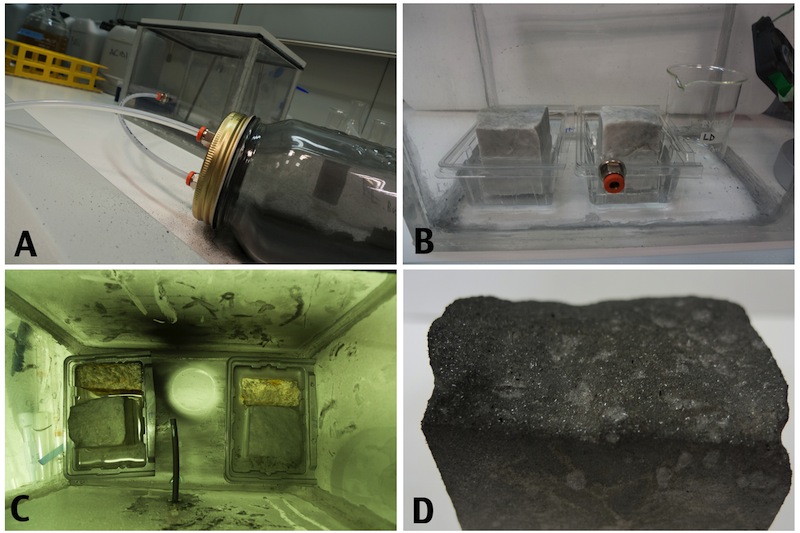
Figure 20: The Crustonator: A small laboratory device was built to simulate the acid rain and pollutants on the stones. In a tightly sealed plexiglass box, connected to a separate chamber containg charcoal, were placed two marble pieces from Carrara and two yellow marble pieces from Vicenza (A). The calcareous stones were partially immersed in water (B) and subjected to a saturated atmosphere of SO3 mixed with small particles of charcoal that were sprayed every 72 hours in the chamber (C). After 216 hours the box was opened and a black crust was observed on the top layer of the marble (D).
The blackened stones are ready to be cleaned by our bacteria!