 "
"
Team:Freiburg/Project/Tal
From 2012.igem.org
| (88 intermediate revisions not shown) | |||
| Line 1: | Line 1: | ||
{{Template:Team:Freiburg}} | {{Template:Team:Freiburg}} | ||
__NOTOC__ | __NOTOC__ | ||
| - | + | = Using the Toolkit = | |
| - | + | ---- | |
| - | + | <br> | |
| - | + | <div align="justify">Here, we give you a manual on how to use our toolkit to design TAL proteins. We recommend reading through all of the manual prior to using the toolkit. Moreover, we included a short introductional video on how to use the toolkit. | |
| - | + | ||
| - | + | <html> | |
| - | + | ||
| - | + | <br><br> | |
| - | + | <iframe style="margin-left:200px; align:center;" src="http://player.vimeo.com/video/52254697" width="400" height="300" align="middle" frameborder="0" webkitAllowFullScreen mozallowfullscreen allowFullScreen></iframe> | |
| - | + | <br><br><br><br> | |
| - | + | </html> | |
| - | + | = Step 1. Choosing effector and target sequence = | |
| - | + | ---- | |
| - | + | <br>First, you need to think about your experimental setup. When working with TAL proteins it's pretty clear you want to target a DNA sequence. To choose your sequence, you need to know some of the operational details of TAL proteins in order to pick it the right way. | |
| - | + | ||
| - | + | ||
| - | + | <b>1. Every TAL binding site starts and ends with a thymine</b> | |
| - | + | ||
| - | + | These thymine binding modules are already inserted in our expression plasmids. So the protein won't bind to other sequences than those which start with a T and end with a T. | |
| - | + | ||
| - | + | ||
| - | + | <b>2. Your sequence must be twelve base pair long</b> | |
| - | + | ||
| - | + | Our toolbox is optimized for sequences of twelve plus two (the thymine at upstream and downstream positions). This lenght guarantees a high specifity and a library size that's good to handle at the same time. | |
| - | + | ||
| - | + | ||
| - | + | You can check out the following online softwares for perfect TAL-TF or TALEN binding sites:<br><br> | |
| - | + | https://boglab.plp.iastate.edu/node/add/talen (for TALENs)<br> | |
| - | + | https://boglab.plp.iastate.edu/node/add/single-tale (for TAL-TFs) | |
| - | + | ||
| - | + | ||
| - | + | ||
| - | + | ||
| - | + | ||
| - | + | ||
| - | + | ||
| - | + | ||
| - | + | ||
| - | + | ||
| - | + | ||
| - | + | ||
| - | + | ||
| - | + | ||
| - | + | ||
| + | <br> | ||
| - | + | <br> | |
| + | = Step 2. Building a TAL = | ||
---- | ---- | ||
| + | <br>Building your TAL starts with your selected sequence. In this manual, we use a fictive sequence that you can substitute with your own. <p>Our sequence will be as follows:</p> | ||
| - | |||
| + | [[Image:sequence1.png|200px|center|no frame|link=]] | ||
| - | |||
| - | |||
| + | <br>Because the two thymines are already in the cloning vector, they are of no interest for our TAL protein: | ||
| - | + | [[Image:sequence2.png|200px|center|no frame|link=]] | |
| - | |||
| + | <br>To build this sequence from our toolkit we need to split it up in pairs of two: | ||
| - | |||
| - | + | [[Image:sequence3.png|350px|center|no frame|link=]] | |
| + | <br>Now, we need to give our pairs position numbers inside the TAL protein: | ||
| - | |||
| + | [[Image:sequence4.png|500px|center|no frame|link=]] | ||
| - | |||
| - | + | <br>Next, we can start taking the parts out of the toolkit. A short look at the toolkit shows you that for every possible pair of bases, for example AA, we have 6 places. Every place stands for one of the six possible positions of the pair AA inside the TAL protein. | |
| - | |||
| - | |||
| - | |||
| + | [[Image:toolkit3.png|300px|center|no frame|link=]] | ||
| - | |||
| - | + | <br>All you have to do now is pick the six direpeats consistent with the six pairs of your sequence. In our case, we would take the the first one of AA because the first pair of bases in our sequence is AA. Then we take the second one of TG the third of AG and so forth. The idea behind this is that every direpeat knows through his downstream and upstream part at which position of the final TAL protein it ought to be. You can find the exact mechanisms behind this in the [[Team:Freiburg/Project/Overview|'GATE Assembly Kit']] part of our project section. <br><br> | |
| - | + | ||
| - | + | ||
| + | [[Image:sequence5.png|500px|center|no frame|link=]] | ||
| - | |||
| - | + | <br> | |
| - | + | For lazy iGEM students, we have written a simple program. So you just have to type in your target DNA sequence and we give you a list of parts that you need to pipet into your Golden Gate reaction mix:<br><br> | |
| - | + | ||
| - | < | + | <html> |
| + | <div align="center"> | ||
| + | <iframe src="http://omnibus.uni-freiburg.de/~lb125/index.html"; width=95%; frameborder="0"; scrolling="no"> | ||
| + | </iframe> | ||
| + | </div> | ||
| + | </html> | ||
| - | |||
| - | |||
| - | |||
| - | <br> | + | <br> |
| - | + | = Step 3. Adding a Function = | |
| - | + | ---- | |
| - | + | <br> | |
| + | Now that you have your TAL BioBricks, you are almost done. But targeting a sequence without doing anything is not really helpful, so you need a fusion protein that does something to your DNA. There are a couple of things you could do with your target sequence, and normally you have thought of this before you chose your sequence. With our toolkit you get a transcription factor (to turn on or enhance the trancription of a gene), a restriction enzyme (to make cuts wherever you want) and a desaminase (to make site-specific mutations). Every one of these factors is already placed inside the final TAL vector and designed to fit the 3'-end of your TAL BioBricks. Conveniently, you just choose one and put it in your reaction tube along with the other BioBricks. | ||
| - | |||
| - | |||
| - | |||
| - | |||
| + | [[Image:TALfunction.png|600px|center|no frame|link=]] | ||
| - | |||
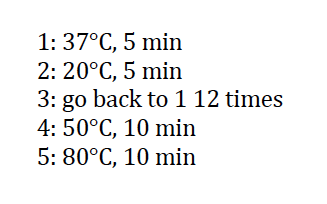
| + | With the six TAL BioBricks and the fusion enzyme in your reaction tube you now only need the type two restriction enzyme BsmB1 and a T7 Ligase to put all the parts together.<br><br> | ||
| - | + | [[Image:protocolggc.png|300px|left|no frame|link=]] | |
| + | <br> | ||
| - | + | [[Image:thermocycler.png|200px|center|no frame|link=]] | |
| - | + | ||
| - | + | ||
| - | + | <br> | |
| + | <br> | ||
| + | <br> | ||
| + | <br> | ||
| + | = Step 4. Transformation and Use = | ||
| + | ---- | ||
| + | <br> | ||
| + | Transform 5 μl of the GATE assembly product into 50 μl of transformation competent bacteria.<br> | ||
| + | <br>'''Important note:''' Your cells need to be sensitive to the ccdB kill cassette in our TAL expression vectors! Otherwise also bacteria that have taken up plasmids without the six direpeats will form false positive colonies. We used the DH10B E.coli strain.<br> | ||
| + | In case you want to express your TALE in bacteria, you need to induce the promoter of our prokaryotic expression plasmid with IPTG. <br>For use in a eukaryotic system, such as HEK 239 cells, perform a midiprep and directly transfect the eukaryotic TAL expression plasmid (or its derivatives pTAL-TF, pTALEN etc.) according to your transfection protocol. | ||
<!--- The Mission, Experiments ---> | <!--- The Mission, Experiments ---> | ||
| - | + | <br><br><br><br><br><br> | |
| - | + | [[#top|Back to top]] | |
| - | + | ||
| - | + | ||
Latest revision as of 01:15, 27 October 2012
Using the Toolkit
Step 1. Choosing effector and target sequence
First, you need to think about your experimental setup. When working with TAL proteins it's pretty clear you want to target a DNA sequence. To choose your sequence, you need to know some of the operational details of TAL proteins in order to pick it the right way.
1. Every TAL binding site starts and ends with a thymine
These thymine binding modules are already inserted in our expression plasmids. So the protein won't bind to other sequences than those which start with a T and end with a T.
2. Your sequence must be twelve base pair long
Our toolbox is optimized for sequences of twelve plus two (the thymine at upstream and downstream positions). This lenght guarantees a high specifity and a library size that's good to handle at the same time.
You can check out the following online softwares for perfect TAL-TF or TALEN binding sites:
https://boglab.plp.iastate.edu/node/add/talen (for TALENs)
https://boglab.plp.iastate.edu/node/add/single-tale (for TAL-TFs)
Step 2. Building a TAL
Building your TAL starts with your selected sequence. In this manual, we use a fictive sequence that you can substitute with your own.
Our sequence will be as follows:
Because the two thymines are already in the cloning vector, they are of no interest for our TAL protein:
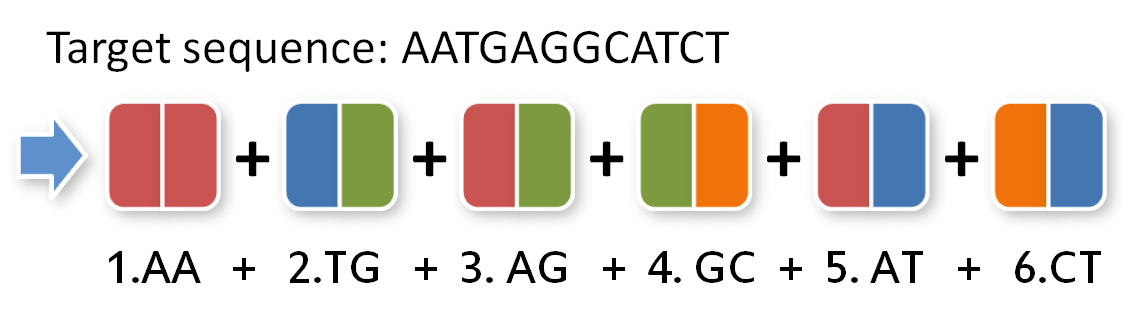
To build this sequence from our toolkit we need to split it up in pairs of two:
Now, we need to give our pairs position numbers inside the TAL protein:
Next, we can start taking the parts out of the toolkit. A short look at the toolkit shows you that for every possible pair of bases, for example AA, we have 6 places. Every place stands for one of the six possible positions of the pair AA inside the TAL protein.
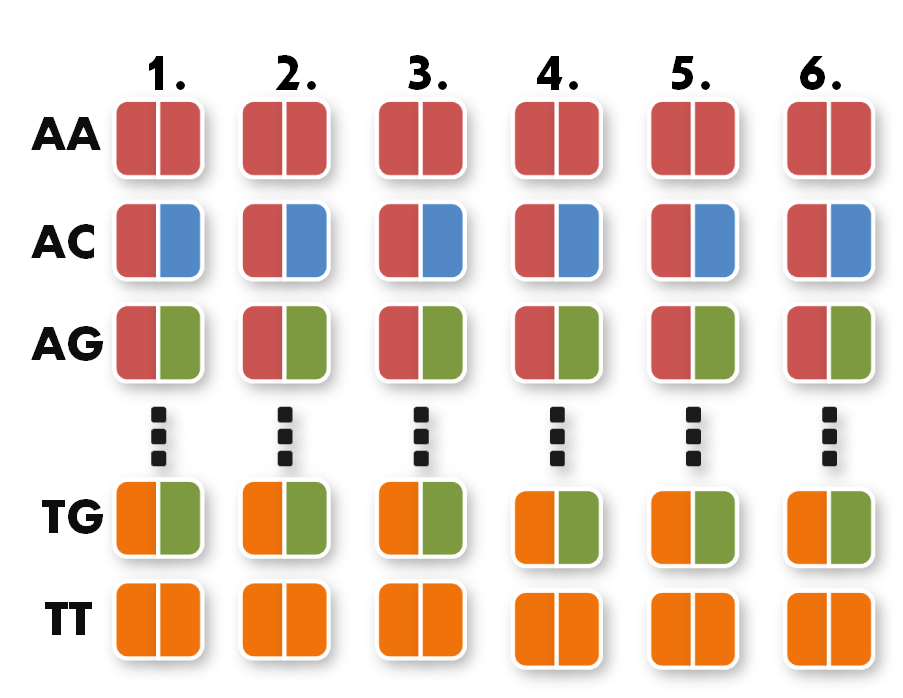
All you have to do now is pick the six direpeats consistent with the six pairs of your sequence. In our case, we would take the the first one of AA because the first pair of bases in our sequence is AA. Then we take the second one of TG the third of AG and so forth. The idea behind this is that every direpeat knows through his downstream and upstream part at which position of the final TAL protein it ought to be. You can find the exact mechanisms behind this in the 'GATE Assembly Kit' part of our project section.
For lazy iGEM students, we have written a simple program. So you just have to type in your target DNA sequence and we give you a list of parts that you need to pipet into your Golden Gate reaction mix:
Step 3. Adding a Function
Now that you have your TAL BioBricks, you are almost done. But targeting a sequence without doing anything is not really helpful, so you need a fusion protein that does something to your DNA. There are a couple of things you could do with your target sequence, and normally you have thought of this before you chose your sequence. With our toolkit you get a transcription factor (to turn on or enhance the trancription of a gene), a restriction enzyme (to make cuts wherever you want) and a desaminase (to make site-specific mutations). Every one of these factors is already placed inside the final TAL vector and designed to fit the 3'-end of your TAL BioBricks. Conveniently, you just choose one and put it in your reaction tube along with the other BioBricks.
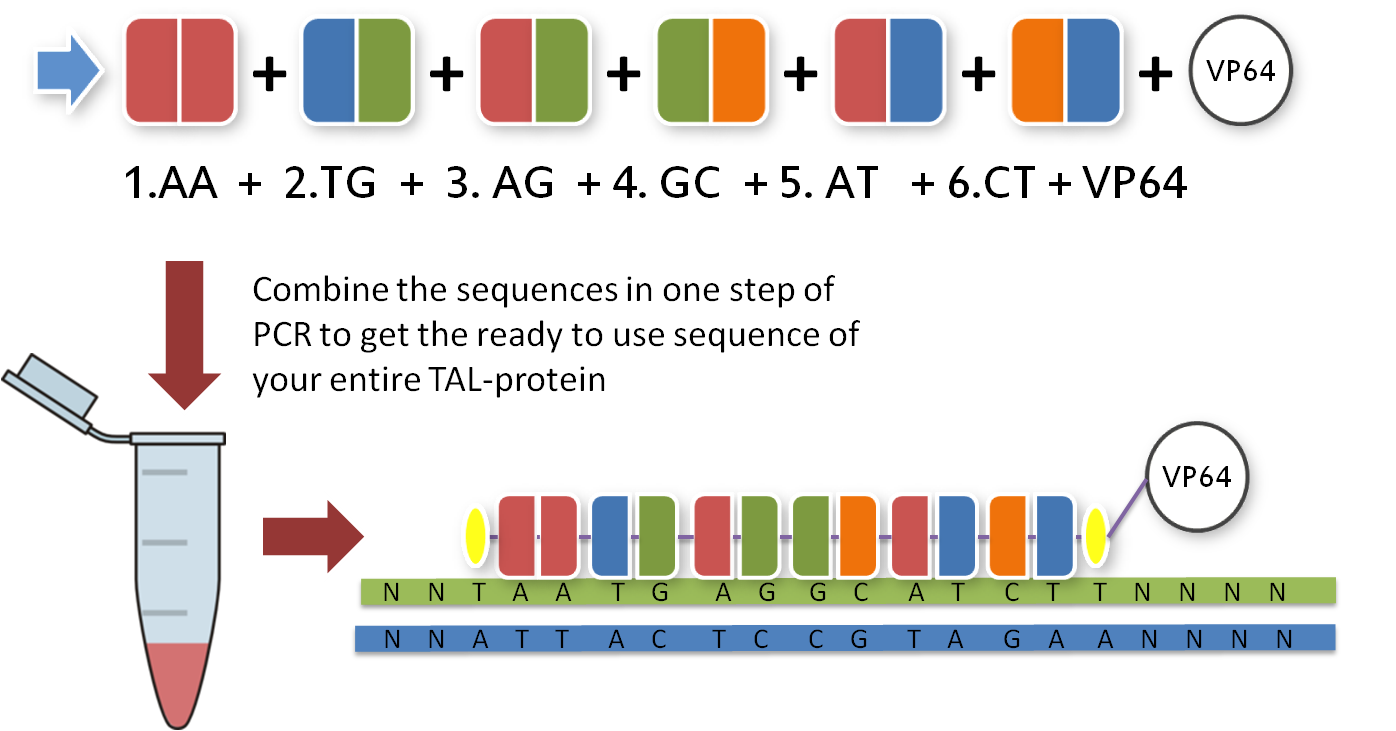
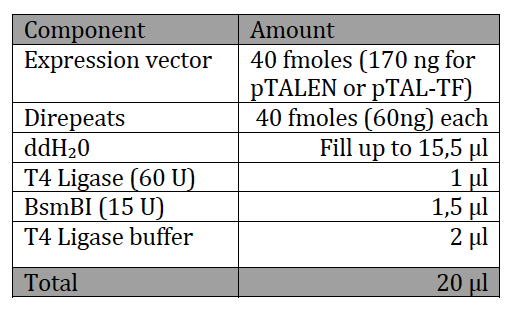
With the six TAL BioBricks and the fusion enzyme in your reaction tube you now only need the type two restriction enzyme BsmB1 and a T7 Ligase to put all the parts together.
Step 4. Transformation and Use
Transform 5 μl of the GATE assembly product into 50 μl of transformation competent bacteria.
Important note: Your cells need to be sensitive to the ccdB kill cassette in our TAL expression vectors! Otherwise also bacteria that have taken up plasmids without the six direpeats will form false positive colonies. We used the DH10B E.coli strain.
In case you want to express your TALE in bacteria, you need to induce the promoter of our prokaryotic expression plasmid with IPTG.
For use in a eukaryotic system, such as HEK 239 cells, perform a midiprep and directly transfect the eukaryotic TAL expression plasmid (or its derivatives pTAL-TF, pTALEN etc.) according to your transfection protocol.