Team:University College London/LabBook/Week15
From 2012.igem.org


Contents |
Monday (17.09.12)
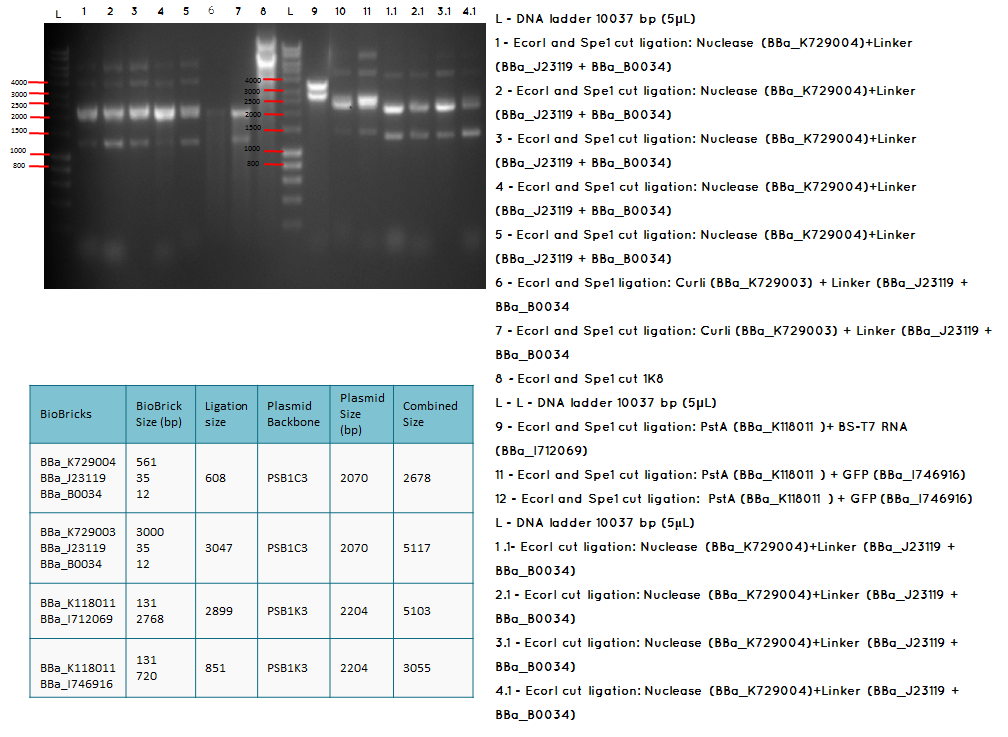
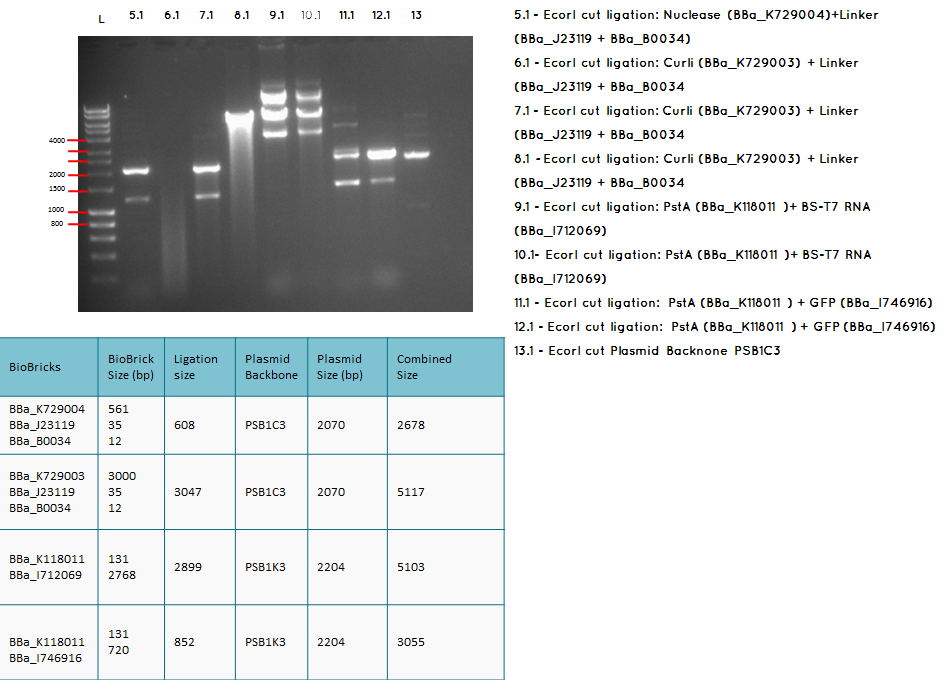
Aim - We want to check if the ligations have been successfulccessful
Step 1 We carried analytical digest of the following ligations:
- BBa_K729004 + BBa_J23119-BBa_B0034
- BBa_K729003 + BBa_J23119-BBa_B0034
- BBa_K118011 + BBA_I746916
Methods:
Step 1 - Thawing cells: Thaw all materials on ice
Step 2 - Adding Ingredient: Add the following ingredients to autoclaved/sterile eppendorf tubes
| Component | Amount (ul) (one enzyme used) | Amount (ul) (two enzymes used) |
|---|---|---|
| dH20 | 2.5 | 1.5 |
| Buffer 1x | 1 | 1 |
| DNA template | 5 | 5 |
| BSA | 0.5 | 0.5 |
| Enzyme 1 | 1 | 2 |
| Enzyme 2 | N/A | 1 |
Step 3 - Addition of BioBrick: Flick contents gently and centrifuge.
Step 4 - Centrifuge:
RPM: 14000
Time: 1 minute
Temperature: 18oC
Step 5 - Digest Program: Place the samples on a thermocycler under the following conditions:
RPM: 550
Time: 2.5 hours
Temperature: 37oC
Step 6 - Denaturing Enzymes: If you are not running the samples on a gel immediately, denature the restriction enzymes by running the samples on a thermocycler under the following conditions:
RPM: 550
Time: 25 minutes
Temperature: 65oC
Step 2- We run a gel of the digests
Methods:
Preparing the Gel
Step 1: Within a conical flask, add 3ml 50X TAE, 1.5g Agarose, and 150ml RO water
Step 2: Heat for 1 min in microwave. Swirl. Heat again for 30s. If solution is clear stop. Else repeat.
Step 3: Cool solution under running cold water.
Step 4: Add 20ul ethidium bromide (normal concentration of EB solution is 500ug/ul)
Step 5: Pour into a sealed casting tray in a slow steady stream, ensuring there are no bubbles
Running a gel
Step 6: Add 1 part loading buffer to five parts of loading sample
Step 7: Position the gel in the tank and add TAE buffer, enough to cover the gel by several mm
Step 8: Add 5ul of DNA ladder to lane 1
Step 9: Add samples to the remaining wells
Step 10: Run at 100 volts for 1hour and 15 minutes
Imaging the Gel
Step 11: Place gel in GelDoc 2000 chamber
Step 12: Turn GelDoc 2000 chamber on
Step 13: From computer: Quantity One > Scanner > Gel_Doc_Xr>Manuqal Acquire
Step 14: Alter the exposure/settings to give a clear image.
TAE - Tris-acetate-EDTA
EDTA - ethylenediamine tetraacetic acid
Results:
Conclusion: The bands that we obtained on the gel did not correspond to the sizes we were expecting. For most of the samples we could clearly see a band at around 2000 which most probably is the backbone. These confusing results may be due to mistakes during the ligation or the enzyme digestion. Contamination is another possible reason for these results.

Tuesday (18.09.12)
Aim - We want to check if the ligations have been successfulccessful
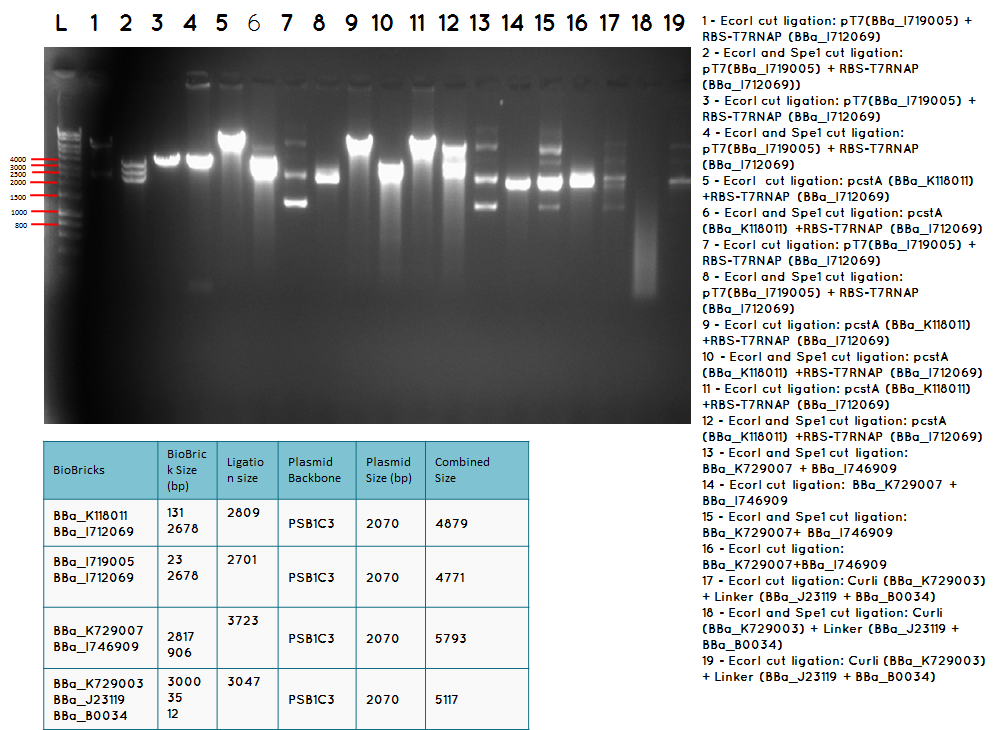
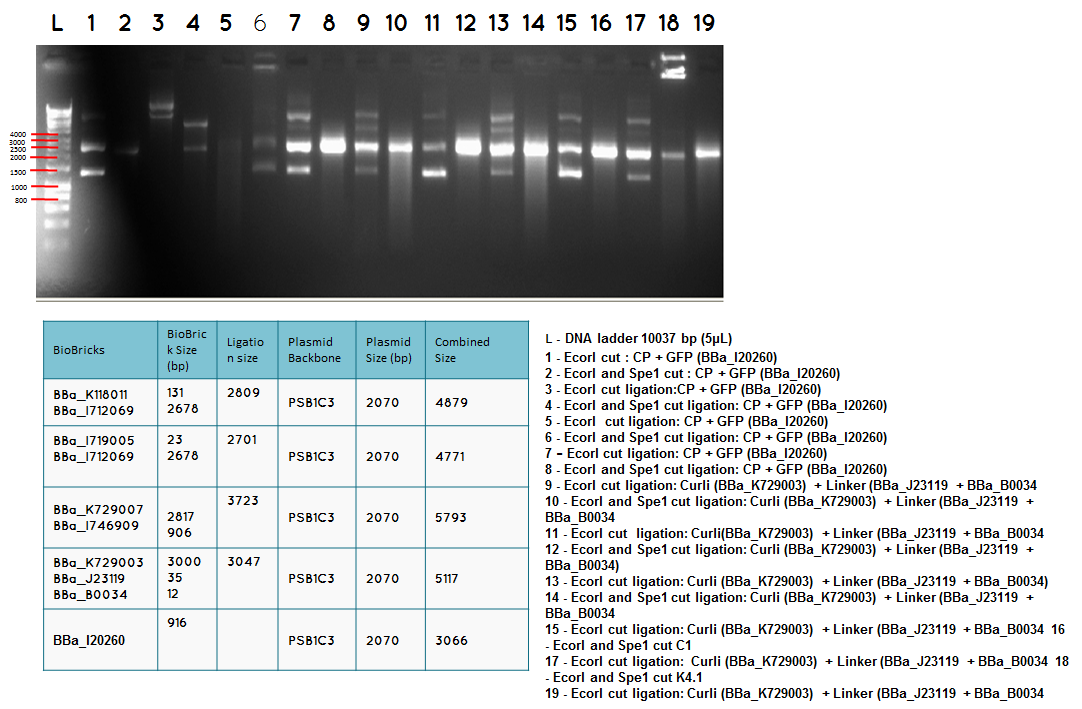
Step 1 We carried analytical digest of the following ligations:
- BBa_K729003+(BBa_J23119-BBa_B0034)
- BBa_K118011+BBa_I712069
- BBa_K729005+BBa_I712069
- BBa_I746909+K729007
Methods
Step 1 - Thawing cells: Thaw all materials on ice
Step 2 - Adding Ingredient: Add the following ingredients to autoclaved/sterile eppendorf tubes
| Component | Amount (ul) (one enzyme used) | Amount (ul) (two enzymes used) |
|---|---|---|
| dH20 | 2.5 | 1.5 |
| Buffer 1x | 1 | 1 |
| DNA template | 5 | 5 |
| BSA | 0.5 | 0.5 |
| Enzyme 1 | 1 | 2 |
| Enzyme 2 | N/A | 1 |
Step 3 - Addition of BioBrick: Flick contents gently and centrifuge.
Step 4 - Centrifuge:
RPM: 14000
Time: 1 minute
Temperature: 18oC
Step 5 - Digest Program: Place the samples on a thermocycler under the following conditions:
RPM: 550
Time: 2.5 hours
Temperature: 37oC
Step 6 - Denaturing Enzymes: If you are not running the samples on a gel immediately, denature the restriction enzymes by running the samples on a thermocycler under the following conditions:
RPM: 550
Time: 25 minutes
Temperature: 65oC
Step 2- We run a gel of the digests
Methods
Preparing the Gel
Step 1: Within a conical flask, add 3ml 50X TAE, 1.5g Agarose, and 150ml RO water
Step 2: Heat for 1 min in microwave. Swirl. Heat again for 30s. If solution is clear stop. Else repeat.
Step 3: Cool solution under running cold water.
Step 4: Add 20ul ethidium bromide (normal concentration of EB solution is 500ug/ul)
Step 5: Pour into a sealed casting tray in a slow steady stream, ensuring there are no bubbles
Running a gel
Step 6: Add 1 part loading buffer to five parts of loading sample
Step 7: Position the gel in the tank and add TAE buffer, enough to cover the gel by several mm
Step 8: Add 5ul of DNA ladder to lane 1
Step 9: Add samples to the remaining wells
Step 10: Run at 100 volts for 1hour and 15 minutes
Imaging the Gel
Step 11: Place gel in GelDoc 2000 chamber
Step 12: Turn GelDoc 2000 chamber on
Step 13: From computer: Quantity One > Scanner > Gel_Doc_Xr>Manuqal Acquire
Step 14: Alter the exposure/settings to give a clear image.
TAE - Tris-acetate-EDTA
EDTA - ethylenediamine tetraacetic acid
Conclusion: We have obtained the expected sizes on for the pcstA (BBa_K118011) +RBS-T7RNAP (BBa_I712069) ligation.

Tuesday (18.09.12)
Step 2 - Inoculating Colonies into a Selective Broth:: Add Yul of antibiotic to reach desired antibiotic concentration.
(For Ampicillin this is 50ug/ml, For Kanamycin it is 25ug/ml, for Tetracycline it is 15ug/ml, and for Chloramphenicol it is 25ug/ml)
Step 4 – Selecting a Colony: Select a clear, isolated colony and using an inoculation hoop scoop up a colony onto the tip. Deposit in the falcon tube
Step 5 - Culture: Culture your falcon tubes overnight at a temperature of 37 oC. Leave for no longer than 16 hours.

Tuesday (18.09.12)
Aim – We would like to ligate BBa_I746909 to BBa_K729007 to obtain the following construct pCstA+RBS+T7RNAP+pT7+RBS+GFP+TT
Step 1 We minipreped the successful ligation of the pcstA (BBa_K118011) +RBS-T7RNAP (BBa_I712069) ligation which is our BioBrick BBa_K729007
Method
Step 2 - Resuspend Cells: Resuspend pelleted bacterial cells in 250ul Buffer P1 and transfer to a microcentrifuge tube
Step 3 - Puncturing Cell Membrane: Add 250ul Buffer P2 and mix thoroughly by inverting the tube 4-6 times until the solution becomes clear. Do not allow the lysis reaction to proceed for more than 5 min.
Step 4 - Neutralising buffer P2: Add 350ul Buffer N3 and mix immediately and thoroughly by inverting the tube 4-6 times.
Step 5 - Centrifuge:
RPM: 13000
Time:10 minutes
Temperature: 18oC
Step 6 - Centrifuge: Apply the supernatant from step 5 to the QIAprep spin column by decanting or pipetting. Centrifuge for 30-60s and discard the flow-through.
Step 7 - Remove Endonucleases from Sample: Wash the QIAprep spin column by adding 500ul of Buffer PB. Centrifuge for 30-60s and discard flow-through.
Step 8 - Remove salts from sample: Wash the QIAprep spin column by adding 750ul of Buffer PE. Centrifuge for 3-60s and discard flow through.
Step 9 - Centrifuge:
RPM: 13000
Time:1 minute
Temperature: 18oC
Step 10 - Elute DNA: Place the QIAprep column in a clean 1.5ml microcentrifuge tube. To elute DNA, add 50ul Buffer EB to the centre of the spin column, let it stand for 1 min, and centrifuge for 1 min.
Step 2 Ligation was performed using the BioBricks BBa_I746909 and BBa_K729007 to generate a BioBrick that contains pcstA-T7RNAP-pT7-GFP-TT.
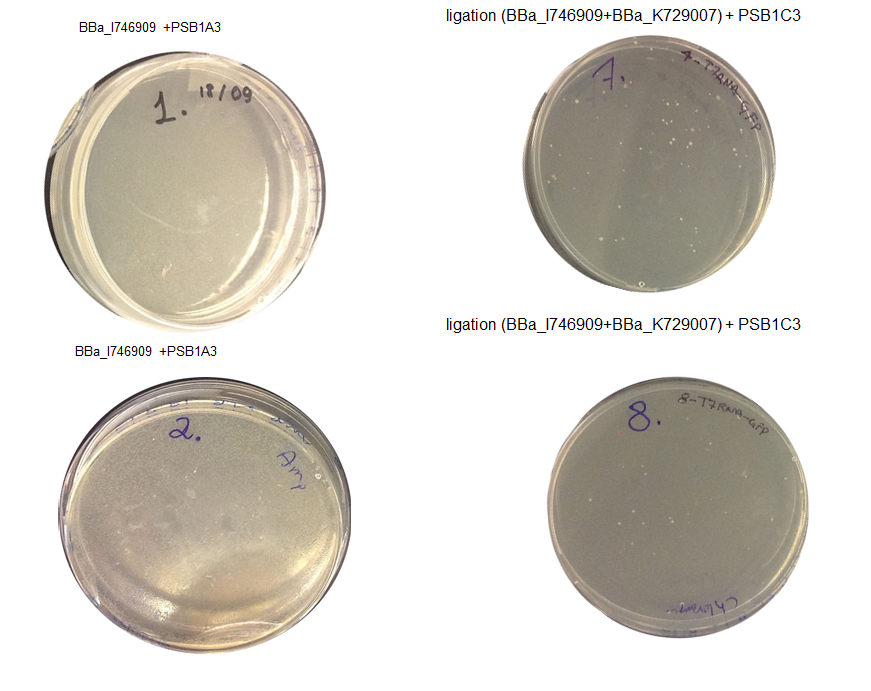
Step 3 Transformation – we plated 4 plates; plate 1 and 2 were with the transformed BBa_I746909 biobrick and plate 3 and 4 were transformed with our ligation (BBa_I746909+BBa_K729007). We are going to incubate over night at 37C and colonies picking the next day.
Method:
Step 1 - Addition of BioBrick: To the still frozen competent cells, add 1 - 5 µL of the resuspended DNA to the 2ml tube.
Step 4 - Incubation: Close tube and incubate the cells on ice for 45 minutes.
Step 5 - Heat Shock: Heat shock the cells by immersion in a pre-heated water bath at 37ºC for 10 minutes.
Step 6 - Incubation: Incubate the cells on ice for 2 minutes.
Step 7 - Add media: Add 1.5ml of Lysogeny Broth and transfer to a falcon tube.
Step 8 - Incubation: Incubate the cells at 37ºC for 1 hour at RPM 550.
Step 9 - Transfer: transfer the solution back into a 1.5ml Eppendorf and centrifuge
RPM: 14000
Time: 2 minutes
Temperature (18-25oC)
Step 10 - Resuspend:Remove supernatant and resuspend in 100ul LB
Step 11 - Plating: Spread the resuspended cell solution onto a selective nutrient agar plate. Place the plates in a 37°C static incubator, leave overnight (alternatively a 30°C static incubator over the weekend)
Wednesday (19.09.12)
Aim 1 – Check the result of transformation. We expect to see growth on plates with transformed biobricks and ligations.
Results - The table below indicates that there was growth on all of the plates
| Plate | Samples | Volume Inoculated | Colony Formation |
|---|---|---|---|
| 1 | BioBrick BBa_I746909 | 10ul | Yes |
| 2 | BioBrick BBa_I746909 | 90uL | Yes |
| 3 | Ligation BBa_I746909+BBa_K729007 | 10ul | Yes |
| 4 | Ligation BBa_I746909+BBa_K729007 | 90uL | Yes |
Conclusion : The transformations have been successful. Colonies will be picked and inoculated into LB media for overnight culture
Step 4 – Inoculating Colonies into a Selective Broth. We had colonies on all the plates. We picked we picked 2 colonies from plates 1 and 2 and 4 colonies from plate 3 and 4. We grow all 12 colonies overnight.The table below indicates the volume of broth and the concentration of antibiotic required.
Step 2 - Inoculating Colonies into a Selective Broth:: Add Yul of antibiotic to reach desired antibiotic concentration.
(For Ampicillin this is 50ug/ml, For Kanamycin it is 25ug/ml, for Tetracycline it is 15ug/ml, and for Chloramphenicol it is 25ug/ml)
Step 4 – Selecting a Colony: Select a clear, isolated colony and using an inoculation hoop scoop up a colony onto the tip. Deposit in the falcon tube
Step 5 - Culture: Culture your falcon tubes overnight at a temperature of 37 oC. Leave for no longer than 16 hours.
| Falcon tube | Samples | Broth | Antibiotic (50 nu/uL) |
|---|---|---|---|
| 1 | BioBrick BBa_I746909 | Lysogeny Broth | Ampicillinn |
| 2 | BioBrick BBa_I746909 | Lysogeny Broth | Ampicillin |
| 3 | BioBrick BBa_I746909 | Lysogeny Broth | Ampicillin |
| 4 | BioBrick BBa_I746909 | Lysogeny Broth | Ampicillin |
| 5 | Ligation BBa_I746909+BBa_K729007 | Lysogeny Broth | Chloramphenicol |
| 6 | Ligation BBa_I746909+BBa_K729007 | Lysogeny Broth | Chloramphenicol |
| 7 | Ligation BBa_I746909+BBa_K729007 | Lysogeny Broth | Chloramphenicol |
| 8 | Ligation BBa_I746909+BBa_K729007 | Lysogeny Broth | Chloramphenicol |
| 9 | Ligation BBa_I746909+BBa_K729007 | Lysogeny Broth | Chloramphenicol |
| 10 | Ligation BBa_I746909+BBa_K729007 | Lysogeny Broth | Chloramphenicol |
| 11 | Ligation BBa_I746909+BBa_K729007 | Lysogeny Broth | Chloramphenicol |
| 12 | Ligation BBa_I746909+BBa_K729007 | Lysogeny Broth | Chloramphenicol |
Thursday (20.09.12)
Aim - We want to check if the ligations were successful.
All 12 colonies so we are going to miniprep and nanodrop all of them
Step 1 - Miniprep
Method
Step 2 - Resuspend Cells: Resuspend pelleted bacterial cells in 250ul Buffer P1 and transfer to a microcentrifuge tube
Step 3 - Puncturing Cell Membrane: Add 250ul Buffer P2 and mix thoroughly by inverting the tube 4-6 times until the solution becomes clear. Do not allow the lysis reaction to proceed for more than 5 min.
Step 4 - Neutralising buffer P2: Add 350ul Buffer N3 and mix immediately and thoroughly by inverting the tube 4-6 times.
Step 5 - Centrifuge:
RPM: 13000
Time:10 minutes
Temperature: 18oC
Step 6 - Centrifuge: Apply the supernatant from step 5 to the QIAprep spin column by decanting or pipetting. Centrifuge for 30-60s and discard the flow-through.
Step 7 - Remove Endonucleases from Sample: Wash the QIAprep spin column by adding 500ul of Buffer PB. Centrifuge for 30-60s and discard flow-through.
Step 8 - Remove salts from sample: Wash the QIAprep spin column by adding 750ul of Buffer PE. Centrifuge for 3-60s and discard flow through.
Step 9 - Centrifuge:
RPM: 13000
Time:1 minute
Temperature: 18oC
Step 10 - Elute DNA: Place the QIAprep column in a clean 1.5ml microcentrifuge tube. To elute DNA, add 50ul Buffer EB to the centre of the spin column, let it stand for 1 min, and centrifuge for 1 min.
Step 2 - Nanodrop
Method
Software ND-1000 Model:
Step 1: Initialise the spectrophotometer by pipetting 1 µ of clean water onto lower optic surface, lowering the lever arm and selecting ‘initialise’ in the ND-1000 software
Step 2: Wipe and add elution buffer as negative control. Click blank in ND-1000 software
Step 3: Wipe and add 1 µl sample
Step 4: On the software set lambda to 260nm
Step 5: Lower the lever arm and click measure in ND-1000 software
Step 6: Take readings for concentration and purity
Step 7: Once measurement complete, wipe surface
In the table below are summarised all the concentrations obtained from the nanodrop.
| Falcon tube | Samples | Plate | Concentration at λ260 (ng/uL) |
|---|---|---|---|
| 1 | BioBrick BBa_I746909 | 1 | 188 |
| 2 | BioBrick BBa_I746909 | 1 | 276.2 |
| 3 | BioBrick BBa_I746909 | 2 | 194.6 |
| 4 | BioBrick BBa_I746909 | 2 | 329.6 |
| 5 | Ligation BBa_I746909+BBa_K729007 | 3 | 233.6 |
| 6 | Ligation BBa_I746909+BBa_K729007 | 3 | 197.7 |
| 7 | Ligation BBa_I746909+BBa_K729007 | 3 | 438.5 |
| 8 | Ligation BBa_I746909+BBa_K729007 | 3 | 337.8 |
| 9 | Ligation BBa_I746909+BBa_K729007 | 4 | 310.3 |
| 10 | Ligation BBa_I746909+BBa_K729007 | 4 | 244.3 |
| 11 | Ligation BBa_I746909+BBa_K729007 | 4 | 249.8 |
| 12 | Ligation BBa_I746909+BBa_K729007 | 4 | 340.2 |
Step 3 - We carried out analytical digest of the minipreped DNA
Methods
Step 1 - Thawing cells: Thaw all materials on ice
Step 2 - Adding Ingredient: Add the following ingredients to autoclaved/sterile eppendorf tubes
| Component | Amount (ul) (one enzyme used) | Amount (ul) (two enzymes used) |
|---|---|---|
| dH20 | 2.5 | 1.5 |
| Buffer 1x | 1 | 1 |
| DNA template | 5 | 5 |
| BSA | 0.5 | 0.5 |
| Enzyme 1 | 1 | 2 |
| Enzyme 2 | N/A | 1 |
Step 3 - Addition of BioBrick: Flick contents gently and centrifuge.
Step 4 - Centrifuge:
RPM: 14000
Time: 1 minute
Temperature: 18oC
Step 5 - Digest Program: Place the samples on a thermocycler under the following conditions:
RPM: 550
Time: 2.5 hours
Temperature: 37oC
Step 6 - Denaturing Enzymes: If you are not running the samples on a gel immediately, denature the restriction enzymes by running the samples on a thermocycler under the following conditions:
RPM: 550
Time: 25 minutes
Temperature: 65oC
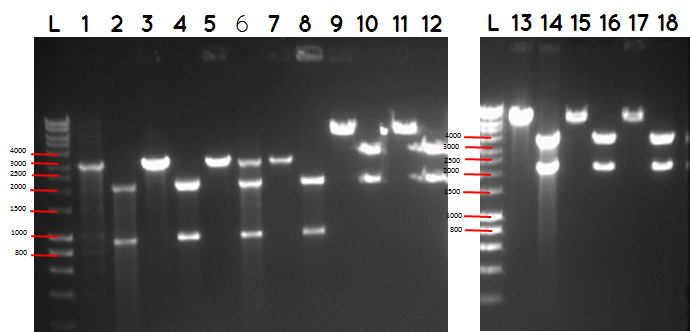
step 4 - Gel electrophoresis of the analytical digest to see if we have the right DNA size
L - DNA ladder 10037 bp (5μL)
1 - PstI cut BBa_I746909+PSB1A3
2 - PstI and Xbal cut BBa_I746909+PSB1A3
3 - PstI cut BBa_I746909+PSB1A3
4 - PstI and Xbal cut BBa_I746909+PSB1A3
5 - PstI cut BBa_I746909+PSB1A3
6 - PstI and Xbal cut BBa_I746909+PSB1A3
7 - PstI cut BBa_I746909+PSB1A3
8 - PstI and Xbal cut BBa_I746909+PSB1A3
9 – PstI cut ligation (BBa_K729007+BBa_I746909) + PSB1C3
10 - PstI and Xbal cut ligation (BBa_K729007+BBa_I746909) + PSB1C3
11 - PstI cut ligation (BBa_K729007+BBa_I746909) + PSB1C3
12 - PstI and Xbal cut ligation (BBa_K729007+BBa_I746909) + PSB1C3
L DNA ladder 10037 bp (5μL)
13 - PstI cut ligation (BBa_K729007+BBa_I746909) + PSB1C3
14 - PstI and Xbal cut ligation (BBa_K729007+BBa_I746909) + PSB1C3
15 - PstI cut ligation (BBa_K729007+BBa_I746909) + PSB1C3
16 - PstI and Xbal cut ligation (BBa_K729007+BBa_I746909) + PSB1C3
17 - PstI cut ligation (BBa_K729007+BBa_I746909) + PSB1C3
18 - PstI and Xbal cut ligation (BBa_K729007+BBa_I746909) + PSB1C3
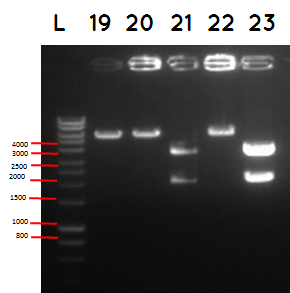
L - DNA ladder 10037 bp (5μL)
19 - PstI cut ligation (BBa_K729007+BBa_I746909) + pSB1C3
20 - PstI cut cut ligation (BBa_K729007+BBa_I746909) + pSB1C3
21 - PstI and Xbal cut ligation (BBa_K729007+BBa_I746909) + pSB1C3
22 - PstI cut ligation (BBa_K729007+BBa_I746909) + pSB1C3
23 -PstI and Xbal cut ligation (BBa_K729007+BBa_I746909) + pSB1C3
| BioBricks | BioBrick size (bp) | Ligation size (bp) | Plasmid backbone | Pasmid backbone(bp) | Combined size(bp) |
|---|---|---|---|---|---|
| BBa_K729007+BBa_I746909 | 2817+906 | 3731 | pSB1C3 | 2070 | 5801 |
| BBa_I746909 | 906 | pSB1A3 | 2155 | 3061 |
Conclusion - The ligation was successful the bands on the gel correspond to the bands we were expecting.

15-5
1. Prepare 11-16 plates (DNAse - Agar + CMP)
2. Streak cells onto all plates at the same time
3. Incubate at 37°C
4. Apply HCl to the first plate before putting in the incubator (set time as zero)
5. Take a second reading after four hours, followed by six readings every 3 hours, and a final three readings every two hours.
6. When the reading is taken, observe the following: a. Diameter of the colony (once the diameter of the colony is measured, pick the colony and put it to grow in LB for nine hours) b. Diameter of the halo that is achieved once HCL is applied c. OD from a) d. Estimate of the depth of the colony on the agar plate
Results:
| Sample/time | Colony diameter /mm | Halo diameter/mm | Absorbance at 600 OD |
|---|---|---|---|
| 1 (12.30 noon) | 0 | 0 | 0 |
| 2 (16.30pm) | 0 | 0 | 0 |
| 3 (19.30 pm) | 0 | 0 | 0 |
| 4 (22.30 pm) | 0.5 | 1 | 0.001 |
| 5 (01.30 am) | 1 | 3 | 0.142 |
| 6 (04.30 am) | 1.5 | 7 | 0.228 |
| 7 (07.30 am) | 1.5 | 7.5 | 0.252 |
| 8 (10.30am) | 2.5 | 11 | 0.522 |
| 9 (12.30noon) | 3 | 13 | 0.749 |
| 10 (2.30pm) | 3.5 | 14.5 | 0.844 |
| 11(4.30pm) | 4 | 16 | 0.937 |
Conclusion: From the table above we concluded that there is a positive correlation between the diameter of the colony and the diameter of the halo and both increase over time. This proves that our ligation of T7+nuclease was successful.

Tuesday (18.09.12)
Aim – We would like to determine if BBa_K729006 is functioning as intended and producing laccase.
Method:
1) W3110 cells transformed with laccase and control W3110 cells are inoculated in 10mL of LB media, and incubated overnight at 37˚C in a 200rpm shaker
2) The O/N culture is then centrifuged at 6100g for 20 minutes, in order to extract the media containing laccase. The supernatant is retained.
3) In order to take readings, cuvettes are prepared with 2.2mL KH2PO4 buffer + 0.5mL Laccase supernatant + 0.3mL Syringaldazine, which is added immediately before readings are begun (as explained in step 4). A blank is created using 0.5mL of LB media instead of laccase supernatant.
4) The optical density at 530nm of each of the samples is measured at five minute intervals over 30 minutes.
Conclusion - Our cells are producing an elevate amount of laccase compared to the control, indicating that the BioBrick is functioning as intended.

Friday (21.09.12)
Aim – We would like to determine if our laccase producing BBa_K729006 is capable of degrading polyethylene.
1) Cells are grown overnight in 10ml of LB media at 37˚C, 200rpm.
- a) BBa_K729006
- b) W3110 Control
2) 1cm2 low density polyethylene squares are introduced into the media, which is incubated for 3 days. Separate LDPE squares are placed in water in this timeframe.
3) LDPE squares are removed from media, dried, mounted, and coated with gold-palladium for scanning electron microscopy
4) LDPE samples are viewed under the SEM at 100x and 10 000x magnification, observing pitting caused by laccase catalysed degradation.
Conclusion - Our laccase producing cells are degrading polyethylene, allowing our BioBrick to be utilised for this function.

Sunday (14.09.12)
Aim – We would like to determine if BBa_K729005 is functioning as intended.
1) Cells are grown overnight in 15ml of LB media at 37˚C, 200rpm.
- a) BBa_K729005
- b) W3110 Control
2) Shake flasks are inoculated with 5 ml of cells, with the following media (50ml):
- a) LB media
- b) LB media + 0.3M NaCl
- c) LB media + 0.6M NaCl
3) Shake flasks are run at 37˚C, 200rpm, measuring the optical density at 600 nm for each flask each hour.
4) Optical density is measured until the cells exit the exponential growth phase
Conclusion - Our transformed cells exhibit improved growth rates, and higher cell count in high salt conditions. This indicates that our cells are producing IrrE, and that our BioBrick is functioning as intended.
 "
"
