Team:Shenzhen/Result/YAO.Genome
From 2012.igem.org
-
S
BioBricks
- Summary
- YAO.Genome
- YAO.Channel
- YAO.Sensor
- YAO.Suicider
-
p
Notebook
- Team History
- YAO.Genome
- YAO.Channel
- YAO.Sensor
- YAO.Suicider
- YAO.Factory
-
e
Practices


- Promoters
- RBS
- Terminators
- I. Reviving (4 days before gene gun experiment)
- II. Amplification (3 days before gene gun experiment)
- III. Preparation of gene gun experiment
- IV. Gene gun experiment
Contents |
Summary
We have fulfilled the first stage and some work of the second stage, mitochondria expressed GFP in two strategies. We have designed many standardized part for the second stage, shown in table of BioBricks. However, for lime limited, we have not carried out test and standardization. Luckily, we have succeeded in capturing positive clones from the homologues recombination and shuttle plasmid experiments. Since it is still very difficult to find positive clones from shuttle plasmid experiments, we have not got good results for terminators test, and experiments in YAO.Sensor & YAO.Suicider. There are two possibilities for the failure in terminators test. One is no positive clones have been captured, and the other is that their termination efficiencies are too high that no green fluorescence could be captured.
Homologues Recombination
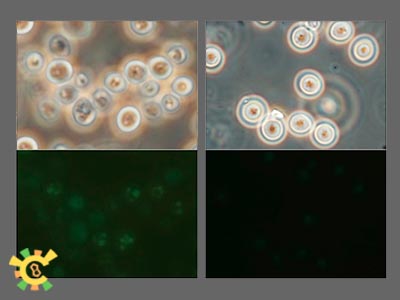
This is our BioBrick for first stage. Recombination sites have been chosen to be upstream and downstream sequences of cox3 gene in mtDNA. MCC109 was the Rho0 strain (without mtDNA), and GW22 and DBY947 mutants were selected to be Rho+ strains (with mtDNA), with lysine-deficient.
As showed in below, our gene gun based transformation system work and green fluorescence proteins spark in mitochondria. And no such signal can be tracked in control.
Shuttle Plasmid
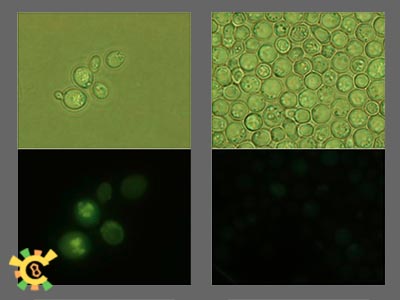
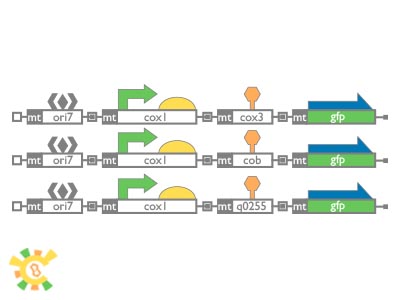
As first part succeeds, we design second part of YAO. Genome construction. Here are BioBricks we built for shuttle plasmids building. ori7 was selected to be the origin of replication site on plasmid, from NCBI database. About 500bp upstream sequence of cox1 gene, containing promoter and RBS, was chosen as regulatory. This experiment is based on Rho+ strain Y187, with ura-deficient.
Shuttle plasmid was build in BioBricks standard and transformed into mitochondria.
To pick out positive clones is very hard and we luckily found one. Same as first stage experiment result, mtGFP expressed and no signal can be tracked in control.
Parts Annotation and Standardization
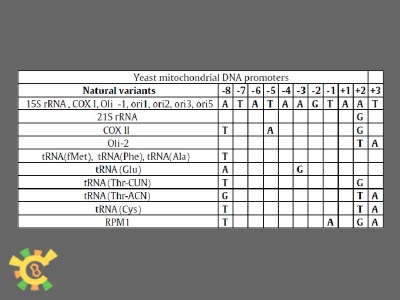
The promoter sequences for YAO project are found in literatures:
Table 1. Promoters sequences for yeast mitochondial DNA. ( Deshpande, A. P. and S. S. Patel (2012). "Mechanism of transcription initiation by the yeast mitochondrial RNA polymerase." Biochim Biophys Acta.)
The RBS sequence for mitochondria is discerned from the mito-chromosome based on following principles:
- 1) RBS are on up-stream of CDS sequence and down-stream of promoter sequence in 5’-UTR sequence.
- 2) The ribosome binds on RBS sequence and starts translation when coming across the first AUG codon.
So the sequence between the last ATG codon and CDS on the DNA sequence is believed to contain RBS. With further modifications, we made those sequences BioBricks.
Annotated RBS:
>AI1
ATGAATATAATAATAATAATATTATTAAAATTAATATATAAAAAAAAAGTAAAA
>OLI1
ATGTTAATTATATATAATATATTTATATATAATTATATATATATATATAAATAATAAATATATATATAATAT
AAAAATAAGAATAGATTAAATATTTAATAAATAAATATT
Mitochondria transcription systems are similar to bacterial transcription system and the RNA polymerase in yeast mitochondria is very similar in sequence and structure to bacteriophage T7 RNA polymerase. With DNA secondary structure analysis of 5’UTR sequence of mitochondrial genes, we found the stem-loop structure in these sequences which are very similar to secondary structure of bacterial Rho-independent terminator. So we synthesized these sequences with some modifications to make them BioBricks and tested these terminators in our experiments. ( Deshpande, A. P. and S. S. Patel (2012). "Mechanism of transcription initiation by the yeast mitochondrial RNA polymerase." Biochim Biophys Acta.)
Annotated Terminators:
>COB
ATTATAGTTCCGGGGCCCGGTCACGGAAGCCGGAACCCCGCAAGGAGATT
>COX3
AAAACTCCTAACGGGGTTCCCGCGAAGCGGGAACTAATAATAATATAAT
>Q0255_2
ATATTAATTAAGTTTCGGGTCCCGGCTACGGGACCCGGAACCCCCGAGAGGAGTTATTATATTTA
BioBricks have been constructed to test the termination efficiency. For we have just one reporter in mitochondrial codon table (mtGFP), we directly put the terminator in the middle of regulatory and mtGFP. As the terminator works, green fluorescence should be limited. However, we failed to pick up positive clones in this experiments. There are two possibilities for the failure in terminators test. One is no positive clones have been captured, and the other is that their termination efficiencies are too high that no green fluorescence could be captured. If we construct another reporter that can be used in mitochondria, we will redesign this experiments using C.Dog protocol.
YAO.Genome Backbone
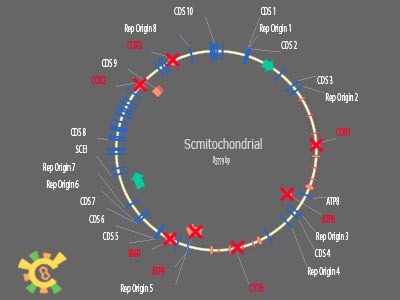
We also minimized the mitochondrial genome, with the annotation database. Deleting all know coding sequences, reserving replication related, translational and transcriptional elements, and non-studied sequences, to be the YAO.Genome backbone. Its sequence can be download in .fa format at Media:backbone.fa.txt.
Protocol: Yeast Counting by Hemocytometer Measurement
1. Dilute sample for Yeast suspension counting. Each grid should contain 4-5 cells generally dilute 10 times (suggest diluting 10 times and 100 times separately).
2. Clean the counting chamber by lens wiping paper and place specialized thick glass on the center of counting chamber.
3. Draw 10 μl diluted Yeast suspension and then drop it on the center of counting chamber and place specialized thick glass on the center of counting chamber. Wait until yeasts fall in grids.
4. Use 25 grid × 16 grid counting chamber (25 double line grids, each of them contain16 grids).Counting should be process on upper left and right, button left and right double line grids, and one center grid.
- Attention:
While counting yeast crossing the line of grid, generally we only count yeast crossing the upper (or button) and the right (or left) lines.
5. Each sample should be counted 3 times and right down the average number to calculate yeast cells number/ 1ml yeast suspension according to the equation below. Yeast cells number/ ml = total yeast cells number in 80 grids/80×400×10 000×dilution factor
6. After using the counting chamber, wash it by tap water, 95% ethyl alcohol or absolute ethyl alcohol, then airing.
Protocol: Transformation of Yeast Mitochondria
A. Thaw competent MG109ρ0 bacterial strain (or other strain for transformation) on ice. Let them sit on ice for at least 10 minutes.
B. Add 5 ml YPD culture and 100 µl yeast inoculums to a 15ml centrifuge tube, 30℃200 rpm overnight incubation.
C. Plate on YPD solid medium and incubate at 30℃ for 3-5 days.
A. Pick a colony which is in a good condition and incubate it in 50ml YPD culture at 30℃200 rpm for 3 days.
B. Add all yeast inoculums to a 50ml centrifuge tube, 3000 rpm centrifuge for 5 min, then re-suspend with 10ml YPD culture.
C. Diluted with the ratio of 1:100.
D. Yeast counting and calculate concentration for 10ml re-suspension. Yeasts number on each culture should be 5X10⁷ to 2X10⁸. Incubate on SD (-URA) (add 1M sorbierite).
Attention:
Yeast should be culture 2 days before experiment or transformation efficiency will be low.
Incubate on SD (-URA) (add 1M sorbierite) should be processed in one day after processed transformation.
Yeast counting can refer to blood counting chamber method of yeast counting.
Yeast volume should be lesser 100 µl after dilution or it will be hard to absorbed by the culture and selection will failed.
Culture with sorbierite is very fragile so it should be cooled at 4 ℃ before spread plate method.
In actual experiment, we realize under condition that tungsten powder spread well, even on rim of 90 mm culture can obtain many colonies that transformation are succeed so there’s no need to concentrated coating.
A. Preparation of tungsten powder (should be prepared before gene gun experiment and quantity should be larger enough to process more than one time.)
1. Add 0.03g tungsten powder and 1 ml 70% alcohol to a 1.5 ml centrifuge tube and vortexing for 5 min, then standing for 15 min and 10,000 rpm centrifuge for 3 min, remove liquid supernatant.(This step should be repeat 3 times)
2. Add 1 ml ddH2O and mix by vortexing for 2 min. 10,000 rpm centrifuge for 3 min, remove liquid supernatant.( This step should be repeat 3 times)
3. Add 500 µl absolute ethyl alcohol and mix by vortexing for 2 min. 10,000 rpm centrifuge for 3 min, remove liquid supernatant.( This step should be repeat 3 times)
4. Add 500 µl sterilization glycerin and mix by vortexing for 2 min. Then store at -20℃.
B. DNA plasmid preparation (should be prepared before gene gun experiment and can be stored)
1. Thaw tungsten powder prepared before and mix by vortexing for 2 min. Add 50 µl tungsten powder to a 1.5ml centrifuge tube.
2. Add more than 6 µg plasmid DNA, 50 µl 2.5M CaCl2 , 3 µl Spermidine. Mix by vortexing for 3 min and standing for 1min. Short centrifuge and remove supernatant.
3. Add 180 µl absolute ethyl alcohol, mix by vortexing for 3 min and standing for 1 min. Then separate it into 6 centrifuge tube.
Attention:
Experiments that related to liquids adding and distributing should be process in super clean bench.
Quantity of reagents added below is used for 6 times of strafe.
Larger quantity of plasmids, bigger successful chances will be.
Absolute ethyl alcohol can accelerate experiment while plasmids are closed to Mircrocarrier by evaporation. But it can also clotting plasmids by evaporation so during gene gun experiment time, we should carry a bottle of absolute ethyl alcohol to solute clotted plasmids.
Separate DNA plasmids will help to process quick mixing in order to solve tungsten powder clotting problem.
Gene gun experiment requires strict sterilization operation. So it is necessary to sterilize for at least 1 hour by using ultraviolet and related experiment should be processed in super clean bench.
Things needed for gene gun experiment: Vortex, absolute ethyl alcohol, isopropanol, seperarted DNA plasmids, 100 µl pipettor and pipette tip.
A. Open Helium gas valve, and pressure of He should be 200psi bigger than the pressure to split the membrame.
B. Use 70% alcohol to deal with the Fixer, Microcarrier and Stop screen for 5 min.
C. Use isopropanol to deal with 1350 psi Rupture Disk for less than 3 s.
D. Add DNA plasmids to the center of Microcarrier. After it evaporation fix it on the fixer.
E. Load the Microcarrier.
F. Assembly the Microcarrier launching device. Distance between Microcarrier launching device and Microcarrier is 6.4 mm. Load the sample at last second clapboard height.
G. Open the gene gun power and airflow control button should be on VAC. Then open the vacuum pump.
H. When vacuum degree do not ascend any more (it should be 25 inch Hg). Turn airflow control button to HOLD and press FIRE button until strafe.
I. After strafe, turn airflow control button to VENT. Wait until vacuum degree become zero then get out the sample.
J. After all gene gun experiment close the Helium gas valve vacuumize (more than 5 inch Hg), and press FIRE until Helium gas pressure gage become zero.
K. Culture samples at 30℃ for 4-5 days.
Attention:
DNA plasmid dispersing effect means a lot to the result. While tungsten powder can be easily separated, we can:
1. Add a little absolute ethyl alcohol on DNA plasmids on Microcarrier to help them dispersing.
2. Add a little absolute ethyl alcohol on DNA plasmids and mixing by vortexing before adding them to the Microcarrier.
It’s necessary for step J if there will be a long time for next gene gun experiment or He will influence instrument seal.
After obtained the sample, we should close cover immediately to prevent pollution.
 "
"


