Contents[hide] |
Colony PCR of pcDNA3.1(+)-LovTAP (part 2)
Protocol: PCR
PCR is a reaction that makes it possible (and relatively easy) to amplify
a certain region of DNA. The first step is the selection of that region
(and the design of the relevant primers). Primer design can be done by hand, or by
using our Primer Design Helper. Once
done, order the primers (in our case, we ordered from them [http://www.idtdna.com/ IDT]).
When you've received the primers, prepare them and make sure you've got your PCR kit (we used the "Phusion® High-Fidelity DNA Polymerase"). Start preparing your master mix, the composition for one tube is:
1X Mastermix 20μl reaction, add in this order
| Reagent | Volume [μl] |
|---|---|
| Water | Complete to total volume of 20μl |
| HF-Buffer (5x) | 4 |
| DMSO (optional) | 0.6 |
| dNTPs | 0.4 |
| Forward primer (50μM) | 0.2 |
| Reverse primer (50μM) | 0.2 |
| Template (10ng/μl) | 0.5 |
| Phusion HF polymerase | 0.2 |
Prepare one or two extra tubes-worth of reagent (you'll use some liquid on the walls of your tips).
Once you've finished, you should run the resulting products on a gel to check if everything went as planned.
Tips
- Thaw the HF-Buffer, DMSO and dNTPs before making the mastermix.
- Avoid taking the Phusion-HF polymerase out of the freezer (only take it out briefly when you need to add it).
- If the reactions have different primers and/or template, add the polymerase right after the dNTPs, split the mastermix and add the rest.
- Don't forget positive and negative controls
- Primers should have similar Tms (less than 5°C).
- Primer Tm calculation is a less exact science than it should be (just test several tools and compare their results). If you're not sure what the correct Tm is, consider using a gradient PCR.
- Avoid primers with strong secondary structures.
- PCR can introduce mutations. Don't forget to sequence your final product (this could be your final plasmid): you really don't want to lose a few weeks because of a "corrupt" plasmid.
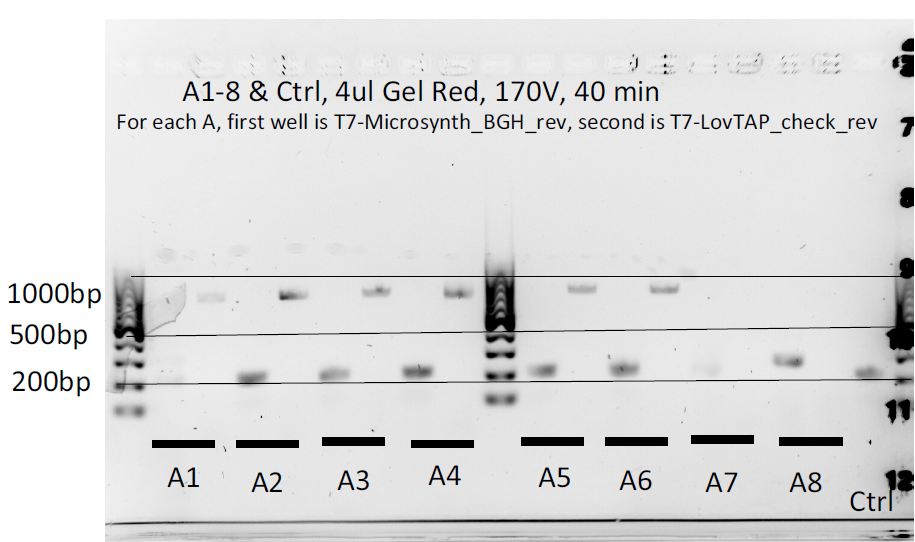
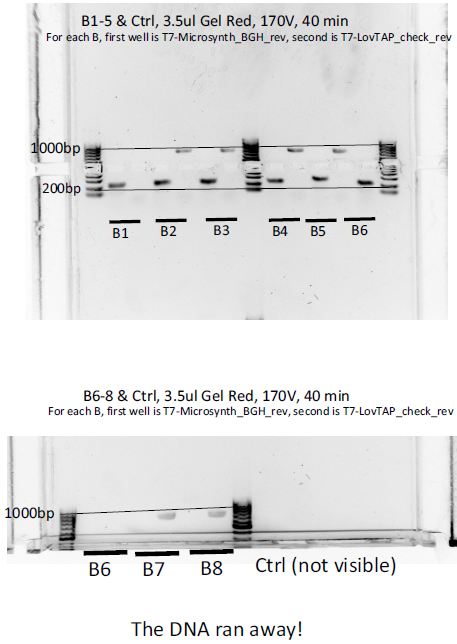
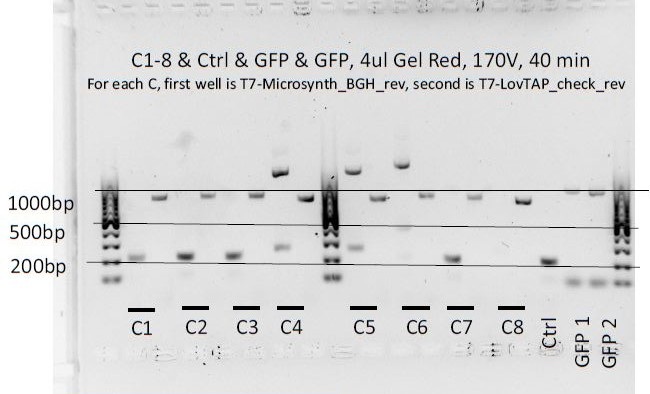
8 colonies of each of the 3 ligation plates and 1 of the negative control plate had been dipped into Lyse'n'Go and then used as PCR template (1ul/20ul reaction).
- Comments
We can notice a certain weird consistency in the results, though the general tendency here is not what we expected ! Only colonies C4, C5 and C6 show promise.
Ligation of purified PCR products into backbones
PCR products have been purified the day before.
For Fussenegger:
- TNFR into pGL
- eGFP into pGL
SEAP can't be ligated yet! Digestion of pGL with MfeI required!
For LovTAP:
- Matt's PCR LovTAP into pMP
- RO into pcDNA3.1+
Protocol: None
Forgot to insert protocol.
- Comments
Insert comments about what happened.
VP16 Activity check
Protocol: Western Blot
Gel Ingredients (choose percentage according to the size of the protein)
| 4-40 kDA | 20% |
| 12-45 kDA | 15% |
| 10-70 kDA | 12.5% |
| 15-100 kDA | 10% |
| 25-200 kDA | 8% |
| Separating gel | |
| Gel percentage | 7.5 % |
| 30% Polyacrylamide | 10 mL |
| 1.5M Tris (pH 8.8) | 10 mL |
| 10% Ammonium persulfate | 0.4 mL |
| 10% SDS | 0.4 mL |
| TEMED | 0.038 mL |
| H2O | 19.2 mL |
| Total volume | 40 mL |
| Stacking gel | |
| Gel percentage | 5 % |
| 30% Polyacrylamide | 1.36 mL |
| 1M Tris (pH 6.8) | 1 mL |
| 10% Ammonium persulfate | 0.08 mL |
| 10% SDS | 0.08 mL |
| TEMED | 0.008 mL |
| H2O | 5.44 mL |
| Total volume | 8 mL |
Preparing Protein Samples
1. Centrifuge around 5 million cells (of any volume) at 2,500 rpm for 10 min.
2. Discard the supernatant with a vacuum pump.
3. Resuspend the cell pellet with 1x PBS and centrifuge it at 2,500 rpm for 10 min.
4. Discard the supernatant with a vacuum pump.
5. Add appropriate amount of lysis buffer depending on the pellet size (for a 20 mg pellet, 150 µl of IP lysis buffer).
6. Keep the lysed sample on ice for 10 min - flick every 3 minutes.
7. Add 3x SDS lysis buffer (for a 20 mg pellet, 75 µl).
8. Incubate the sample for 5 minutes at 95 degrees, to denature proteins.
Preparing loading samples
1. Load the ladder (7 µl is the recommended volume).
2. Complete sample volume to 50 µl.
3. Load the samples.
I. SDS Gel electrophoresis
1. Prepare the separating and stacking gel solutions without APS and TEMED.
2. Add APS and TEMED to the separating gel solution only when the SDS kit is ready to be used, they are time-sensitive. Move the solution inside of the setup. Add some distilled water on top of it.
3. After 20-30 mins, remove the water and check whether the gel has solidified. Don't move to the next step until it does.
4. Add TEMED to the stacking gel solution, pour it on top of the solidified separating gel.
5. Insert a stack carefully and leave it for 20-30 mins.
6. Take the stack out and fill the kit with SDS loading buffer.
7. Load the samples.
8. Add more loading buffer, set the voltage to 80 Volts. Leave for 1.5 hours.
II. Membrane transfer
1. Prepare a membrane transfer kit.
2. Take the gel out of the SDS kit and put it on the membrane paper.
3. From bottom to top, assemble the components in the following order: 1) Sponge - 2) Blot paper - 3) Membrane - 4) Gel (Pour some M-transfer buffer on the gel) - 5) Blot paper again - 6) Sponge again.
4. Close the sandwich, set the voltage to 20 V. Leave for 30 mins - 1 hour.
5. Discard the gel. Leave the membrane in 5% skim milk with 30ml of TBST buffer (blocking buffer, to achieve the 5%, add 1.5 g of skim milk powder to the buffer) for one hour.
III. Antibody tagging
1. Discard the blocking buffer, leave only 5ml of it. Add primary antibody with a ratio of 1:1000 or 1:2000 (5 µl of antibody in 5 ml of buffer gives 1:1000)
2. Leave the mix overnight at 4 °C.
3. Wash 3 times with 1x TBST (5 minutes on shaker for every wash).
4. Dilute the secondary antibody (for example, goat anti-rabbit antibody) to 1:2000 in 5% skim milk buffer. Add it. Leave at room temperature for 2 hours.
5. Wash 3 times with 1x TBST (5 minutes on shaker for every wash).
6. Reveal the protein bands in the dark room.
I. VP16 sample preparation
1. VP16 has been aliquoted and stocked in -80 degree again. (There are Good and Bad labeled VP16 - Good means it has been preserved in -80 and Bad means it once had been in room temperature for a while so maybe denatured)
2. Diluted the VP16 sample with 1x TBST solution and made 10microG/microL of VP16 sample.
3. Loaded 5microG / 10microG / 15microG of VP16 for Good and Bad each thus 6 samples.
II. CHO cell mixture with VP16 1. CHO cell has been lysated and mixed with VP16. 2. Made some gradient level of CHO cell concentration - 20 / 30 / 40 microL with Good VP16 sample.
From lane 1 - 10,
- 1. Ladder = 7 microL
- 2. 20microL of CHO cell lysis + 1microL of VP16 (10microG) + 29microL of SDS lysis buffer = 50microL total
- 3. 30microL of CHO cell lysis + 1microL of VP16 (10microG) + 19microL of SDS lysis buffer = 50microL total
- 4. 40microL of CHO cell lysis + 1microL of VP16 (10microG) + 9microL of SDS lysis buffer = 50microL total
- 5. 24.5microL of SDS lysis buffer + 0.5microL of VP16 (5microG) = 25microL total (Good)
- 6. 24microL of SDS lysis buffer + 1microL of VP16 (10microG) = 25microL total (Good)
- 7. 23.5microL of SDS lysis buffer + 1.5microL of VP16 (15microG) = 25microL total (Good)
- 8. 24.5microL of SDS lysis buffer + 0.5microL of VP16 (5microG) = 25microL total (Bad)
- 9. 24microL of SDS lysis buffer + 1microL of VP16 (10microG) = 25microL total (Bad)
- 10. 23.5microL of SDS lysis buffer + 1.5microL of VP16 (15microG) = 25microL total (Bad)
I stocked this in -4' refrigerator and I will tag antibodies on Monday.
 "
"


