Team:Wageningen UR/MethodsDetection
From 2012.igem.org
Contents |
Detection of Virus Like Particles
A key part of our project is the detection of VLPs. We need sufficient visualization to get conclusive evidence of VLP formation. Besides standard aproaches, we will investigate alternative methods to detect the formation and stability of Virus-Like Particles. In this paragraph we explain in short which methods we used and how these methods work. We also describe the limitations of the techniques, so that other people have an idea about what is possible.
Electron Microscopy
The most straight forward method to detect VLPs is Electron Microscopy (EM) [1]. We prepared and investigated multiple samples ourselves. This work was done at the Virology department of the Wageningen University.
Electron microscopy works similar to light microscopy (figure 1), but instead of visible light being used to illuminate the sample, it is done by electrons [1]. The EM has multiple lenses to focus the beam to magnify and light the sample. The lenses are electromagnetic instead of glass and therefore allow a much higher resolution than conventional light microscopy. In theory it is possible to reach a resolution of around 0.005 nm, but in practice it is mostly around 1-2 nm [1]. Possible reasons are certain errors of the lenses, inexperience of the operator (for example our team members) or the sample not being thin enough. All these factors can reduce the resolution of the electron microscope [1]. We investigated various samples obtained in our experiments with the help of the EM. The wild types of the Cowpea chlorotic mottle virus (CCMV) and Hepatitis B (HepB) were detected. Multiple variations of CCMV have been tested too, unfortunately with mixed results.
EM results
EM Course
The goal of the course was to get familiar with the EM and to handle it safely. Dr. Jan van Lent of the Virology department of Wageningen UR gave us an introduction to EM with a small presentation. During this instruction he explained in detail the electron microscope itself, the preparation of good samples and how to operate the EM properly. Afterwards he showed the sample preparation in the wet lab. Preparation of the sample is critical to have a good resolution and during the course we learned how to do it. The sample must be thin, between 2 - 300nm, and stable in the electron microscope. This can be done by drying or cryo-freezing the sample. After drying or freezing, the sample is stained with a coating containing a heavy metal salt. This coating reflects the electron waves of the microscope, whereas the spots with the VLPs have no coating at all. The missing coating allows the electron waves to go through unhindered. The information of reflection and permeability is processed to a full image which shows the VLPs.
After the preparation of the samples Dr. van Lent explained the whole procedures of visualizing a sample. After this last introduction we were able to analyze and investigate multiple samples ourselves.
At the end of the day we were able to use EM for our own experiments starting with sample preparation, handling of the microscope and proper visualization. After the course, the attending team members, were trained and allowed to use the EM without supervision.
Limits
Knowing the limit of a technique is required to interpret the raw data properly, this also applies to electron microscopy. One of the most troublesome limitations is that the preparation of the sample is laborious and can lead to potential debris, which can ruin the sample. Another limitation is that the preparation of the sample, operation of the EM and the analysis of the data requires special training. We were lucky enough to receive a course on how to use the EM. Also samples that are put into the EM must be resilient against the vacuum in the microscope [2].
Dynamic Light Scattering
Another method to detect VLPs is dynamic light scattering (DLS), also known as photon correlation spectroscopy or quasi-elastic light scattering. This technique is used to measure the size of particles [3]. We applied this technique as a complimentary method to electron microscopy. To use this technique we must purified first by FPLC to get good measurements
The standard setup of the DLS is seen in figure 2.
When light travels through the sample and hits a particle, it gets scattered in all directions. This scattered light is detected by the DLS. Due to Brownian motion, the particles move randomly in the solution. These movements of the particles changes the distance of the particles with respect to the detector. This change of distance to the detector results in constructive or deconstructive interference of the scattered light. The change of intensity of the scattered light by the interference is related to the radius of the particle and can be calculated by the Stokes-Einstein equation [3].
We investigated various samples with the help of DLS. The main issue was that the sample was not pure or not concentrated enough. After optimization of the production and purification protocol we succeeded to detect VLPs. The main improvement was the implementation of FPLC, which filters out all aggregates and subunits, yielding pure VLP solutions.
Limits
The same as electron microscopy, dynamic light scattering has its limitations. To detect particles with the DLS, the particle has to have a different refractive index than the solvent. If not, the particle doesn't scatter light. Also the sample must be very pure. Any dust particle or aggregate can ruin the data output. This is because large particles scatter way more light than small particles. The data analysis requires vast amounts of knowledge and time [5].
Comparison between the EM and DLS
The electron microscope has been used for years to detect VLPs, but is rather expensive to use. So we searched for alternatives. One of the alternatives we found was the dynamic light scattering technique. Dynamic light scattering is sometimes mentioned as a way to detect VLPs, but is never explained thoroughly. We didn't know any possibilities or limitations of the DLS, so we wanted to see if the output of the DLS is similar to the output of the EM. If the results are positive we can use the DLS as a cheap and easy way to detect VLPs.
In order to quantify the DLS, we set up an experiment to compare the size distribution of the VLPs. We produced a large batch of wild-type CCMV monomers and assembled them in vitro into VLPs. After purification we split up the sample. One part is analyzed by the electron microscope and the other part is analyzed by the dynamic light scattering technique. To calculate the size distribution of the VLPs with the EM, we took multiple pictures of the VLPs. We printed out the pictures and measured by hand each particle individually. After these measurements, we calculated the actual radius of each particle and plotted it on a graph. To calculate the size distribution of the VLPs with the DLS, we took the sample and measured it multiple times, so that anomalies were reduced. After measurement we used the CONTIN method to get the size distribution and plotted it in excel.
As seen in figure 4, the size distribution calculated by both methods looks similar. Both the EM and DLS detect particles around 15 nm, precisely what you expect from the literature. The minor differences can be explained by the methods used to calculate the size distribution. With the EM we visualized the particles first and then calculated the size distribution. With the DLS, the raw output was fitted and can be wrong if the sample is not pure or not concentrated enough. We took that into account by measuring multiple times.
Both the EM and DLS can be used to detect VLPs. This means we've confirmed that both techniques combined create a solid and secure method to detect and analyze VLPs. It is possible to discover many characteristics of VLPs. The part [http://partsregistry.org/Part:BBa_K883001 BBa_K883001] that represents the wild-type CCMV gene with the IPTG induced promoter has been extendedly tested on the stability.
Stability experiments
CCMV is a virus that can be useful in nanotechnology, because it is a well-studied virus and certain physical properties of the CCMV-VLP are already known. We want to provide additional information about the conditions in which the CCMVs are stable. These conditions are important when it comes to site-specific drug delivery. A better understanding of what will happen when the VLPs are injected into the bloodstream, will result into a better treatment for patients.
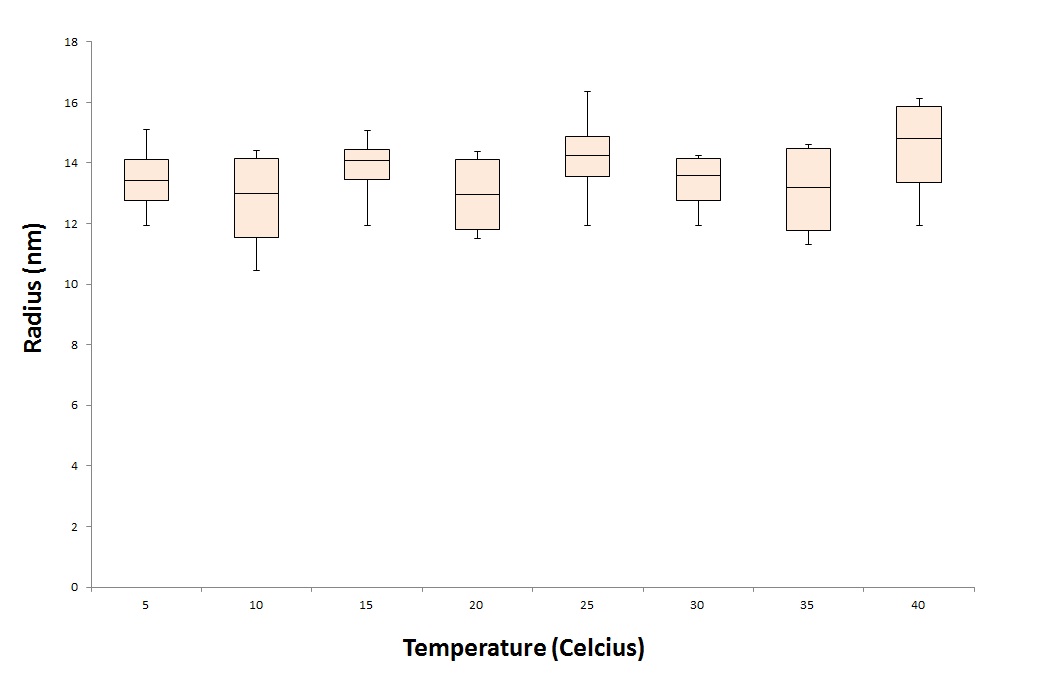
To test the stability of the CCMV VLPs, we treat the VLPs under different conditions. One parameter we want to test is the temperature stability of the CCMV VLPs. To test this we put the CCMV VLPs for 24 hours in waterbaths with different temperatures. These temperatures range from 5 degrees Celcius to 40 degrees representing the ill human being. After the treatment we tested the samples under the DLS and EM.
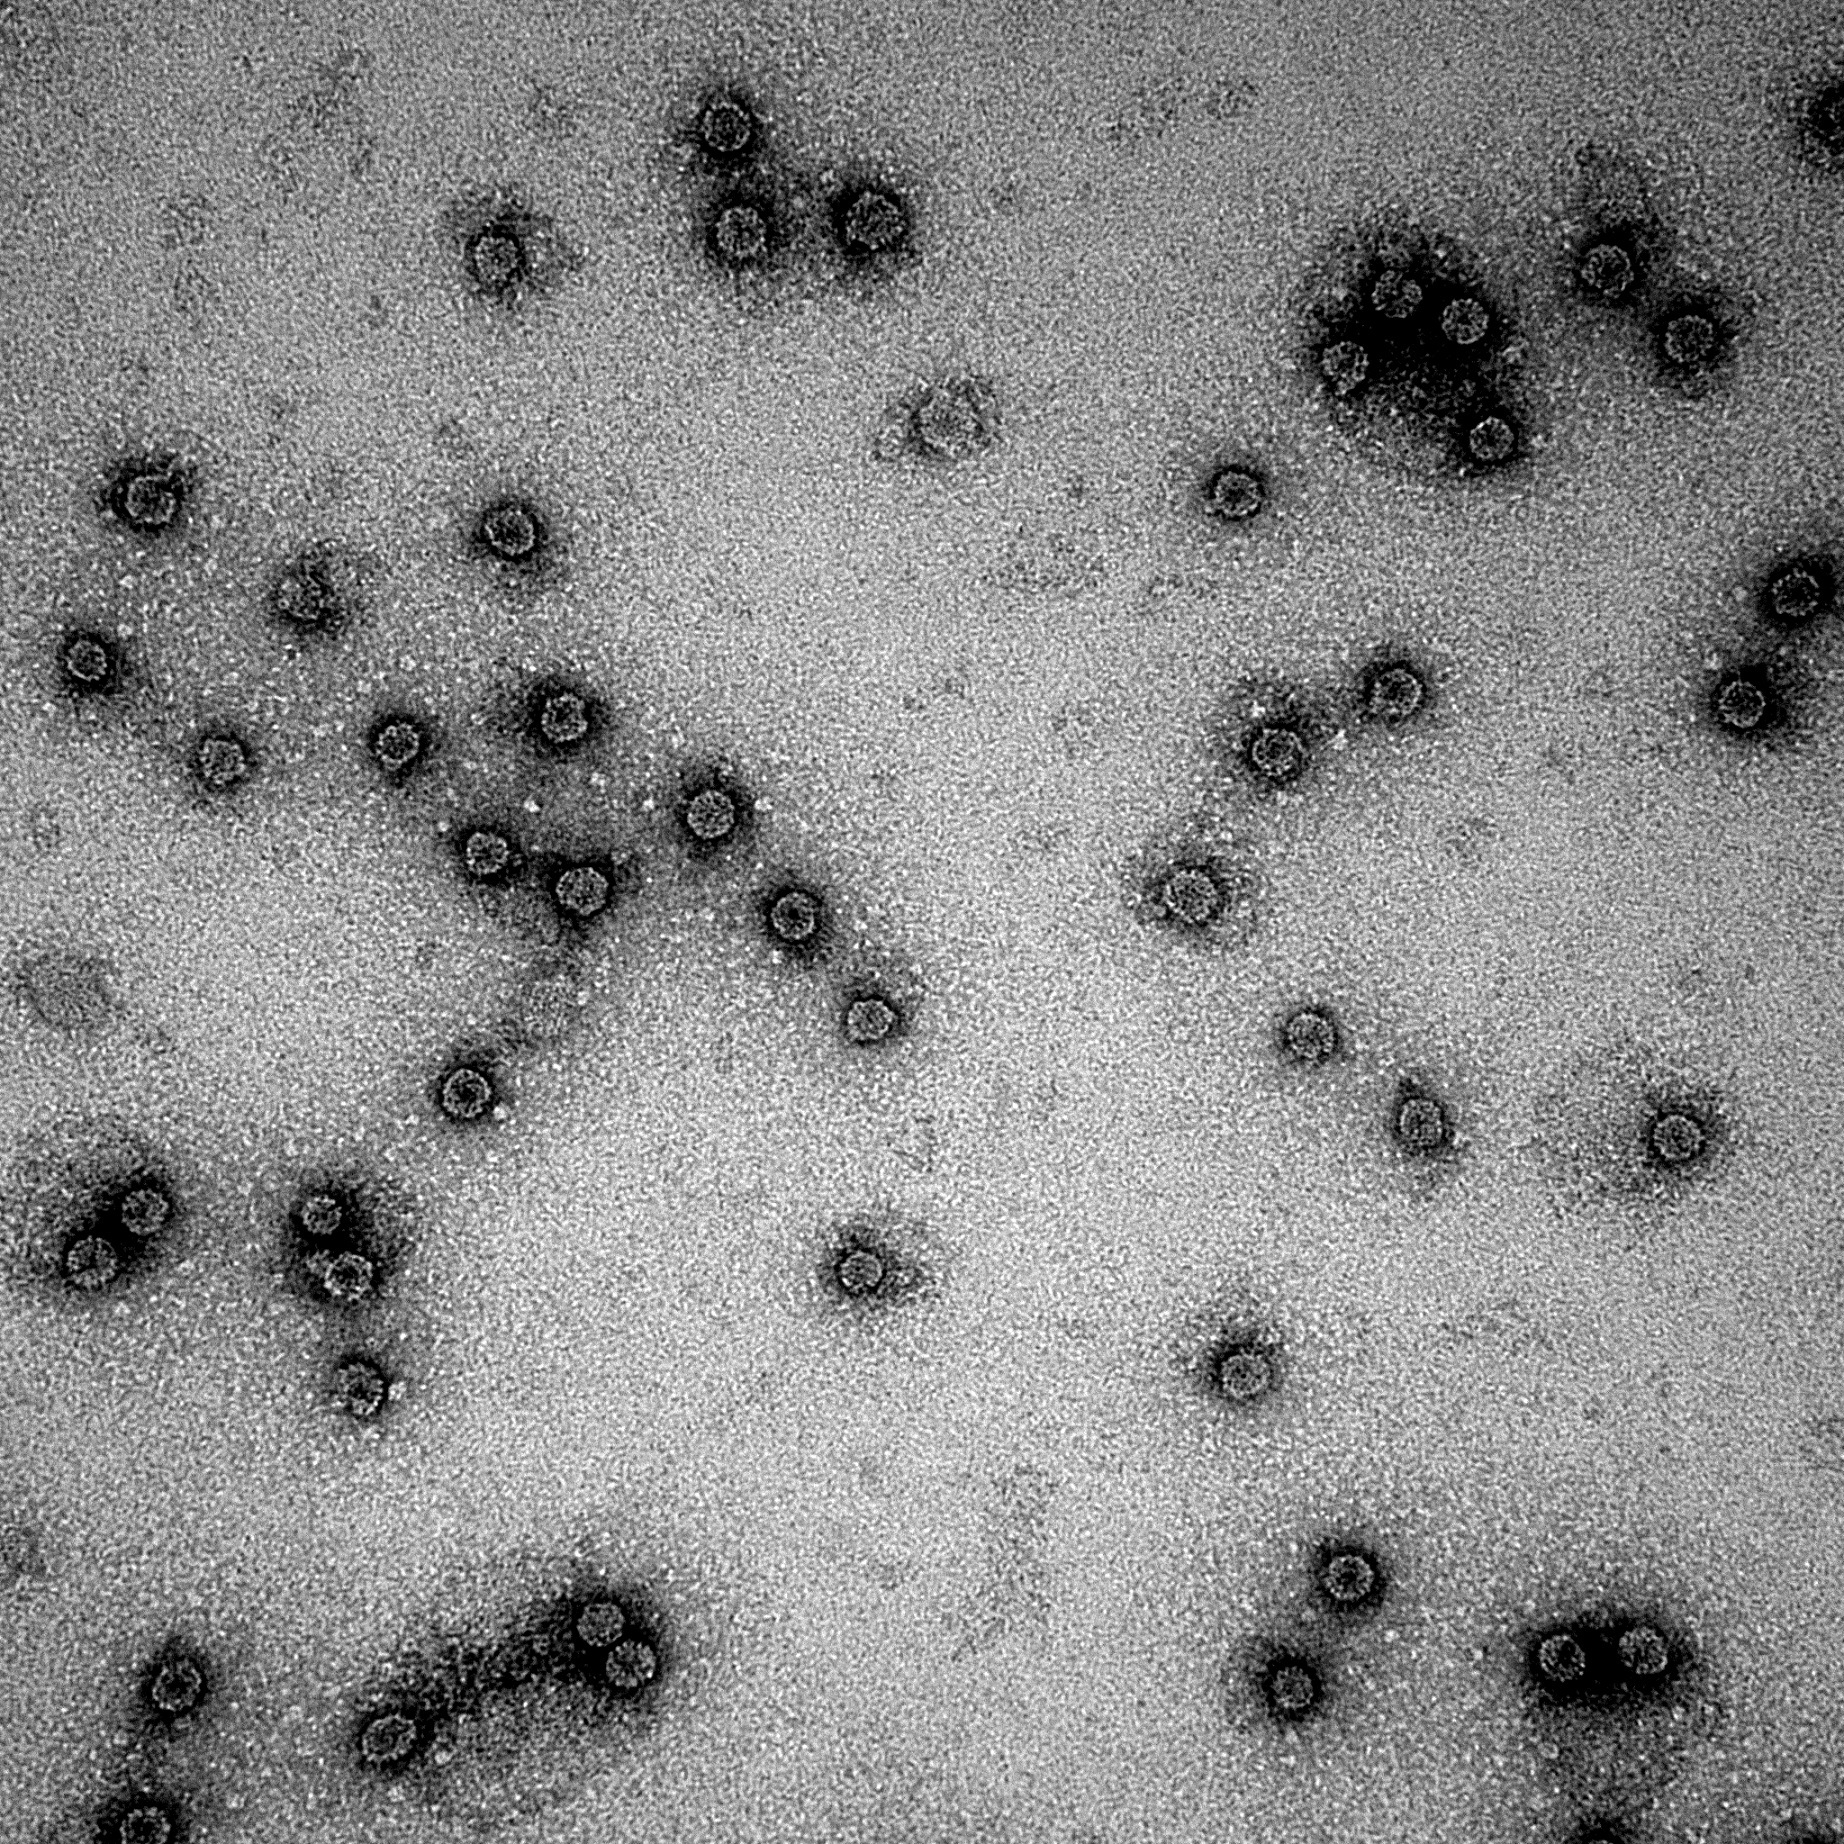
As seen in graph 2 and figure 2, the particles are still detected after a 24 hour treatment with 40 degrees Celcius. This means that the particles will not break down immediately when exposed to the temperature of an ill human being.
CCMV VLPs are renowned for its wide pH stability. It is stable between a pH range of 4.7 and 6.5. At a pH of 4.7 the CCMV is in it's unswollen form with a radius of around 14 nm. At a pH of 6.5 it is in its swollen form, the VLPs radius is around 15-16nm. It is possible to change form, but change the pH gradually with the use of dialysis. If you change the pH too sudden, the VLPs are falling apart and forms aggregates as seen in figure 3.
To test the stability of the VLPs during a long period of time, we designed an experiment. We produced multiple CCMV VLPs and measured them after 3, 6 and 24 hours after formation (graph 3).
It is shown in graph 3 that we still detect wild-type CCMV VLPs after 24 hours. In theory, under perfect conditions (pH at 4.7, T = 4 degrees Celcius) it is possbile to store the CCMV VLPs for a good few weeks. Be aware that aggregate formation may occur when the VLPs are exposed to changing pH or temperature.
References
- David B. Williams, et al., Transmission Electron Microscopy: A Textbook for Materials Science, 2009
- Leonard F. Pease, et al., Quantitative characterization of virus-like particles by asymmetrical flow field flow fractionation, electrospray differential mobility analysis, and transmission electron microscopy Biotechnol Bioeng, 2009 102 (3):845-55
- Wolfgang Schartl, et al., Light Scattering from Polymer Solutions and Nanoparticle Dispersions, 2007
- Chao Chen, et al., Nanoparticle-Templated Assembly of Viral Protein Cages Nano Letters 2006 6 (4), 611-615
- Dynamic Light Scattering: With Applications to Chemistry, Biology, and Physics - Door Bruce J. Berne,Robert Pecora
 "
"


