Team:Wageningen UR/Journal/week15
From 2012.igem.org
week 15: 6 august - 12 august
Office work
Lab work
General
We prepared new electrocompetent DH5-alpha and MachI E. coli cells. Transformation efficiency was determined: DH5-alpha: 10^8; MachI: 10^9
Ligation PCR product Berkely coil into pSB1C3
The ligation mixtures were incubated for 30 min at 22°C and 10 min heat inactivation of the ligase at 65°C. Followed by a transformation of E.coli strain MachI with the ligated plasmid and a 2h growth in SOC-medium. Transformed cells were later plated on LB + chloramphenicol agar. After a red-white screening (with BBa_J04450) on the agar plate 5 colonies were grown in 5 ml liquid LB to do a miniprep. Digestion check with just EcoRI showed bands of expected size and samples are ready for sequencing
CCMV
6th August (Hugo)
Colony PCR on Robert’s KilR and CCMV with a negative interior (CCMV_NEG).
Grew CCMV_NEG transformants and BBA_J3901 transformants overnight in liquid culture in Greiner tubes.
7th August (Hugo)
Miniprepped two of Robert’s KilR cultures, two CCMV_NEG cultures and two white BBA_J3901 cultures, followed by a digestion check with PstI + EcoRI.
8th August (Hugo)
Miniprep on red BBA_J3901 colonies, followed by digestion check with EcoRI + PstI.
Induced BBA_J3901 cells with FeSO4 1, 10, 100, 1.000, 10.000 PPM and with Fe2O3 1, 10, 100, 1.000 PPM. Used RFP chloramphenical backbone as a positive control. Tried to visualize RFP expression under a UV lamp. Then tried to visualize RFP expression using fluorescence microscopy, with no results.
9th August (Hugo)
Miniprepped 8 CCMV_NEG colonies, followed by digestion check with EcoRI + PstI.
Digestion with XbaI + PstI of two CCMV_NEG plasmid samples. Then cut the gel slices to store in the fridge.
10th August (Hugo)
Digested IPTG_kanamycin backbone with SpeI + PstI, followed by PCR purification.
Gel purified the gel slices of the two CCMV_NEG plasmid samples of 09-08.
Ligated CCMV_NEG into digested IPTG_kanamycin backbone.
Used the ligation product to transform MachI competent cells by electrophoresis.
TuYV
- Bricking:
Last week's minipreps were digested (EcoRI, PstI), the inserts ligated into the chloramphenicol backbone from BBa_J04450 and transformed into our electrocompetent DH5-Alpha E. coli. A PCR check gave negative results, but miniprep was performed anyway.
- Expression:
Last week's minipreps were digested (XbaI, Spe1), the inserts ligated into the promotor&RBS-containing backbone from BBa_J04500 and transformed into our electrocompetent BL21 E. coli. ALthough there were colonies colonies on the sample plate, but we got negative results from both colony PCR and growing in LB+ antibiotic medium, so the entire procedure was done again on Saturday.
Written by: Wouter and Han
PLRV
Four different PLRV CP's were transformed into E.coli DH5α electrocompetent cells. After culturing the cells, we miniprepped the plasmids. Restriction check with XbaI and SpeI enzymes confirms the presence of the PLRV CP inside the plasmid.
Plasmids were sent out to be sequenced. The sequence results of three of the four submitted samples were good. One of the samples did not have a SpeI restriction site.
Hepatitis B general
6 August
- Electro-transformation of the HepB+IPTG promoter biobrick into BL21 (expression strain)
- Adding a terminator to the HepB+IPTG promoter biobrick and electro transformation with DH5α
8 August
- colony PCR of those transformants using sequencing primers
-> no fragments where found on the gel
9 August
- the colony PCR was repeated using both sequencing primers as well as Hepatitis core protein primers in parallel
Hepatitis B outside modification
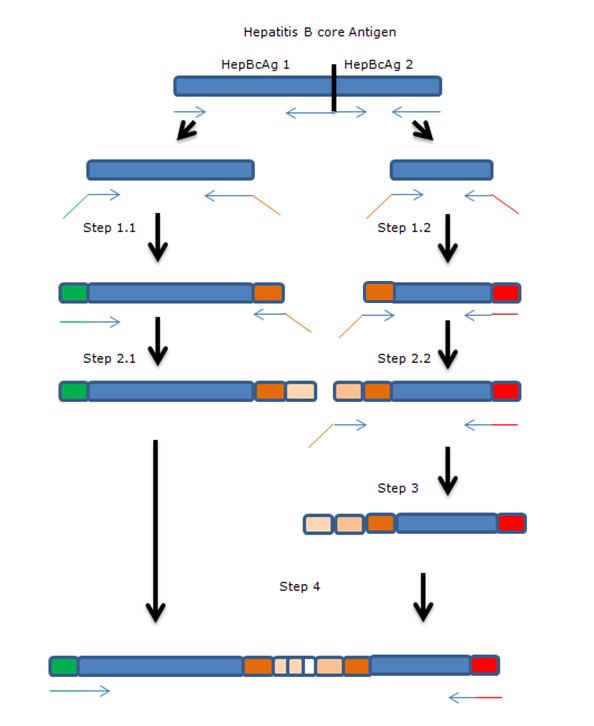
The gene of HepBcAg will be ‘cut’ in two parts using two sets of primers after which the parts will be extended towards each other by using overhanging primers. The overhang codes for linkers and the E-coil.
Legend:
- Blue: Hepatitis B core antigen gene
- Green: iGEM standard 10 prefix
- Red: iGEM standard 10 suffix
- Orange: insert containing linkers and K-coil
- Arrows: primers, with overhang.
Full insert HB1-FL2-3KCoil-FL2-HB2
The sequence below shows parts of the wild type gene (in bold) and the insert constructed by the primers.
Aacctgggtcggcaataatctg CTTGGTGGTGGTGGTTCTGGTGGTGGTGGTTCTGCTGCTGCT AAGATAGCGGCGTTGAAGGAGAAAATCGCAGCACTAAAAGAAAAGATAGCGGCGTTGAAGGAGCTTGGTGG TGGTGGTTCTGGTGGTGGTGGTTCTGCTGCTGCT Gtcgacgctggtggaggt
The primers used for the whole modification of the HepB coat protein are given below. Each primer anneals on the previous one, so FW2 anneals on FW1 and rev2 on rev1. In this way, the pcr product gets extended by each step after which it can be ligated.
Forward Primers: 5’-3’
FW1 FL2HepB2: TGGTGGTGGTTCTGGTGGTGGTGGTTCTGCTGCTGCTGtcgacgctggtggaggt
FW2 Kcoil1&2: TAAAAGAAAAGATAGCGGCGTTGAAGGAGCTTGGTGGTGGTGGTTCTGGTG
FW3 Kcoil2&3: AAGATAGCGGCGTTGAAGGAGAAAATCGCAGCACTAAAAGAAAAGATAGCGGCGTT
Reverse Primers: 5’-3’
rev1 FL2HepB1: CAGCAGAACCACCACCACCAGAACCACCACCACCAAGCAGATTATTGCCGACCCAG
rev2 Kcoil 3&2: AGCAGCTGCGATTTTCTCCTTCAACGCCGCTATCTTCAGCAGAACCACCACCACCA
rev2.2 :ctgcgattttctccttcaacgccgctatcttagcagcagcagaaccaccaccac
8 August
• PCR step 1
Step 1 of the above described pcr scheme was done using primers Rev1 and FWGeneral for part 1.1 of the gene and FW1 with RevGeneral for part 1.2 of the gene. All steps were done using phusion polymerase, because of the low chance of mutations in the gene.
Full insert HB1-FL2-3KCoil-FL2-HB2
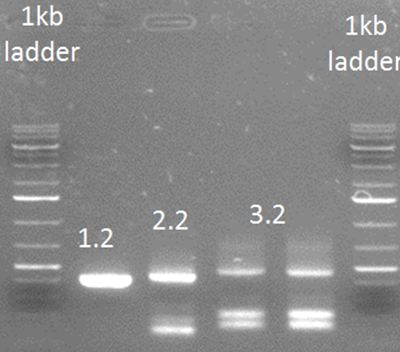
Result of step 1 on 1% agarose gel.
• PCR step 2
PCR steps 1.1 and 1.2 were purified using a PCR purification kit (Thermo). The primers used for this step were Rev2 and FW general on step 1.1 FW2 and Rev general on step 1.2
9 August (Kees)
• PCR step 3
Template used was purified step 2.2 with primers: FW3 and Rev general
The nanodrop of step 3 yielded sufficient DNA to continue working (107.2 ng/µL).
10 August (Kees)
• PCR step 4
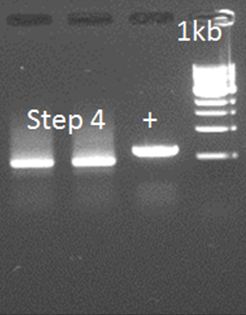
In this step, the amplicons of step 3 and 2.1 and mixed with the primers that anneal on the outside of the final construct. The overhang between the two parts should serve as a starting point for the amplification. So, for the PCR we used: 2 µL of step 2.1 (50 ng/µL) 1 µL of step 3 (100 ng/µL) With the primers: FW general Rev 3 (including a HIS-tag) This didn’t work out. Investigation of the primers showed a shift of 5aa in primer Rev 2. This error could inhibit the annealing and elongation of the overhang of the two parts. A new primer was ordered: Rev 2.2
11 August (Kees)
• PCR step 2 (with new Rev primer)
Step 2 was repeated using the new primer. The result was fully negative, including the positive control. Most like explanation is that one of the components was not added (FW primer, enzyme)
• Repeat PCR step 2
• Step 4 attempt 2
The primers were used as on August 10, only the DNA has changed because of the different DNA resulting from step 2.
Hepatitis B inside modification
10 August
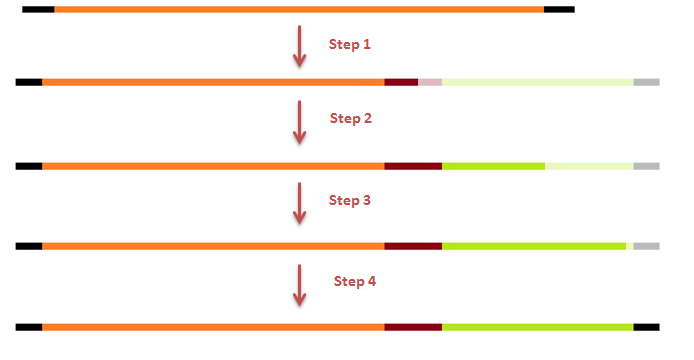
- 1st step of the 4 step reaction to fuse a coil to the C-terminal of the HepB core protein (see inside modification Hepatitis B)
-> 1st step seemed to work
-> the gel shows a positive negative control
GFP modification
10 August
- 1st step of the 2 step reaction to fuse a coil to the N-terminal and a histag to the C-terminal of GFP
-> 1st step seemed to work
CCMV Stability experiments
6 August (Mark)
- Growing CCMV for the stability experiments
- Inoculated 600 mL of LB with BL21 that contains the IPTG inducible CCMV wild type monomer
- Followed protocol of producing CCMV
7th -10th August (Mark)
- Dialysis CCMV VLPs
- Now running 3 times 50 mL dialysis tubes with CCMV wild type
- Followed protocol of dialysis of CCMV
11th - 14th August (Mark)
- Ultracentrifuge 4 times
- Followed protocol of purification CCMV
- Total end volume is 15 ml
 "
"


