Team:TU Munich/Project/Brewing
From 2012.igem.org
(→Brewing) |
VolkerMorath (Talk | contribs) |
||
| Line 69: | Line 69: | ||
| - | |||
| - | |||
| - | |||
Revision as of 10:11, 26 September 2012


Contents |
Brewing
Contrary to popular opinion, the chief ingredient of beer is not YPD but gyle, a carefully prepared mixture of malt, hop, barley and water. Although the name S. cerevisiae suggests that it is used in the beer brewing process, in fact the yeast employed in brewing have strongly adapted to gyle, as they are reutilized in every succeeding brewing cycle. Hence some investigation on how our yeast performs in gyle was necessary.
The Brewing Process
Preparation of the Mash
- (1A) We start by filling 20L water in a steel pot and heating it to about 50°C and then add 4-5kg of shredded malt. If you are in possession of a special bag for mash, a so called "Maischesack", you can fill the malt in the bag and hang it into the pot. Mind that the bag should not touch the bottom of the pot, as this could lead to burning of the bag and result in a slightly burned taste.
- (1B) We keep up the temperature of 50°C and continuously stir the mixture for 30 minutes. During these 30 minutes proteaeses will decompose proteins contained in the shredded malt. After those 30 minutes we heat the mixture to 63°C and keep up this temperature for 60 minutes. Subsequently we heat to 73°C and keep stirring continuously.
- (1C) The next step is the iodine test, to we verify whether starch was completely converted to sugar. We remove a small sample of mash and add iodine. A resulting blue-violet coloring indicates that there is still some leftover starch so the temperature of 73°C is kept up and this step is repeated until no staining is visible.
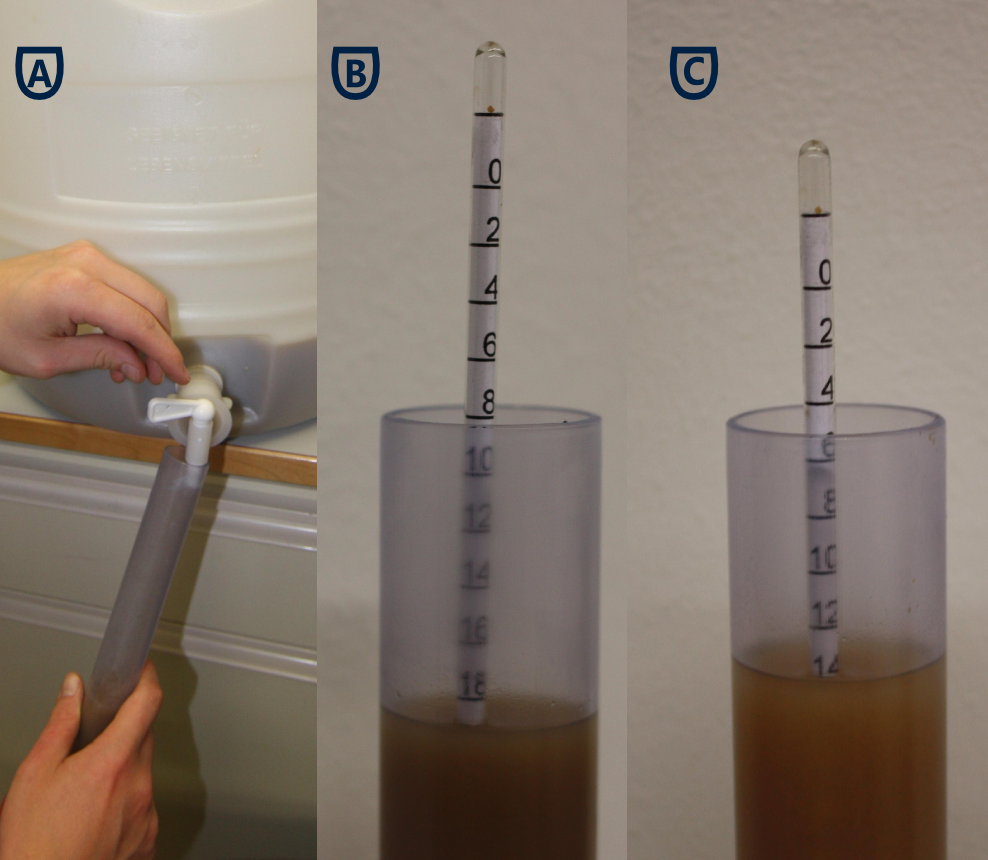
As soon as the iodine does not cause any stain, the mash is heated to 78°C for 90 minutes, again under continuouos stirring. - (1D/E) The next step in the procedure is the lautering: a lautering cloth is strained over the opening of a large plastic pot and all the mash is filtered through this cloth. As all the malt will be filtered out in this step the lautering cloth needs to be well fixated to the plastic pot as it will need to carry weights of up 5kg.
- (3A-C) The filtrate, the so called gyle, should now have a wort of about 12%. The wort is measured with the help of a refractometer or an hydrometer. If the target of 12% is not reached, hot water should be filtered through the mash and the lautering cloth until 12% wort are attained.
- (1F) Eventually the mash should be filled back into the steel pot, after carefully cleaning it.
Brewing the beer
- After heating the gyle to 100°C, 30-40 gram of hop are added. The best results are obtained when the hop is not directly added to the gyle but filled in a small bag with small stones and then thrown into the gyle.
- The temperature of 100°C should be kept up for 60 minutes. During this time the plastic pot should be cleaned and sterilised. The lautering cloth should also be cleaned, using bolding water.
- Now another filtration step is necessary which is exactly the same as step 4 above although this time every utensil employed needs to be kept steril.
- The plastic pot should now be stored in a cold place where the gyle can cool down. Speeding up this procedure as long as the gyle is kept steril is highly advised.
- The following steps can very depending on the yeast that will be used.
- As S. cerevisiae is a bottom-fermenting yeast the gyle should have a temperature of about 10°C. From now on all temperatures should be checked regularly as heat is generated during the fermentation process.
- When the target temperature is attained, the yeast is added and the gyle is stirred to homogeneously spread the yeast in the gyle. The plastic pot should the be closed with a cap(not air tight!) and stored for 24h at about 20°C.
- When working with a fermenting tube it should now be attached to the cap and filled with bolding water. This should close the pot air tight.
- Now the beer should be stored for 8-11 days until no more bubbles are visible on top of the gyle. This will conclude the brewing process.
- The finished beer can now be filled in bottles. Pay attention that no yeast is dispersed from the bottom of the pot! When working with transgenic yeast, steril filtering should be used to assure that no transgenic yeast enters the bottle!
Results
Experiment 1: Survival and growth of different yeast strains under various conditions
To ensure that the our yeast strain INVSc grows in a medium which is typical for the brewing process we set up an experiment with different conditions.
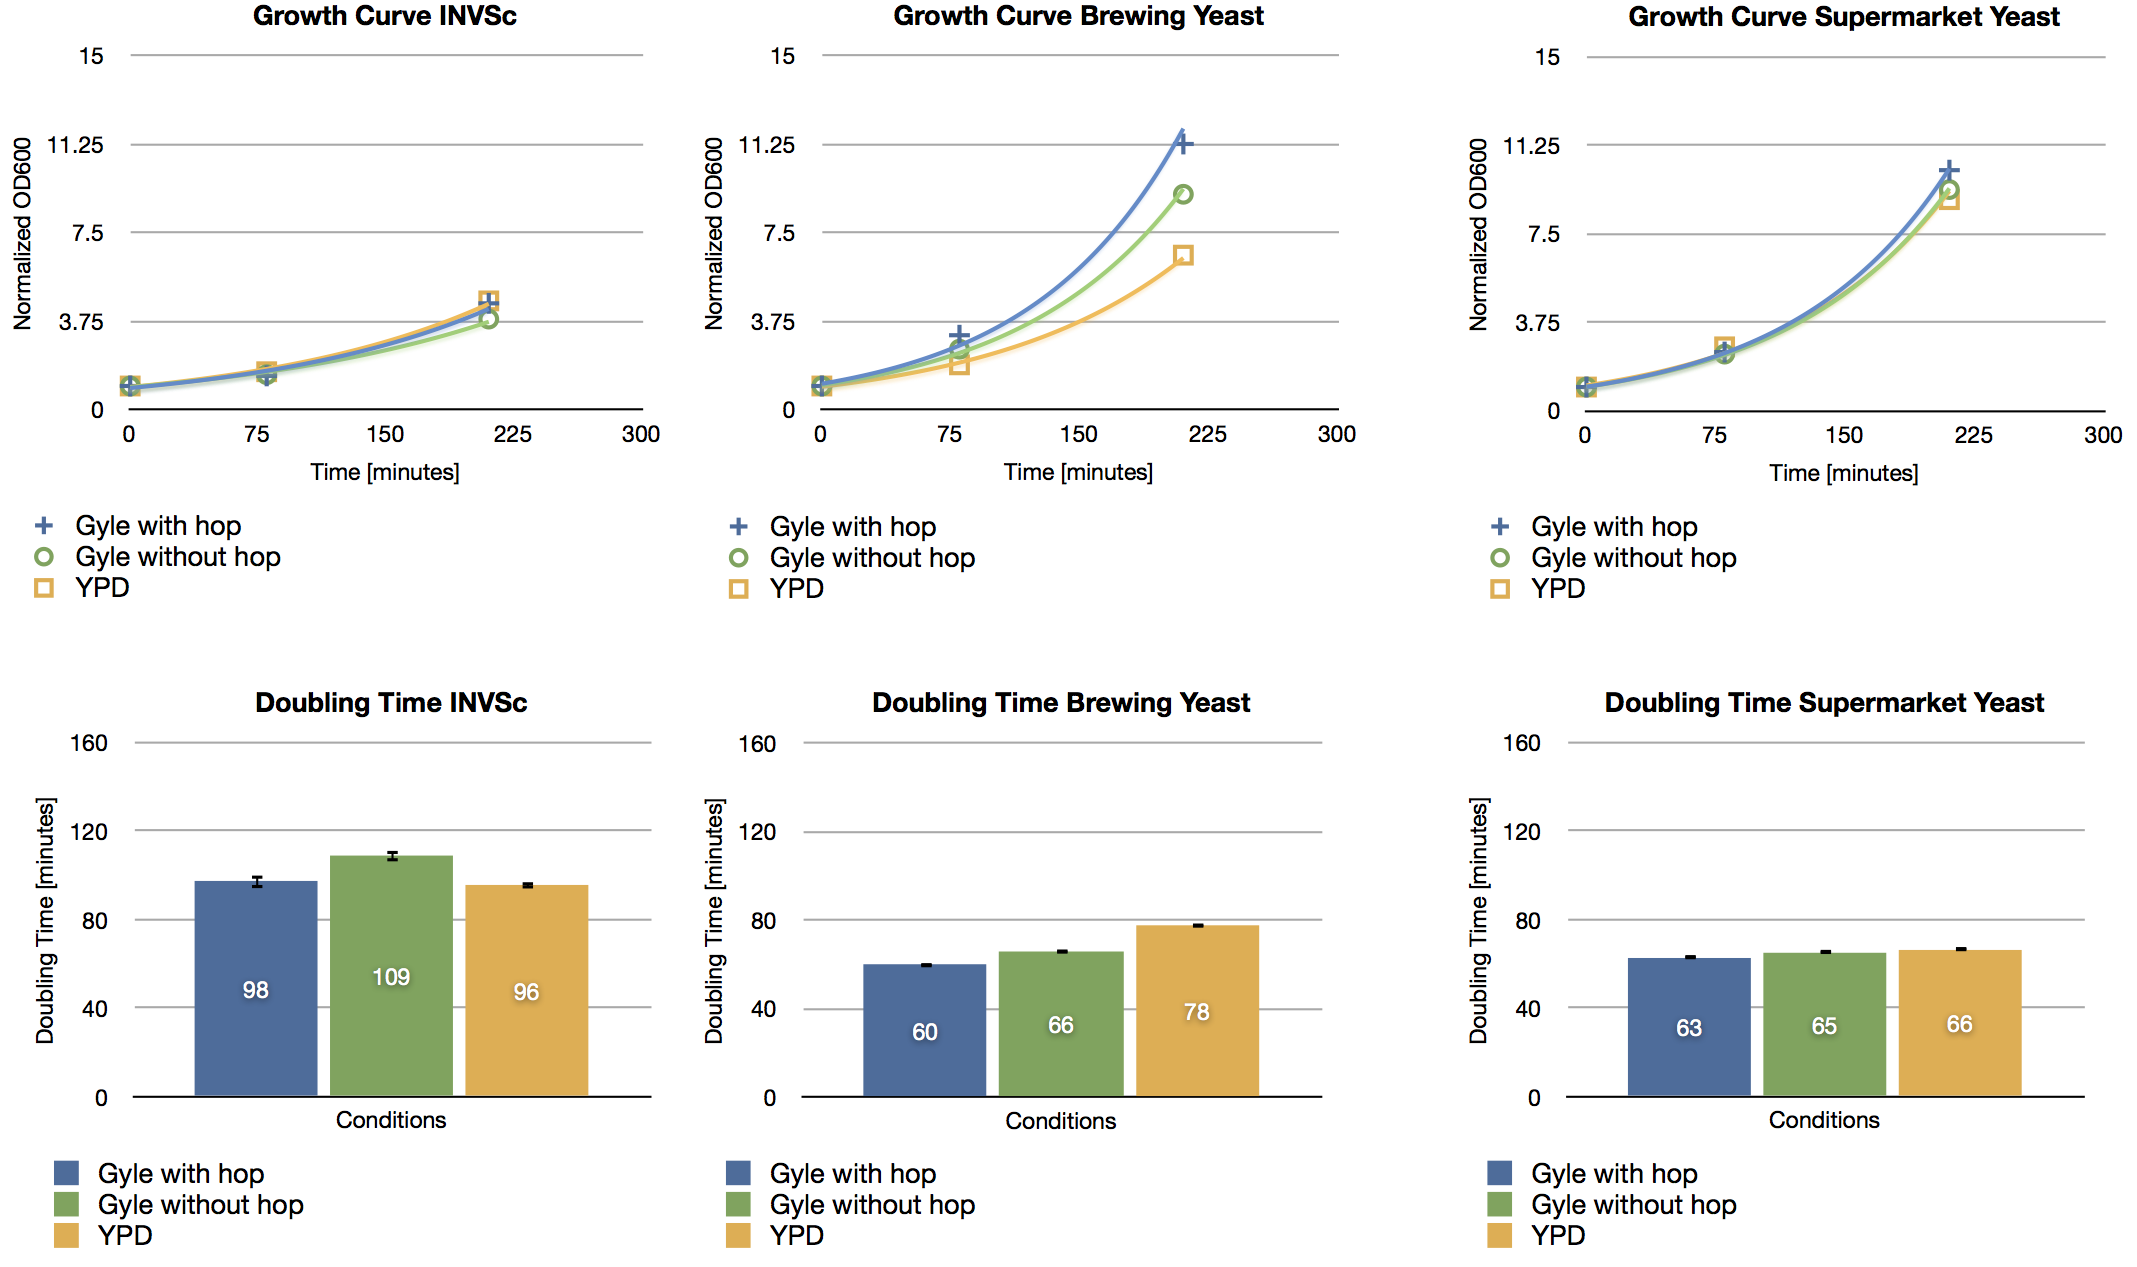
We compared the growth rate of the laboratory yeast INVSc to a yeast strain, which is typically used for brewing beer and to a yeast strain, which can be purchased at a normal supermarket. We inoculated those three strains with the same OD in three different mediums: gyle with and without hop, and the typically laboratory medium YPD, which we used for all our expression experiments. The growth rate was measured after a defined time period by measuring the OD at 600 nm.
The results show no difference in the growth behavior. Neither the three different strains grew unequal in the same medium, nor the various mediums had an effect on the growth rate of the yeast strains. We conclude, that our genetically modified yeast is equally able to grow in an environment typically for brewing than the usually used brewing strain.
Experiment 2: Toxic concentration of the substances to be produced
Experiment 3: Experiments with expression cassetts on a transient transfected vector
 "
"


