 "
"
Team:Purdue/Notebook
From 2012.igem.org
(→Adding Antibiotics to LB) |
(→Gibson Assembly) |
||
| Line 330: | Line 330: | ||
4) [[#Transforming Chemically Competent Cells| Transform]] as usual | 4) [[#Transforming Chemically Competent Cells| Transform]] as usual | ||
| - | |||
* The protocol for Gibson assembly is provided by Open Wet Ware | * The protocol for Gibson assembly is provided by Open Wet Ware | ||
* The original paper for the Gibson assembly protocol can be found [http://www.nature.com/nmeth/journal/v6/n5/full/nmeth.1318.html| here] | * The original paper for the Gibson assembly protocol can be found [http://www.nature.com/nmeth/journal/v6/n5/full/nmeth.1318.html| here] | ||
Revision as of 15:50, 18 June 2012
| Home | Team | Official Team Profile | Project | Parts Submitted to the Registry | Modeling | Notebook | Human Practices | Safety | Attributions |
|---|
You should make use of the calendar feature on the wiki and start a lab notebook. This may be looked at by the judges to see how your work progressed throughout the summer. It is a very useful organizational tool as well.
Monday, May 15
List of useful contacts on the google doc, including DowAgro
Begin to list the different devices/constructs that will be used in our project
Attachment (adhesion)
Filtration
- Modularize the sequence so we can test individually (e.g. but GFP, RFP, YFP at the end of each segment – construct silica binding protein first with constitutive promoter/repressible promoter to produce promoter and make sure it does what you think it should)
- Investigate multiple silica binding protein (surface protein – silica binding peptide);must choose several top candidates for each element.
Hierarchy
Perfecting the FFL
- And (low affinity, not dimer), Or (high affinity)
- Schematic Diagram
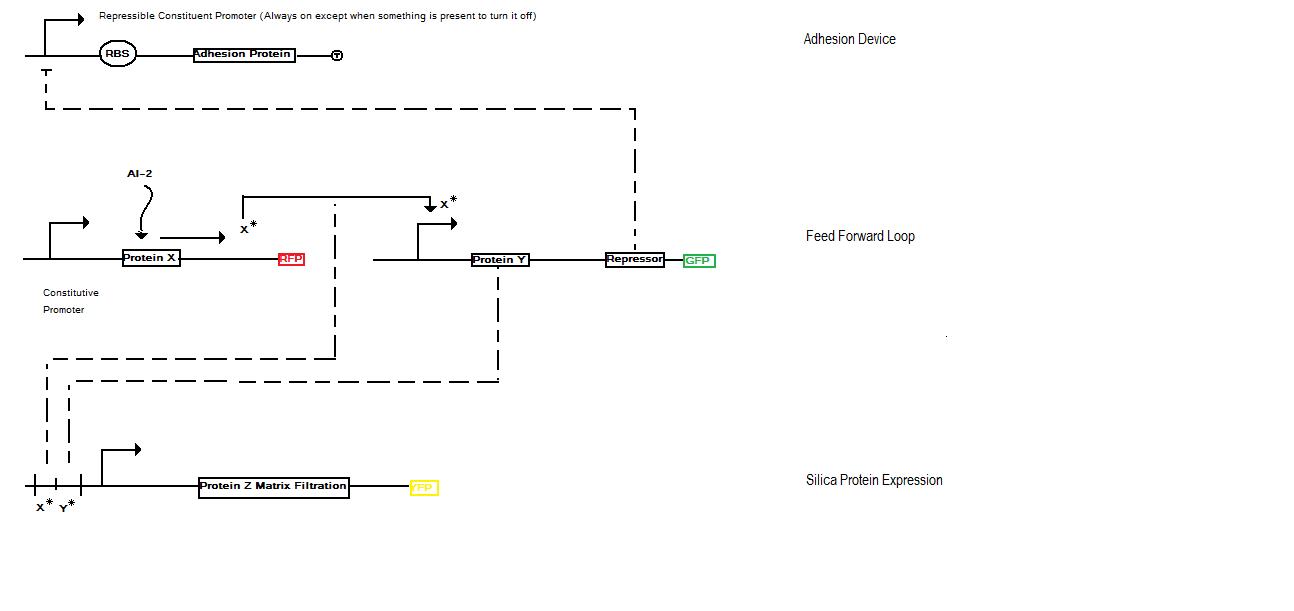
Modeling and Experimental
- Communication in terms of data (e.g. kinetic parameters)
- Review Characterization Data Sheets (look in the DropBox for an uploaded link from Sean )
- Strong integration of modeling translates to a strong performance in the competition.
List of things we need
- Competent Cells (Laris Avramova (core molecular biologist, 222), Tarun (electron microscopy)may have the needed cells)
- Antibiotics (AMP, tetracycline)
- Enzymes (Pst1, Xba1, EcoR1, Spe1, Ligase, polymerase/PCR reagents, T5exonuclease )
- Parts (available in the registry)
- Constitutive promoter (orthogonal t7 promoter)
- Signaling Promoters (investigate the precedent for construction FFL)
- RBS –(B0034)
- Thermodynamic models for designing RBSs, etc (Voights model)
- Terminators
- Proteins Transcription Factors
Monday, May 21
- We're all looking forward to an exciting iGEM summer! Our SURF students have just arrived and are gradually being introduced to synthetic biology and iGEM.
- Sean gave a crash course on synthetic biology to Mrudula, Rachel, Amanda and August. The powerpoint is available here, compiled by our wonderful graduate mentor, Janie.
Tuesday, May 22
- First Journal Club Meeting - Identified the reducible elements of our system
- Detailed outline of the project to the SURF students
- What is the advantage of using this entire process? Is not it kind of roundabout?
- Diagram of complete device was shown
For the NEXT MEETING Tuesday 29th May :
- Identify, in these teams:
a. What Adhesion system we want to use (Amanda, Peter, Mrudula)
b. Which silica-binding system we want to use (Rachel, August)
c. Control Elements (Max, Mrudula, Rachel, Sean)
d. Find strain auxotrophic for RSC (gene which breaks down arabinose) (Jim)
Announcements:
- Be ready to explain your assigned element of the project (starting generally and moving more specifically)
- Read the introductory/background elements of the thesis that Dr. Rickus will put in the dropbox General Announcements
- Be ready to work the BioBuilder HighSchool Teacher iGEM workshop during the week of June 4th – June 8th (more details to come)
- Everyone is welcome to visit Drs. Rickus and Clase’s lab group meeting on Thursday at 12PM
Thursday May 24th
Update on the human practice component available through the Powerpoint
Tuesday, May 29
Overview of small group presentations
Adhesion Proteins – Amanda, Mrudula, and Peter
- Ag43 : [University of Queensland 2009] PROS: makes chains instead of aggregates, works well in flow, in the registry, abiotic adherence CONS: not concomitant
- TibA: PROS: modular, concomitant, auto-transport CONS: not in the registry
- AIDA-1: PROS: binds Ag43 and self, in registry, higher shear tolerance CONS: only expressed in certain cells, blocked by Fimbriae (due to length)
- FimA-H: [Michigan 2010] PROS: forms chains, compatible w/ E. coli, shear resistant, grows in constant flow, binds well to glycoproteins CONS: inhibits function of other proteins
- Curli: [Lyons 2011] PROS: well characterized in registry, amyloid fibers CONS: inhibits Ag43 and AIDA-1
Decision:
- primary: AIDA-1 [order from registry and improve bad sequencing or re-synthesize] ====
- secondary (if AIDA-1 proves unfeasible): TibA [with goal of characterizing part, must synthesize]
Silica Binding Proteins – Rachel and August
- INP – Silicatein [MN 2011] – PROS: CONS: very large, no data on viability, not biobrick compatible.
- OmpA-Silicatein alpha fusion – PROS: shorter than INP-Silicatein, active in neutral pH, no illegal sites, known to work CONS: must construct fusion peptide vector NOTES: optimum at low temperatures [OmpA - K103006]
- R5 peptide: PROS: active at neutral pH, small, has been used in E. coli CONS: part of a larger protein (no silaffin post-translational modifications), contains EcoRI site
Modeling the Network Motif - Max, Mrudula, Rachel, and Sean
- Modeled the simplified system
- Matlab and MathCad Model
- Need concrete entry parameters for more robust models
For Next week:
- Construct your parts in DNA 2.0 and anything in registry start detailing
Wednesday, May 30
- In Lab:
- Cleaned and organized the laboratory space
- Ordered laboratory suppleies
- Made LB agar plates and LB liquid media with ampicillin
- Created the adhesions and SBP devices in silico using Gene Designer by DNA 2.0
Thursday, May 31
- Attended Rickus and Porterfielt laboratory group meeting
- Each person introduced themselves and their research
- Decided on the use of future meetings
- Researched primer design and began to design primers. These primers will be used for PCR to perform the Gibson assembly method
Friday, June 1
- Performed Cell Transformations of the following parts:
- Lac promotor and CFP generator (BBa_I13601)
- PoPs receiver (BBa_F2620)
- Tet repressor (BBa_C0040)
- Tet promotor with green fluorescent protein (BBa_I13522)
- Completed Primer Sequences for surface expression protein
Monday, June 4
- Welcomed Bio Builders workshop participants
- Janie gave a powerpoint on the basics of synthetic biology to the workshop participants
- Amanda, August, Max, Mrudula, and Rachel helped the participants with an experiment based on MIT's 2006 iGEM project, a banana scent generator
Tuesday, June 5
- Amanda, August, Mrudula, Rachel, and Soo spent the morning watching presentations on abstraction and devices with the Bio Builder workshop participants
- Soo gave a presentation to the participants on how to use TinkerCell
- The iGEM team helped the Bio Builder participants to transform green and purple fluorescent protein into E. coli
- Created a timeline for the rest of the summer as seen below
- Week 3:
- Design and order primers for Gibson assembly
- Order reagents
- Complete a miniprep for the previously transformed parts
- Select plasmid backbones
- Week 4:
- PCR parts for Gibson assembly
- Complete Gibson assembly
- Decide on which parts will be synthetic
- What devices can be synthesized or should we synthesize individual parts?
- Create competent cells
- Week 5:
- Complete plasmid midi and mega preps
- Transform parts into expression vectors
- Week 6:
- Complete functional analysis of protein expression
- Construct the full system
- Week 7:
- Build the flow system for biofilm establishment
- Complet functional analysis of biofilm thickness
- Week 8-10:
- Iterate and improve on flow setup
- Week 3:
Wednesday, June 6
- Sean gave a presentation to the Bio Builder participants on 3A and Gibson assembly
- Sean lead a 3A assembly lab with the participants
- Worked on designing primers
Thursday, June 7
- Continued to design primers
Monday, June 11
- We attempted to optimize our primers using online guidlines and software.
- Here is a website that details primer design.
- We used a Tm calclator and an Oligo Analyzer which can calculate the liklihood of occurances such as hairpins and dimers.
- Upon analysis, we found that the primers that would be required to use Gibson assembly were not ideal. In some cases, the forward and the reverse primers did not have Tm values that were close enough to each other. We also had difficulty with making our primers a reasonable length. Furthermore, many of the primers had a high probability (Gibson free energy value lower than zero) of froming dimers or hairpins. Finally, we deicided that it would most likely be more successful to use 3A assembly instead of Gibson.
- Welcomed Rubeena to the iGEM team. We are looking forward to working with her!
Tuesday, June 12
- insert meeting minutes
Wednesday, June 13
- August, Mrudula, and Rachel were trained on how to use the flow cytometer
- Made competent cells (DH5α). The protocol for making competent cells is found here
Thursday, June 14
- Rachel had a demonstration on how to make silica. The procedure is shown here.
- We welcomed Chris to the iGEM team. We know he will be a great asset to the team!
- We had an overview meeting for Rubeena and Chris to help them catch up on the project.
Friday, June 15
- We transformed all of the parts needed for the adhesion device. These included the following
- AIDA-1 (BBa_K257018)
- Plasmid (pSB1AK3)
- pTet (BBa_R0040)
- RBS (BBa_B0034)
- Terminator (BBa_B0015)
- Plasmid (pSB1AC3)
- CFP (BBa_E0020)
- insert meeting minutes
Saturday, June 16
- Removed the following parts from the incubator and placed in the refrigerator with parafilm wax
- BBa_E00032 (GFP device from plates)
- Bba_
Protocols
Creating Chemically Competent Cells
- The protocol for creating chemically competent cells is provided by the parts registry and can be found here.
Transforming Chemically Competent Cells
- The protocol for transforming chemically competent cells is provided by Open Wet Ware and can be found here.
SOB Media Contents
- 2% w/v bacto-tryptone (20 g)
- 0.5% w/v Yeast extract (5 g)
- 8.56mM NaCl (0.5 g) or 10mM NaCl (0.584 g)
- 2.5mM KCl (0.186 g)
- ddH2O to 1000 mL[4]
- For maximum effectiveness, SOB media should have its pH adjusted to 7.0 by adding concentrated sodium hydroxide.
- Autoclave media to ensure sterility
SOC Recipe
In addition to the contents of SOB media
- 10mM MgCl2 (0.952 g) or 20mM MgSO4 (2.408 g)[2]
- 20mM glucose (3.603 g)
- Alternatively, SOC can be made by adding small amounts of concentrated magnesium chloride and glucose solutions to pre-prepared SOB.
- For maximum effectiveness, SOC media should have its pH adjusted to 7.0 by adding concentrated sodium hydroxide.
- Autoclave media to ensure sterility
Silica Creation
1) Obtain 14.4g of nanopure water
2) Obtain 50µL of .04M HCL and combine it with the water. Put this solution in an ice bath
3) Obtain 7.6g of tetramethyl orthosilicate (TMOS) in a separate container
4) Combine the TMOS and HCL/water
5) Immediately begin the vortex the solution. The solution will be cloudy while the reaction is taking place. Once the solution is clear again, the reaction is finished. This will take approximately 5 minutes
6) When the reaction is finished, let the solution set for 1-2 minutes
7) Use a rotary evaporator at 47ºC to remove the methane from the solution. This should take 2-3 minutes. The final solution volume should be approximately 13mL
8) If the silica is to be used immediately, put it on ice. It can be stored for up to a week if it is refrigerated.
9) Filter the silica before use
- The procedures are provided by Rickus lab group.
Adding Antibiotics to LB
- How to make LB liquid plus antibiotics:
- Ampicillin – The frozen stock solutions of ampicillin are at 50mg/ml and 100mg/ml in H2O, and are marked with a red sticker. The final concentration for LB liquid culture is 50ul/ml. To obtain this in 100ml (the amount in each LB bottle), add 100ul stock solution.
- Kanamycin – The frozen stock solutions of kanamycin are at 50mg/ml in H2O, and are marked with green. The final concentration for LB liquid culture for growing plasmids is 50ug/ml, and for cosmids is 20ug/ml. To obtain 50ng/ml in 100ml of LB, add 100ul stock solution, and to obtain 20ug/ml, add 40ul stock solution.
- Tetracycline – The frozen stock solutions of tetracycline are at 15mg/ml in methanol and are marked with black. The final concentration for LB liquid culture is 15ug/ml. To obtain this in 100ml of LB, add 100ul stock solution.
- Chloramphenicol – The frozen stock solutions of chloramphenicol are at 25mg/ml in 100% ethanol and are marked with purple. The final concentration for LB liquid culture is 25mg/ml. To obtain this in 100ml of LB, add 100ul stock solution.
- How to make LB plates plus antibiotics:
- Follow the recipe card in box for making LB plates, being sure to add the agar. After autoclaving, and when the agar has cooled enough that it’s not too hot to touch (about 1 to 1.5hrs), add antibiotics as follows:
- Ampicillin – add 1ml ampicillin (at 100mg/ml) per liter of agar to obtain a final concentration of 100ug/ml. Mark the plate with a single red line on the side.
- Kanamycin – add 1ml kanamycin stock (at 50mg/ml) per liter of agar to obtain a final concentration of 50ug/ml. Mark the plates with a single green line on the side.
- Tetracycline – add 1ml tetracycline stock (at 15mg/ml) per liter of agar to obtain a final concentration of 15ug/ml. Mark the plates with a single black line on the side.
- Chloramphenicol – add 1ml chloramphenicol stock (at 25mg/ml) per liter of agar to obtain a final concentration of 100ug/ml. Mark the plates with a single purple line on the side.
PCR protocol
1) For a 25ul rxn:
- Use 1ul of 60ng/ul or 100ng/ul DNA
- Use 1ul of each primer at 3.2pmole/ul concentration or 1.25ul of each primer at 100ng/ul concentration
- 2.5ul 10x PCR Buffer w/ Mg (1.5mM)
- 0.5ul 25mM MgCl2
- 0.5ul dNTP
- 0.125ul Taq
- 18.375ul sterile water to equal a 25ul rxn
- if not making master mix, dilute Taq so that you can add 1ul of Taq and 17.5ul sterile water to equal a 25ul rxn
2) For a 50ul rxn:
- Use 2ul of 60ng/ul or 100ng/ul DNA
- Use 2ul of each primer at 3.2pmole/ul concentration or 2.5ul of each primer at 100ng/ul concentration
- 5ul 10x PCR Buffer w/ Mg
- 1ul 25mM MgCl2
- 1ul dNTP
- 0.25ul Taq
- 36.75ul sterile water to equal a 50ul rxn
- if not making a master mix, dilute Taq so that you can add 1ul of Taq and 36ul sterile water to equal a 50ul rxn
3) Keep the reagents on ice.
4) Add the Taq last, and keep it in the freezer until you are ready to add it.
5) Vortex briefly and quick spin.
6) Cycle:
- 95°C for 1-5minutes (usually 4min)
- 95°C for 1min
- 55°C for 1min. Cycle 30 times
- 72°C for 1.5 to 2min (usually 2min)
- 72°C for 10min
- 4°C hold
- A video showing the theory behind PCR can he found here
3A Assembly
- The protocol for 3A assembly is provided by Open Wet Ware and can be found here
Gibson Assembly
Prepare a master mix, as detailed below. Store them in 15 ul aliquots at -20 °C. Then:
1) Thaw a 15 μl assembly mixture aliquot and keep on ice until ready to be used.
2) Add 5 μl of DNA to be assembled to the master mixture. The DNA should be in equimolar amounts. Use 10-100 ng of each ~6 kb DNA fragment. For larger DNA segments, increasingly proportionate amounts of DNA should be added (e.g. 250 ng of each 150 kb DNA segment).
3) Incubate at 50 °C for 15 to 60 min (60 min is optimal).
4) Transform as usual
- The protocol for Gibson assembly is provided by Open Wet Ware
- The original paper for the Gibson assembly protocol can be found here