 "
"
Team:Tianjin/Protocol
From 2012.igem.org


Gel Extraction Procedure
Excising and Dissolving the Gel
- Excise a minimal area of gel (up to 400 mg) containing the DNA fragment.
- Add Gel Solubilization Buffer (L1) to the excised gel in the tube size as indicated:
- Place the tube with the gel slice and Buffer L1 into a 50°C water bath or heat block. Incubate the tube at 50°C for 15 minutes. Invert the tube every 3 minutes to mix.
- Purify DNA using Centrifugation as described below.
Purifying DNA using Centrifugation
- Load. Place a column into a 2-mL Receiver Tube. Pipet the dissolved gel piece onto the column. Centrifuge the column at >12,000 × g for 1 minute. Discard the flow-through and place the column into the 2-mL Receiver Tube.
- Wash. Add 500 μL Wash Buffer (L2) containing ethanol to the column. Centrifuge the column at >12,000 × g for 1 minute. Discard the flow-through and place the column into the Receiver Tube. Centrifuge the column at maximum speed for 1 minute.
- Elute. Place the column into a clean 1.5 mL microcentrifuge tube. Add 50 μL of TE Buffer to the column. Incubate the tube for 1 minute at room temperature. Centrifuge the tube at >12,000 × g for 2 minutes.
- Store. The elution tube contains the purified DNA. Store the purified DNA at −4°C for immediate use or at−20°C for long-term storage.
Agarose Gel Electrophoresis
General Procedure
- Cast a gel
- Place it in gel box in running buffer
- Load samples
- Run the gel
- Image the gel
Casting Gels
The amount of agarose to use in your gel depends on the DNA in question. Use the following table as a rough guide:
- Measure out the appropriate mass of agarose into a beaker with the appropriate volume of buffer (see the documentation for your gelbox -- 50mL makes a good, thick gel for a 7x10cm gelbox).
- Microwave until the agarose is fully melted. This depends strongly on your microwave, but a 90 seconds at full power or 3 minutes at half power seem to provide decent results. As long as you do not burn the agarose and nothing bubbles over, this step is robust.
- Let the agarose cool on your bench until touching the bottom of the beaker with your bare hand doesn't burn you (~5 minutes for a 50mL gel).
- At this point add your DNA stain, e.g., ethidium bromide. The beaker will cool unevenly (surface first), so you must be careful not to cause ripples and bubbles.
- While the solution is cooling, seal the open edges of your gel box with one long piece of masking tape on each side. Make sure it is sealed well or the gel will leak.
- Pour the agarose solution into the taped gelbox. Carefully pop or shove to the side any bubbles, put in the comb, and let it cool for about 30 minutes, until the gel is solid.
- If your gel is at all purple, and you are using ethidium bromide as the DNA stain, you need to decrease your concentration by at least a factor of ten.
According to OpenWetWare.org
T4 Ligase Ligation
Materials
- T4 DNA Ligase
- 10x T4 DNA Ligase Buffer
- Deionized, sterile H2O
- Purified, linearized vector (likely in H2O or EB)
- Purified, linearized insert (likely in H2O or EB)
Procedure
10μl Ligation Mix
- 1.0 μL 10X T4 ligase buffer (use 10µl aliquots in -20 freezer; repeated freeze-thaw cycles can degrade the ATP in the buffer that's critical for the ligation rxn)
- 6:1 Molar ratio of insert to vector (~10ng vector). Gradients are used sometimes.
- Add (8.5 - vector and insert volume)μL ddH2O
- 0.5 μL T4 Ligase
Method
- Add appropriate amount of deionized H2O to sterile PCR tube
- Add 1 μL ligation buffer to the tube.
- Pipette buffer up and down before pipetting to ensure that it is well-mixed.
- Add 0.5 μL T4 ligase. PIPETTE half the volume of the mixture UP AND DOWN to ENSURE MIXING OF THE ENZYME.
- Also, the ligase, like most enzymes, is in some percentage of glycerol which tends to stick to the sides of your tip. Just touch your tip to the surface of the liquid when pipetting to ensure accurate volume transfer.
- Let the 10 μL solution incubate at 25°C for 15mins.
- Store at 4°C.
- (Use agarose gel electrophoresis to check sometimes)
- Transform into cell.
PCR Overlap Extension
Procedure
- Design Primers:
- These primers are like bridges between the two parts you want to assemble together.
- You will order two primers which are complements of one another.
- These primers will each have a 60°C Tm with one part and a 60°C Tm with the other part.
- The "end primers" will not have any complements and will likely only have restriction sites.
- "Extension PCR" PCR amplify the necessary fragments separately
- Use a proofreading polymerase enzyme.
- Use an annealing temp of 60°C.
- Clean up the product using a DNA column.
- "Overlap PCR" Use cleaned up fragments as template in a PCR reaction:
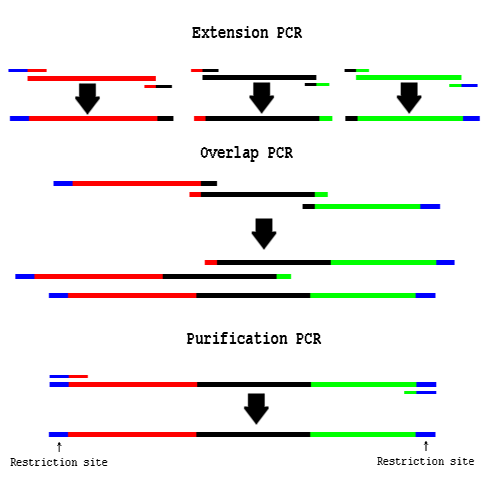 Diagram of PCR Overlap Extension
- About 1/2 to 3/4 volume of the Overlap PCR reaction should be equimolar amounts of purified fragments.
- Do not use Phusion polymerase. Try Pfu Turbo.
- Do not add any primers; the templates will prime each-other.
- Run 15 PCR cycles without primers.
- Use an annealing temp of 60°C.
- "Purification PCR" Add end primers to the Overlap PCR reaction:
- Continue cycling for another 15-20 rounds.
- Use an annealing temp of 72°C
- Gel extract the correct size fragment.
- Clone into the desired vector.
- Digest
- Ligate
- Transform
- Select
- Sequence

DNA Assembler in Yeast
SC Minimal Medium and Plates
SC is synthetic minimal defined medium for yeast. 0.67% yeast nitrogen base (without amino acids) 2% carbon source (i.e. glucose or raffinose) 0.01% (adenine, arginine, cysteine, leuine, lysine, threonine, tryptophan, uracil) 0.005% (aspartic acid, histidine, isoleucine, methionine, phenylalanine, proline, serine, tyrosine, valine) 2% agar (for plates)
- Dissolve the following reagents in 900 ml deionized water (800 ml if preparing medium containing raffinose). Note: We make medium and plates as we need them and weigh out each amino acid. Many researchers prepare 100X solutions of each amino acid that they need.
Reminder: Omit uracil to make selective plates for growing pYES2 transformants.</br> - If you are making plates, add the agar after dissolving the reagents above.
- Autoclave at 15 psi, 121°C for 20 minutes.
- Cool to 50°C and add 100 ml of filter-sterilized 20% glucose or 200 ml of filter-sterilized 10% raffinose.
- Pour plates and allow to harden. Invert the plates and store at 4°C. Plates are stable for 6 months.
Induction Medium
If you are making induction medium, follow Steps 1–3 above except dissolve the reagents in 800 ml of deionized water. Cool the medium to 50°C and add 100 ml of filter-sterilized 20% galactose and 100 ml of filter-sterilized 10% raffinose to the medium.
When making stock solutions of raffinose, do not autoclave the stock solution. Autoclaving the solution will convert the raffinose to glucose. Filter-sterilize the stock solution.
Yeast Extract Peptone Dextrose Medium (YPD) 1 liter
1% yeast extract 2% peptone 2% dextrose (D-glucose)
- Dissolve the following in 1000 ml of water:
- 10 g yeast extract
- 20 g peptone
- 20 g dextrose (see note below if making plates)
- Optional: Add 20 g agar, if making plates.
- Autoclave for 20 minutes on liquid cycle.
- Store medium at room temperature or cool the medium and pour plates. The
shelf life is approximately one to two months.
0.1 M Sodium Phosphate, pH 7.4
Materials needed:
Sodium phosphate, monobasic (NaH2PO4·H2O; Sigma-Aldrich S9638)
Sodium phosphate, dibasic (Na2HPO4·7H2O; Sigma-Aldrich S9390)
Protocol:
- Prepare 100 ml of 1 M NaH2PO4·H2O by dissolving 13.8 g in 90 ml of deionized water. Bring volume up to 100 ml. Filter-sterilize.
- Prepare 100 ml of 1 M Na2HPO4·7H2O by dissolving 26.81 g in 90 ml of deionized water. Bring volume up to 100 ml. Filter-sterilize.
- For 1 liter of 0.1 M sodium phosphate, pH 7.4, mix together 22.6 ml of 1 M NaH2PO4 and 77.4 ml of 1 M Na2HPO4. Bring the volume up to 1 liter with deionized water.
- Filter-sterilize and store at room temperature.
10X TE
100 mM Tris, pH 7.5 10 mM EDTA
- For 100 ml, dissolve 1.21 g of Tris base and 0.37 g of EDTA in 90 ml of deionized water.
- Adjust the pH to 7.5 with concentrated HCl and bring the volume up to 100 ml.
- Filter-sterilize and store at room temperature.
Alternatively, you can make the solution using 1 M Tris-HCl, pH 7.5 and 0.5 M EDTA, pH 8.0.
1X TE
10 mM Tris, pH 7.5 1 mM EDTA Dilute 10X TE 10-fold with sterile water.
10X LiAc
1 M Lithium Acetate, pH 7.5
- For 100 ml, dissolve 10.2 g of lithium acetate in 90 ml of deionized water.
- Adjust pH to 7.5 with dilute glacial acetic acid and bring up the volume to 100 ml.
- Filter-sterilize and store at room temperature.
1X LiAc
100 mM Lithium Acetate, pH 7.5 Dilute 10X LiAc solution 10-fold with sterile, deionized water.
1X LiAc/0.5X TE
100 mM Lithium Acetate, pH 7.5 5 mM Tris-HCl, pH 7.5 0.5 mM EDTA
- For 100 ml, mix together 10 ml of 10X LiAc and 5 ml of 10X TE.
- Add deionized water to 100 ml.
- Filter-sterilize and store at room temperature.
1X LiAc/40% PEG-3350/1X TE
100 mM Lithium Acetate, pH 7.5 40% PEG-3350 10 mM Tris-HCl, pH 7.5 1 mM EDTA
- Prepare solution immediately prior to use. For 100 ml, mix together 10 ml of 10X LiAc, 10 ml of 10X TE, and 80 ml of 50% PEG-3350.
- Filter-sterilize and store at room temperature.
Small-Scale Yeast Transformation
Materials Needed
- YPD liquid medium
- 1X TE (see Recipe, page 12)
- 1X LiAc/0.5X TE (see Recipe, page 12)
- Denatured salmon sperm DNA (see recipe on the next page)
- pYES2 vector construct (or other plasmid DNA to be transformed)
- 1X LiAc/40% PEG-3350/1X TE (See Recipe, page 12)
- DMSO
- Selective plates
Protocol
- Inoculate 10 ml of YPD medium with a colony of INVSc1 and shake overnight at 30°C.
- Determine the OD600 of your overnight culture. Dilute culture to an OD600 of 0.4 in 50 ml of YPD medium and grow an additional 2–4 hours.
- Pellet the cells at 2500 rpm and resuspend the pellet in 40 ml 1X TE.
- Pellet the cells at 2500 rpm and resuspend the pellet in 2 ml of 1X LiAc/0.5X TE.
- Incubate the cells at room temperature for 10 minutes.
- For each transformation, mix together 1 μg plasmid DNA and 100 μg denatured sheared salmon sperm DNA with 100 μl of the yeast suspension from Step 5.
- Add 700 μl of 1X LiAc/40% PEG-3350/1X TE and mix well.
- Incubate solution at 30°C for 30 minutes.
- Add 88 μl DMSO, mix well, and heat shock at 42°C for 7 minutes.
- Centrifuge in a microcentrifuge for 10 seconds and remove supernatant.
- Resuspend the cell pellet in 1 ml 1X TE and re-pellet.
- Resuspend the cell pellet in 50–100 μl 1X TE and plate on a selective plate.
Preparing Denatured Salmon Sperm DNA
Materials Needed
- Salmon Sperm DNA (Sigma-Aldrich, Cat. no. D1626)
- 1X TE
- Sonicator
- 50 ml conical centrifuge tubes
- TE-saturated phenol
- 250 ml centrifuge bottle
- Chloroform
- Low-speed centrifuge
- 3 M sodium acetate, pH 6.0
- 95% ethanol (–20°C)
- 250 ml centrifuge bottle
- TE-saturated phenol:chloroform:isoamyl alcohol (25:24:1)
Protocol
- In a 250 ml flask, dissolve 1 g salmon sperm DNA into 100 ml of TE
(10 mg/ml). Pipette up and down with a 10 ml pipette to dissolve completely.
- Incubate overnight at 4°C.
- Using a sonicator with a large probe, sonicate the DNA twice for 30 seconds at 3/4 power. The resulting DNA will have an average size of 7 kb. You may verify the size of the DNA on a gel.
- Aliquot the sonicated DNA into four 50 ml conical centrifuge tubes (25 ml per tube).
- Extract with 25 ml of TE-saturated phenol. Centrifuge at 10,000 × g for 5 minutes at 4°C. Transfer the DNA (upper layer) to a fresh 50 ml conical centrifuge tube.
- Extract with 25 ml of TE-saturated pheno:chloroform:isoamyl alcohol (25:24:1). Centrifuge at 10,000 × g for 5 minutes at 4°C. Transfer the DNA (upper layer) to a fresh 50 ml conical centrifuge tube.
- Extract with 25 ml of chloroform. Centrifuge at 10,000 × g for 5 minutes at 4°C. Transfer the DNA (upper layer) to a 250 ml centrifuge bottle.
- Add 5 ml of 3 M sodium acetate, pH 6.0 (1/10 volume) and 125 ml ice-cold (–20°C) 95% ethanol (2.5 volume) to precipitate DNA.
- Pellet the DNA at 12,000 x g for 15 minutes at 4°C.
- Wash the DNA once with 200 ml 70% ethanol and centrifuge as described in step 9.
- Partially dry DNA by air or in a Speed-Vac (cover tubes with parafilm and
poke holes in top) for 20 minutes.
- Transfer DNA to a 250 ml sterile flask and dissolve DNA in 100 ml sterile TE (10 mg/ml).
- Boil for 20 minutes to denature DNA. Immediately place on ice, aliquot in 1 ml samples, and freeze at –20°C.
According to INVITROGEN pYES2 Manual