Team:Paris-Saclay/Project/Materials - Techniques
From 2012.igem.org
YohannPetiot (Talk | contribs) |
YohannPetiot (Talk | contribs) |
||
| Line 23: | Line 23: | ||
</head> | </head> | ||
<body> | <body> | ||
| - | <div id="single- | + | <div id="single-tile3" class="red live-tile" data-mode="flip" data-delay="4000"> |
<div id="tiles"> | <div id="tiles"> | ||
<div class="child-tile"><p class="child-tile">GEMOTE</p></div> | <div class="child-tile"><p class="child-tile">GEMOTE</p></div> | ||
Revision as of 13:17, 26 September 2012
GEMOTE


GEMOTE
The biobricks and plasmids we received were dehydrated. Several steps had to be performed before we could use them to build our final constructions. First, we had to rehydrate the DNA. Then, we had to transform the bacteria with this DNA and plate the transformed bacteria onto LB medium supplemented with the appropriate antibiotic (most of the time, ampicillin). The transformants had then to be cultivated in liquid medium before plasmid extraction was carried out (miniprep) to get a large amount of plasmids containing the biobricks. These plasmids could then be used to amplify the biobricks by PCR for the Gibson Assembly. This required the synthesis of oligonucleotides. Finally, we analysed and purified the products before proceeding to the Gibson Assembly.
Rehydratation of the DNA
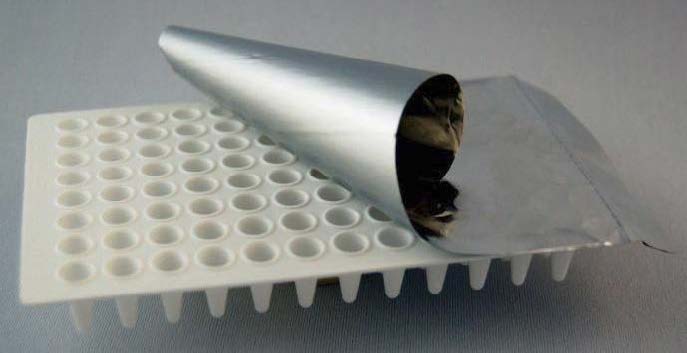
First we pierced the capsule of the chosen biobrick with a cone. Next, we added 10 µL of distilled water and waited 5 minutes. We then transferred the rehydratated DNA in a 0.2 ml eppendorf tube that we kept at -20°C.
Chemical transformation of competent E. coli DH5α cells
Once the biobricks were rehydrated, we used them to chemically transform competent E. coli bacteria We added 1 to 2 µL of the DNA to 50 µL of E. coli DH5α competent bacteria. DNA and competent cells were mixed softly keeping the tubes in ice. The tubes were incubated in ice during 30 minutes, then heat-shocked for 1 minute 30 secondes in a bain-marie at 42°C and finally put 5 minutes in the ice. We next added 200µL of liquid LB and incubate the cell at 37°C during 1 hour. Finally, 20µL and 200µL of the cell cultures were plated on petri dishes previously prepared with LB agar supplemented with ampicillin at the concentration of 50µg/mL. Petri dishes were incubated overnight at 37°C overnight.
Plasmid DNA extraction
Isolated colonies were picked from the plates with a pipette tip and introduced in liquid LB supplemented with ampicillin (50µg/ml) or chloramphenicol (25µg/ml), depending on the resistance marker the biobrick plasmid backbone offered. As a negative control, one tube containing the culture medium only was prepared as well. All tubes were incubated at 37°C overnight.
We could then extract the plasmids containing the biobricks from the cultivated cells (miniprep). To do so, we used a Nucleospin Plasmid DNA extraction kit (Macherey-Nalgel) using the following protocol:
We put 2 mL of culture in an eppendorf tube and we centrifuged at 11 000 rpm during 30s. We removed the supernatant and added 2 mL of the culture again. We centrifuged at 11 000 rpm during 30s and removed the supernatant again. We resuspended the cell pellet in 250 µL of buffer A1 (containing RNase, kept at 4°C). Next we added 250µL of buffer A2 (lysis) and gently mixed by inverting the tubes. We let it 5 minutes at room temperature, added 250µL of buffer A3 and gently mixed by inverting the tubes 5 to 8 times. We centrifuged the tubes at 13 000 rpm (maximal speed) during 15 minutes. We next added 700µL of the supernatant onto a Miniprep column that we centrifuged at 11 000 rpm during 1 minute. We took off the flow-through, added 600 µL of buffer AW (washing) to the column, and centrifuged at 11 000 rpm during one minute.
We removed the supernatant again, add 600µL of buffer A4 (washing), and centrifuged one minute at 11 000 rpm. The flow-through is eliminated and the mixture is centrifuged again at 11 000 rpm during 2 min. We then put the column in a new eppendorf tube, added 50µL of distilled water to it, incubated it for 1 min and centrifuged for 1 min at 11000 rpm. The eluate is re-loaded onto the column and the tube is centrifuged 1 min at 11 000 rpm. The concentration of the DNA obtained was measured using the Nanodrop or by electrophoresis. The DNA is then stored at -20°C.
Storage of the E. coli strains
Using the liquid cultures of the E. coli DH5α containing the biobricks we previously prepared, we made cells stock in 20% glycerol. This allowed us to easily prepare new stocks of plasmids each time it was needed. To make this stock, we added ⅓ of volume of a sterile 60% glycerol solution with ⅔ of volume of the E. coli cultures in a cryogenic tube of 1,8mL. This tube is then stored at -80°C.
Design of the primers
We decided to use a technique called “Gibson Assembly” to create our construction. For this technique, it is very important to amplify the biobricks and plasmids with modified primers that contains at their 5’ extremities regions corresponding to the beginning/end of the following/previous PCR fragment to be assembled. Thus, the fragments assembled during the Gibson assembly contain between 20 and 40 common bases at their extremities, which will allow the correct assembly between the different fragments (the Gibson assembly mechanism is explained more in detail later on).
PCR
After extracting the plasmids, we aimed to amplify each fragment (biobrik or plasmid) necessary for our constructions using PCR. Depending on the size of the fragment and on its composition in G/C, the elongation time and the annealing temperatures will vary. We use the Phusion polymerase, whose elongation speed is around 15-30 s for 1 kb. The melting temperature Tm for each primer is calculated using the Tm calculator on the finnzymes website (http://www.finnzymes.fi/tm_determination.html).
We also used PCR to verify the constructions we obtained. For this PCR verification, we tried to amplify separately each biobrick of the construction. In that case, we used the TAQ polymerase from Qiagen rather than the Phusion polymerase because we did not need necessarily a high degree of fidelity and the important price of the Phusion enzyme forced us to limit its use.
Analysis and purification PCR products
After each PCR, we analyzed our products using gel electrophoresis to check if we amplified the desired fragment. For the purification of the PCR products there were two cases:
_ if the only amplified fragment was the expected one, we purified it using a PCR Clean up kit (Macherey Nalgel) using the following protocol: in an Eppendorf tube, we mixed one volume of the sample with 2 volumes of buffer NT. We placed a column (supplied in the kit) with a collector tube and we load the mix onto this column. Then we centrifuged at 11000 rpm during 1 min and removed the flow-through. We added 700 µL of NT3 buffer, we centrifuged at 11000 rpm during 1 minute, removed the flow-through and recentrifuged at 11000 rpm during 2 minutes. We eliminated what is in the collector tube. We put the column on a new clean tube and we add 15µL of distilled water, we wait during 1 minute then we centrifuged it at 11000g during 1 minute and repeated this last step.
_ if we observed nonspecific amplification (other bands in addition to the expected one), we performed a gel extraction of the desired PCR fragment and we purified it with the kit PCR Clean up after melting the gel.
Gibson Assembly
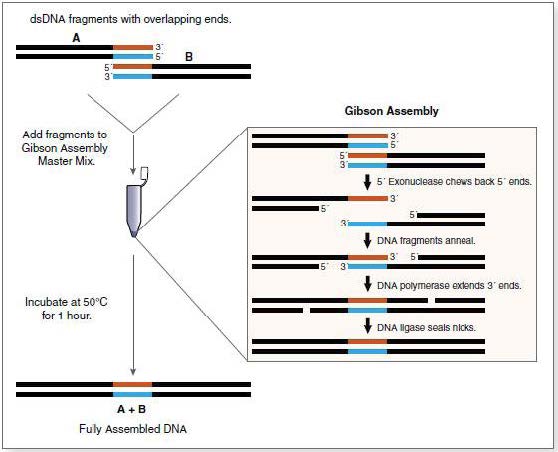
The Gibson assembly is a technique that allows the efficient assembly of several DNA fragments with complementary extremities. For this assembly, 3 enzymes are used:
- A 5’ exonuclase, which creates the cohesive 3’extremities, allowing fragments to hybridize in their complementary regions.
- A polymerase, which extend the 3’ ends of the fragments.
- A ligase ligating the assembled DNA fragments.
Mechanism of the Gibson assembly
The protocol we used for the Gibson assembly is as follows: All the fragments required for the construction were combined in a molecular ratio equivalent in no more than 5µ final volume. If necessary, water was added to fill the tube up to 5 µL. We tried to use 100 ng of the plasmid backbone. To this mixture a 15 µl aliquot of the Isothermal Assembly Reaction mix was added. The mix was kept at 50°C during 15-60min, more often during 30 min. The bacteria were then transformed with 1 µL of the assembly mix.
 "
"


Follow us !