Team:Peking/Project/3D/3D
From 2012.igem.org
m |
|||
| (3 intermediate revisions not shown) | |||
| Line 21: | Line 21: | ||
<img src="/wiki/images/b/b1/Peking2012_3DprintingDNA3_b.png" style="width:400px;" /> | <img src="/wiki/images/b/b1/Peking2012_3DprintingDNA3_b.png" style="width:400px;" /> | ||
<p class="description"style="text-align:center;"> | <p class="description"style="text-align:center;"> | ||
| - | Figure 1. the | + | Figure 1. the setup used in the 3D printing. |
</p> | </p> | ||
</div> | </div> | ||
<p> | <p> | ||
| - | Consistent with our prediction, the layer-by-layer method works well with | + | Consistent with our prediction, the layer-by-layer method works well with the <i>Luminesensor</i>. As a proof of concept, three layers of thin plate were printed using our 2D-Bioprinting method. After obtaineing the high-resolution 2D Bio-printing images on the plate, we build up all the three thin layers. As shown in Figure 2, a six-pointed star was build based on the three basic elements. The side view of the 3D Bio-printing product showed that there was indeed difference in the Z-dimension, which convinced us that the <i>Luminesensor</i> was very suitable for 3D Bio-printing. |
</p> | </p> | ||
<div class="floatC"> | <div class="floatC"> | ||
<img src="/wiki/images/1/1d/Peking2012_3D_Printing.png" style="width:400px;" /> | <img src="/wiki/images/1/1d/Peking2012_3D_Printing.png" style="width:400px;" /> | ||
<p class="description"style="text-align:center"> | <p class="description"style="text-align:center"> | ||
| - | Figure 2. Result of 3D Bio-printing using <i>Luminesensor</i>. | + | Figure 2. Result of 3D Bio-printing using the <i>Luminesensor</i>. |
</p> | </p> | ||
</div> | </div> | ||
Latest revision as of 05:14, 26 October 2012
3D Printing
3D printing is a promising technology that has been rising for many years. It is a form of additive manufacturing technology where a three dimensional object is created by laying down successive layers of material. The tools are effectively modified ink-jet printers that deposit successive layers of material until a three-dimensional object is built up. The methods for 3D printing in manufacturing are quite developed, but in synthetic biology, there have been only a few attempts made. We believe that 3D Bio-printing can be utilized in many applications in both medical and manufacturing, such as with the synthesis of artificial vessels, organs, or bone tissues, and the creation of high-order biomaterials based on the high spatial resolution of the light. With more precise control of the response threshold of the optic biosensor, we can obtain holographic images from a solid medium.
Most modern 3D printers work by printing layer by layer. This is done by ‘cutting’ visual objects into 2D slides and printing each layer onto a surface.
The principal advantage of our system for 3D Bio-printing is the "graver"--light. Light is a cheap source with high spatial resolution, allowing for us to fabricate complex objects. The use of transparent LB or M9 medium allows light to be exposed to the entire culture. We’ve attempted 3D Bio-printing with our Luminesensor.
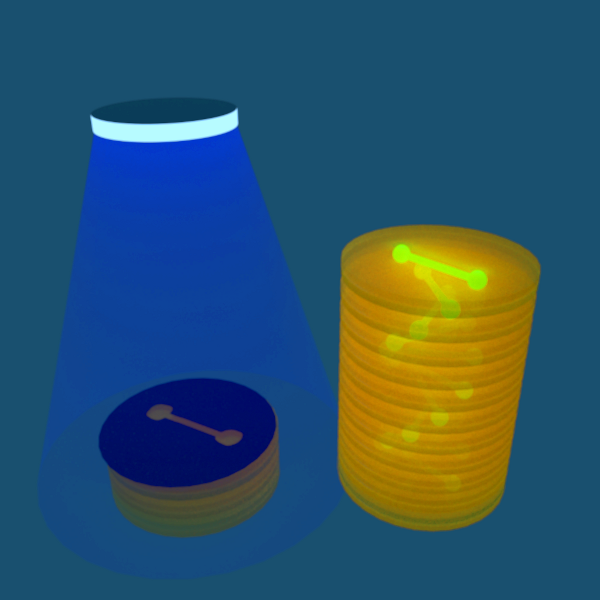
We tried the current method--building up layer by layer. About more details, many identical masks were made and just as in 2D Bio-printing, after exposed to parallel light of 12 hours, we obtain a series of luminous steps forming stairs by putting them layer by layer. Figure 1 demonstrates the basic device for 3D printing.

Figure 1. the setup used in the 3D printing.
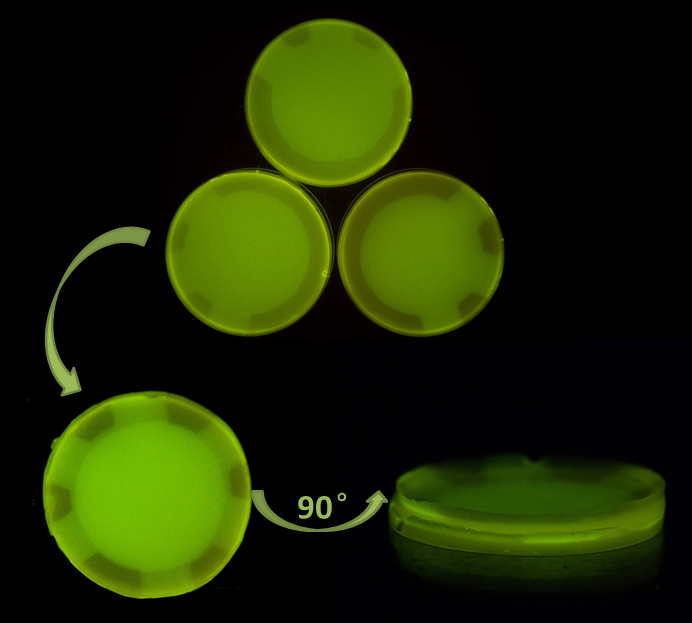
Consistent with our prediction, the layer-by-layer method works well with the Luminesensor. As a proof of concept, three layers of thin plate were printed using our 2D-Bioprinting method. After obtaineing the high-resolution 2D Bio-printing images on the plate, we build up all the three thin layers. As shown in Figure 2, a six-pointed star was build based on the three basic elements. The side view of the 3D Bio-printing product showed that there was indeed difference in the Z-dimension, which convinced us that the Luminesensor was very suitable for 3D Bio-printing.

Figure 2. Result of 3D Bio-printing using the Luminesensor.
We have realized that it may be the first 3D Bio-printing product controlled by light signal in Synthetic Biology. We proved that the general 3D printing principle, namely, layer-by-layer, was applicable in Bio-printing. Additionally, the high spatiotemporal specificity of light signal makes it possible to print more complex products with specific function, e.g. human issues or organs, a further step of what we have presented here.
Reference
- 1. Lam, C.X.F., Mo, X.M., Teoh, S.H., Hutmacher, D.W.(2002) Scaffold development using 3D printing with a starch-based polymer. Mat. Sci. Eng. C., 20: 49: 56
- 2. Nicola Jones(2012).Science in three dimensions: The print revolution. Nature, 487: 22: 23
- 3. Leukers, B., Gulkan, H., Irsen, S.H., Milz, S., Tille, C., Schieker, M., Seitz, H.(2005) Hydroxyapatite scaffolds for bone tissue engineering made by 3D printing. J. Mater. Sci. Mater. Med., 16: 1121:1124
- 4. Erickson, B., Singh, R., Winters, P.(2012) Synthetic Biology: Regulating Industry Uses of New Technologies. Science, 333:1254:1256
- 5. Khalil, A.S., Collins, J.J.(2010)Synthetic biology: applications come of age. Nat. Rev. Genet., 11:367: 379
 "
"


