Team:Peking/Project/3D/2D
From 2012.igem.org
m |
|||
| (12 intermediate revisions not shown) | |||
| Line 10: | Line 10: | ||
<h3 id="title1">Summary</h3> | <h3 id="title1">Summary</h3> | ||
<p> | <p> | ||
| - | We transformed <i>E. coli</i> strain BL21 with | + | We transformed <i>E. coli</i> strain BL21 with the <i>Luminesensor</i> by which expression of Green Fluorescence Protein (GFP) was controlled. Later on, we performed a series of plate assays which were carried out as graphic visual depictions of the <i>Luminesensor</i>. |
<br /><br /> | <br /><br /> | ||
Through blue light exposure on a lawn of bacteria, light-induced spatial control of gene expression in <i>E. coli</i> was achieved in our experiment. This has the potential to be used to "print" complex biological materials<sup><a href="#ref1" title="Christopher A. Voigt.et al. Nature 438; 441-442 (2005)">[1]</a></sup> or to control metabolic pathways in a cheaper and more precise way in the future. | Through blue light exposure on a lawn of bacteria, light-induced spatial control of gene expression in <i>E. coli</i> was achieved in our experiment. This has the potential to be used to "print" complex biological materials<sup><a href="#ref1" title="Christopher A. Voigt.et al. Nature 438; 441-442 (2005)">[1]</a></sup> or to control metabolic pathways in a cheaper and more precise way in the future. | ||
| Line 24: | Line 24: | ||
<h3 id="title2">Preparation of Plates for Printing</h3> | <h3 id="title2">Preparation of Plates for Printing</h3> | ||
<p> | <p> | ||
| - | We transformed the strain BL21 and grew the cultures overnight in 5mL of LB broth + respective antibiotics in 30<sup>o</sup>C, followed by irradiating in blue LED (465nm,6-10μW/cm<sup>2</sup>). 1 mL suspension culture (OD<sub>600</sub>~0.9-1.6) were added into 100mL of LB solid medium (0.6g agarose with respective antibiotics) and the mixture was poured into culture dishes. | + | |
| + | |||
| + | We transformed the strain BL21 and grew the cultures overnight in 5mL of LB broth + respective antibiotics in 30<sup>o</sup>C, followed by irradiating in blue LED (465nm,6-10μW/cm<sup>2</sup>). 1 mL suspension culture (OD<sub>600</sub>~0.9-1.6) were added into 100mL of LB solid medium (0.6g agarose with respective antibiotics) and the mixture was poured into culture dishes.<br /> | ||
</p> | </p> | ||
</div> | </div> | ||
| Line 30: | Line 32: | ||
<h3 id="title3">Printer Design</h3> | <h3 id="title3">Printer Design</h3> | ||
<p> | <p> | ||
| + | |||
| + | |||
| + | |||
After several attempts, a simple printer (Figure 2) was put into use for printing experiments. A single blue LED served as the light source and was put at the focal point of a convex lens. Both the LED and the convex lens were securely fastened on a "light-tight" tube, with the purpose of shielding stray light. Through the use of this device, parallel light is obtained. A "photo-mask" was then adhered to the bottom of the plate and securely fastened onto the tube. The whole device was then wrapped in black fabric and incubated in 30<sup>o</sup>C. As it is fairly easy to produce the "photo-mask", images could be printed with convenience. | After several attempts, a simple printer (Figure 2) was put into use for printing experiments. A single blue LED served as the light source and was put at the focal point of a convex lens. Both the LED and the convex lens were securely fastened on a "light-tight" tube, with the purpose of shielding stray light. Through the use of this device, parallel light is obtained. A "photo-mask" was then adhered to the bottom of the plate and securely fastened onto the tube. The whole device was then wrapped in black fabric and incubated in 30<sup>o</sup>C. As it is fairly easy to produce the "photo-mask", images could be printed with convenience. | ||
| + | |||
| + | |||
| + | |||
| + | |||
</p> | </p> | ||
<div class="floatC"> | <div class="floatC"> | ||
<img src="/wiki/images/3/37/Peking2012_2D_printing_2.jpg" style="width:500px;" /> | <img src="/wiki/images/3/37/Peking2012_2D_printing_2.jpg" style="width:500px;" /> | ||
| - | <p class="description">Fig. 2 (a)The printer that uses the photo-mask. The blue LED is placed at the focal point of the convex lens | + | <p class="description">Fig. 2 (a)The printer that uses the photo-mask. The blue LED is placed at the focal point of the convex lens. </p> |
</div> | </div> | ||
<div class="floatC"> | <div class="floatC"> | ||
<img src="/wiki/images/e/e9/Peking2012_2D_printing_result_printing.jpg" style="width:500px;" /> | <img src="/wiki/images/e/e9/Peking2012_2D_printing_result_printing.jpg" style="width:500px;" /> | ||
| - | <p class="description">Fig. 2 | + | <p class="description">Fig. 2 (b)Even complex Chinese characters can be printed. The line width is approximately about 1 mm. This character means illumination or sunshine.</p> |
</div> | </div> | ||
<p> | <p> | ||
| - | We also had a different printer design in which an Apple iPad is used as a light source. It is expected to serve as an interface between cellular and electronic components<sup><a href="#ref2" title="">[2]</a></sup> (Figure | + | |
| + | We also had a different printer design in which an Apple iPad is used as a light source. It is expected to serve as an interface between cellular and electronic components<sup><a href="#ref2" title="">[2]</a></sup> (Figure 3). | ||
| + | |||
| + | |||
| + | |||
</p> | </p> | ||
<div class="floatC"> | <div class="floatC"> | ||
| - | <img src="/wiki/images/ | + | <img src="/wiki/images/6/69/Peking2012_iPrinting-v.2.01.jpg" style="height:400px;" /> |
<p class="description">Fig. 3 (a) Printer utilizing an Apple iPad retina display. The tube is adjustable to form a sharper image on the plate.(b)(c) An apple logo is printed.</p> | <p class="description">Fig. 3 (a) Printer utilizing an Apple iPad retina display. The tube is adjustable to form a sharper image on the plate.(b)(c) An apple logo is printed.</p> | ||
</div> | </div> | ||
| Line 58: | Line 71: | ||
<h3 id="title4">Discuss: How to Get Sharper Image</h3> | <h3 id="title4">Discuss: How to Get Sharper Image</h3> | ||
<p> | <p> | ||
| - | + | ||
| + | |||
| + | There are three key necessities for 2D-printing: 1)dark room, 2)parallel light or clear image formation, and 3) thin plate. | ||
| + | |||
| + | |||
<br /><br /> | <br /><br /> | ||
| - | (1) As <i>Luminesensor</i> is highly sensitive, it is vital | + | (1) As the <i>Luminesensor</i> is highly sensitive, it is vital to stay shielded from stray light. The set-up needs to be separated from the indoor lighting environment, or it may accidentally sense the extraneous light and the imaging process would be disturbed, resulting in inaccurate results.<br /><br /> |
2) In regards to the set-up using parallel light, it is important to keep the light parallel, which requires careful measurement of the focal length. (Figure 4 a-c)<br /><br /> | 2) In regards to the set-up using parallel light, it is important to keep the light parallel, which requires careful measurement of the focal length. (Figure 4 a-c)<br /><br /> | ||
3) A thinner plate produces sharper edges, though the contrast ratio would become lower, for fewer bacterial colonies exist. (Figure 4 d-f) | 3) A thinner plate produces sharper edges, though the contrast ratio would become lower, for fewer bacterial colonies exist. (Figure 4 d-f) | ||
</p> | </p> | ||
<div class="floatC"> | <div class="floatC"> | ||
| - | <img src="/wiki/images/ | + | <img src="/wiki/images/5/51/Peking2012_Comparing_v.1.01.jpg" style="width:500px;" /> |
<p class="description"> | <p class="description"> | ||
Fig.4 (a)-(c) These three figures demonstrate how parallel light produces sharper images. (d)-(f) These three figures explain how thinner plates produce sharper images. | Fig.4 (a)-(c) These three figures demonstrate how parallel light produces sharper images. (d)-(f) These three figures explain how thinner plates produce sharper images. | ||
| Line 74: | Line 91: | ||
<h3 id="title5">Reference</h3> | <h3 id="title5">Reference</h3> | ||
<p></p> | <p></p> | ||
| - | <ul><li id="ref1"> | + | <ul class="refer"><li id="ref1"> |
1. Voigt., C.A., <i>et al.</i>(2005) Engineering <i>Escherichia coli</i> to see light. <i>Nature</i>, 438: 441: 442 | 1. Voigt., C.A., <i>et al.</i>(2005) Engineering <i>Escherichia coli</i> to see light. <i>Nature</i>, 438: 441: 442 | ||
</li><li id = "ref2"> | </li><li id = "ref2"> | ||
| - | 2. Jeffrey, J., Tabor, Levskaya, A. & Voigt., C.A.(2011) | + | 2. Jeffrey, J., Tabor, Levskaya, A. & Voigt., C.A.(2011) Multichromatic Control of Gene Expression in <i>Escherichia coli</i>. <i>J.Mol.Biol.</i>, 405:315:324 |
</li></ul> | </li></ul> | ||
</div> | </div> | ||
</html>{{Template:Peking2012_Color_Epilogue}} | </html>{{Template:Peking2012_Color_Epilogue}} | ||
Latest revision as of 05:14, 26 October 2012
Summary
We transformed E. coli strain BL21 with the Luminesensor by which expression of Green Fluorescence Protein (GFP) was controlled. Later on, we performed a series of plate assays which were carried out as graphic visual depictions of the Luminesensor.
Through blue light exposure on a lawn of bacteria, light-induced spatial control of gene expression in E. coli was achieved in our experiment. This has the potential to be used to "print" complex biological materials[1] or to control metabolic pathways in a cheaper and more precise way in the future.
![[Fig 1.]](/wiki/images/b/be/Peking2012_2D_printing_result_1.jpg)
Fig 1. Printing result – the right image shows that the bacteria did not die or flee, but instead they evenly distributed across the plate.
Preparation of Plates for Printing
We transformed the strain BL21 and grew the cultures overnight in 5mL of LB broth + respective antibiotics in 30oC, followed by irradiating in blue LED (465nm,6-10μW/cm2). 1 mL suspension culture (OD600~0.9-1.6) were added into 100mL of LB solid medium (0.6g agarose with respective antibiotics) and the mixture was poured into culture dishes.
Printer Design
After several attempts, a simple printer (Figure 2) was put into use for printing experiments. A single blue LED served as the light source and was put at the focal point of a convex lens. Both the LED and the convex lens were securely fastened on a "light-tight" tube, with the purpose of shielding stray light. Through the use of this device, parallel light is obtained. A "photo-mask" was then adhered to the bottom of the plate and securely fastened onto the tube. The whole device was then wrapped in black fabric and incubated in 30oC. As it is fairly easy to produce the "photo-mask", images could be printed with convenience.
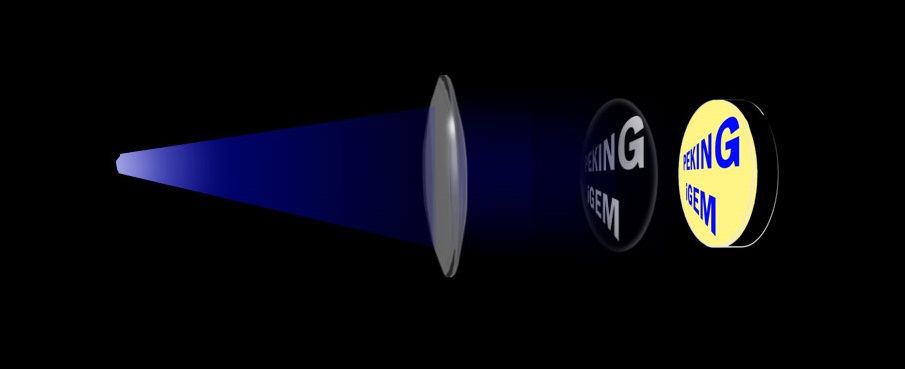
Fig. 2 (a)The printer that uses the photo-mask. The blue LED is placed at the focal point of the convex lens.
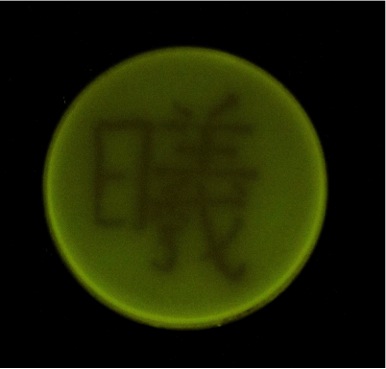
Fig. 2 (b)Even complex Chinese characters can be printed. The line width is approximately about 1 mm. This character means illumination or sunshine.
We also had a different printer design in which an Apple iPad is used as a light source. It is expected to serve as an interface between cellular and electronic components[2] (Figure 3).
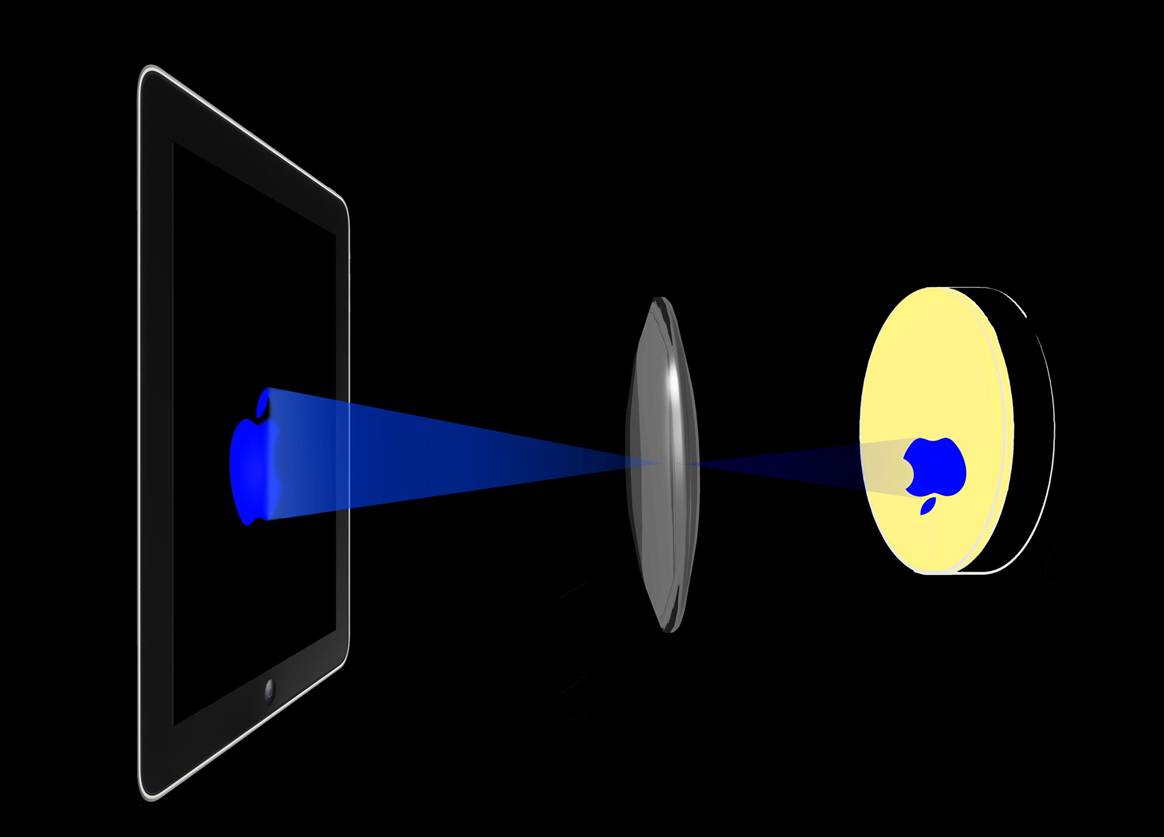
Fig. 3 (a) Printer utilizing an Apple iPad retina display. The tube is adjustable to form a sharper image on the plate.(b)(c) An apple logo is printed.
We made use of the image formation property of the convex lens to form images directly onto the plate. The tube is adjustable to form a sharper image on the plate.
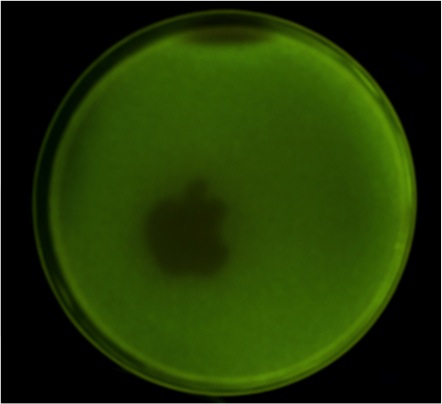
Fig. 3 (a) Printer utilizing an Apple iPad retina display. The tube is adjustable to form a sharper image on the plate.(b)(c) An apple logo is printed.
Discuss: How to Get Sharper Image
There are three key necessities for 2D-printing: 1)dark room, 2)parallel light or clear image formation, and 3) thin plate.
(1) As the Luminesensor is highly sensitive, it is vital to stay shielded from stray light. The set-up needs to be separated from the indoor lighting environment, or it may accidentally sense the extraneous light and the imaging process would be disturbed, resulting in inaccurate results.
2) In regards to the set-up using parallel light, it is important to keep the light parallel, which requires careful measurement of the focal length. (Figure 4 a-c)
3) A thinner plate produces sharper edges, though the contrast ratio would become lower, for fewer bacterial colonies exist. (Figure 4 d-f)
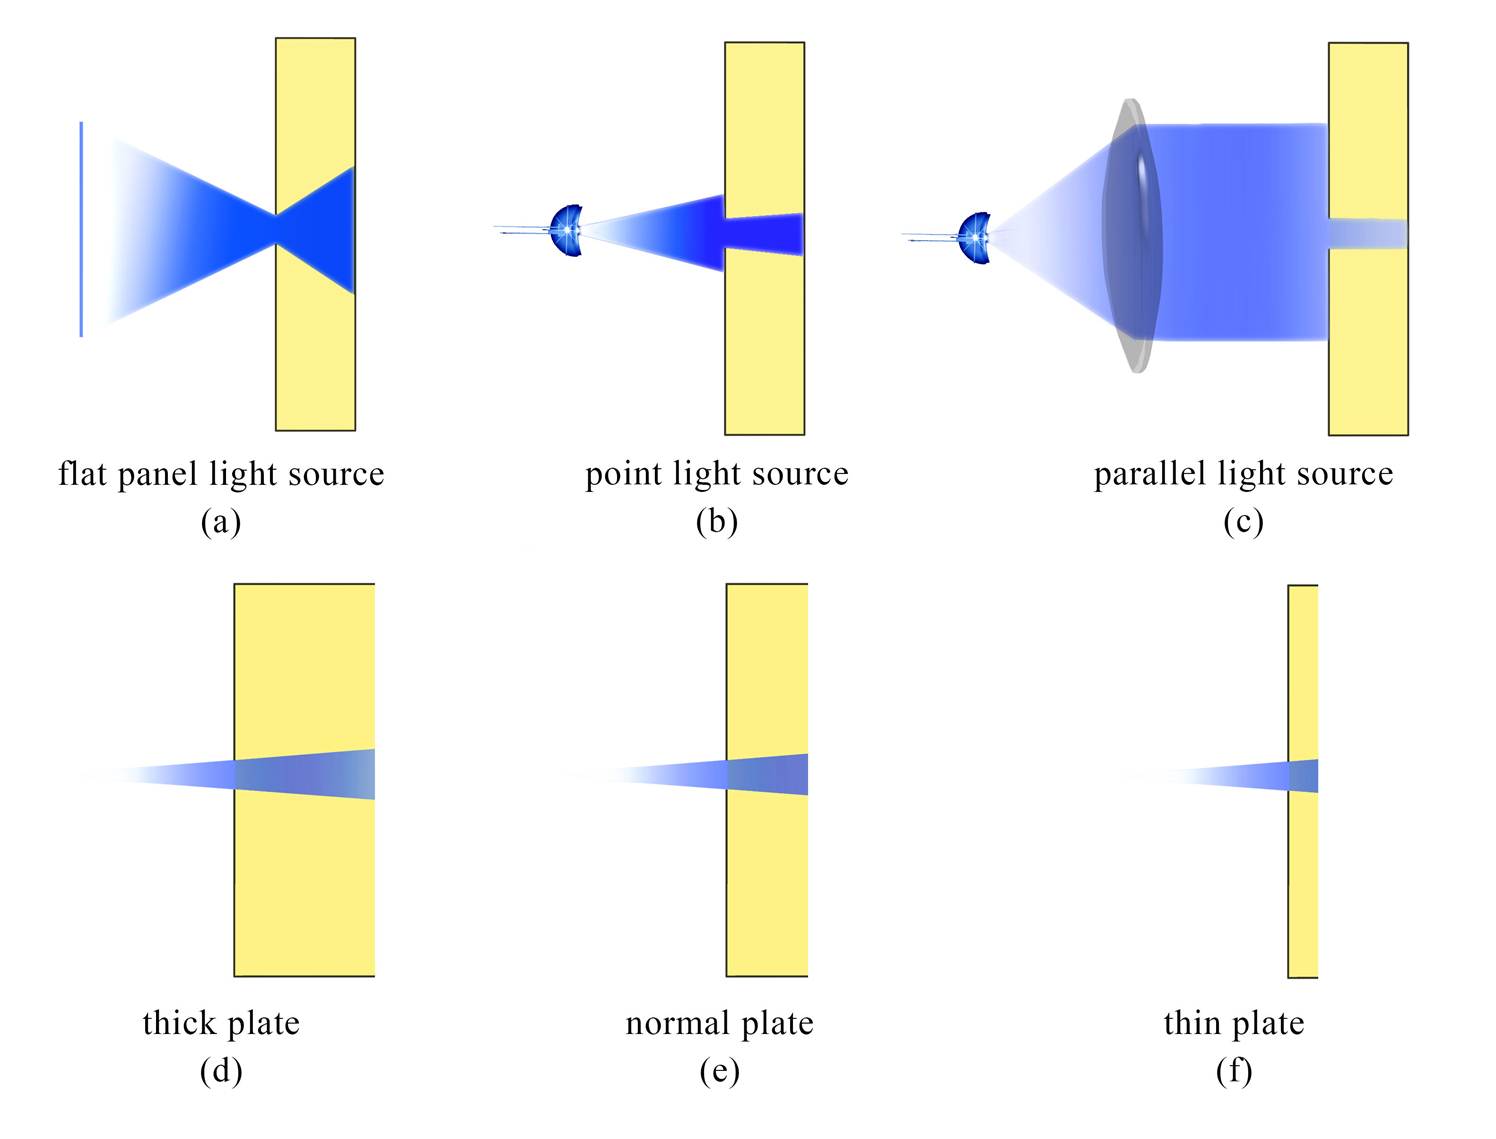
Fig.4 (a)-(c) These three figures demonstrate how parallel light produces sharper images. (d)-(f) These three figures explain how thinner plates produce sharper images.
Reference
- 1. Voigt., C.A., et al.(2005) Engineering Escherichia coli to see light. Nature, 438: 441: 442
- 2. Jeffrey, J., Tabor, Levskaya, A. & Voigt., C.A.(2011) Multichromatic Control of Gene Expression in Escherichia coli. J.Mol.Biol., 405:315:324
 "
"


