Contents |
Purification of Biobricked LovTAP, SEAP and TNFR
Protocol: PCR Cleanup
After doing a PCR, the resulting DNA should be cleaned up to get
rid of the primers, polymerases, dNTPs and the various other reagents
used in the PCR. This can also be used to remove small fragments
of DNA from other sources (such as digestions).
We used Macherey-Nagel's "Nucleospin® Gel and PCR clean-up" kit. The manual can be found here: Gel and PCR clean-up Manual
The kit uses a silica membrane to bind DNA which is then washed with several different buffers. The final step is the removal from the membrane by elution and recovery of our cleaned DNA.
Note: To increase the yield we applied the optional steps in 4 and 5 in the PCR cleanup protocol on pages 18 and 19. By incubating the columns at 70 degrees and eluting the DNA with heated elution buffer the yield of longer fragments can be increased.
The PCR purification kit from Macherey-Nagel was used.
Restriction digest of pCDNA3.1(-), LovTAP, SEAP and TNFR
Protocol: Restriction site digestion
- Look for the best pair of restriction sites, ideally with similar digestion temperatures and times.
- NEBcutter for finding cutting enzymes.
- Double Digest Finder for the parameters.
- Calculate the amounts required of:
- DNA
- Buffer (usually from 10x to 1x)
- BSA, if needed (usually from 100x to 1x)
- Enzymes (depends on the amount of DNA)
- Water
- Get the recommended buffer (and BSA if needed) from the freezer and let defreeze.
- Mix all the ingredients, except DNA, in a tube.
- Note: Enzymes should stay no longer than a couple of minutes out of the freezer. Don't touch the bottom of the tubes! Don't vortex!
- Distribute the mix in as many tubes as DNA samples and add the DNA.
- Keep in the Thermomixer at the recommended temperature.
Sowmya's recommended amounts (50 µl total solution):
- 5 µl of 10x buffer
- 0.5 µl of 100x BSA
- 1 µl of each enzyme
- 5 µl of DNA
- 37.5 (up to 50 µl) of water.
Protocol based on what was done on July the 4th.
SEAP and TNFR were cut with EcoRI and PstI. LovTAP was digested with NheI and KpnI. pcDNA3.1(-) was cut with NheI and KpnI.
Ligations
Protocol: Ligation
Ligation is a method of combining several DNA fragments into a single plasmid. This is often the
step following a PCR (and a PCR cleanup) or a gel extraction. You can also do a "dirty" ligation, where you follow a certain number of digestions directly by a ligation.
- Download the following spreadsheet : File:Team-EPF-Lausanne Ligation.xls
- Fill in the pink areas with the vector and fragment concentration, their size and the ratio.
- Add all the suggested ingredients order in a microcentrifuge tube, in the order they appear.
- Ligate for 2 hours at 14ºC.
- Immediately transform competent bacteria with the ligation product.
Note: This protocol hasn't been optimized for blunt-end ligation (though it might still work).
LovTAP was ligated with pcDNA3(-).
Colony PCRs: pMP-LovTAP, pGL4.30-EGFP, pGL4.30-TNFR
Protocol: PCR
PCR is a reaction that makes it possible (and relatively easy) to amplify
a certain region of DNA. The first step is the selection of that region
(and the design of the relevant primers). Primer design can be done by hand, or by
using our Primer Design Helper. Once
done, order the primers (in our case, we ordered from them IDT).
When you've received the primers, prepare them and make sure you've got your PCR kit (we used the "Phusion® High-Fidelity DNA Polymerase"). Start preparing your master mix, the composition for one tube is:
1X Mastermix 20μl reaction, add in this order
| Reagent | Volume [μl] |
|---|---|
| Water | Complete to total volume of 20μl |
| HF-Buffer (5x) | 4 |
| DMSO (optional) | 0.6 |
| dNTPs | 0.4 |
| Forward primer (50μM) | 0.2 |
| Reverse primer (50μM) | 0.2 |
| Template (10ng/μl) | 0.5 |
| Phusion HF polymerase | 0.2 |
Prepare one or two extra tubes-worth of reagent (you'll use some liquid on the walls of your tips).
Once you've finished, you should run the resulting products on a gel to check if everything went as planned.
Tips
- Thaw the HF-Buffer, DMSO and dNTPs before making the mastermix.
- Avoid taking the Phusion-HF polymerase out of the freezer (only take it out briefly when you need to add it).
- If the reactions have different primers and/or template, add the polymerase right after the dNTPs, split the mastermix and add the rest.
- Don't forget positive and negative controls
- Primers should have similar Tms (less than 5°C).
- Primer Tm calculation is a less exact science than it should be (just test several tools and compare their results). If you're not sure what the correct Tm is, consider using a gradient PCR.
- Avoid primers with strong secondary structures.
- PCR can introduce mutations. Don't forget to sequence your final product (this could be your final plasmid): you really don't want to lose a few weeks because of a "corrupt" plasmid.
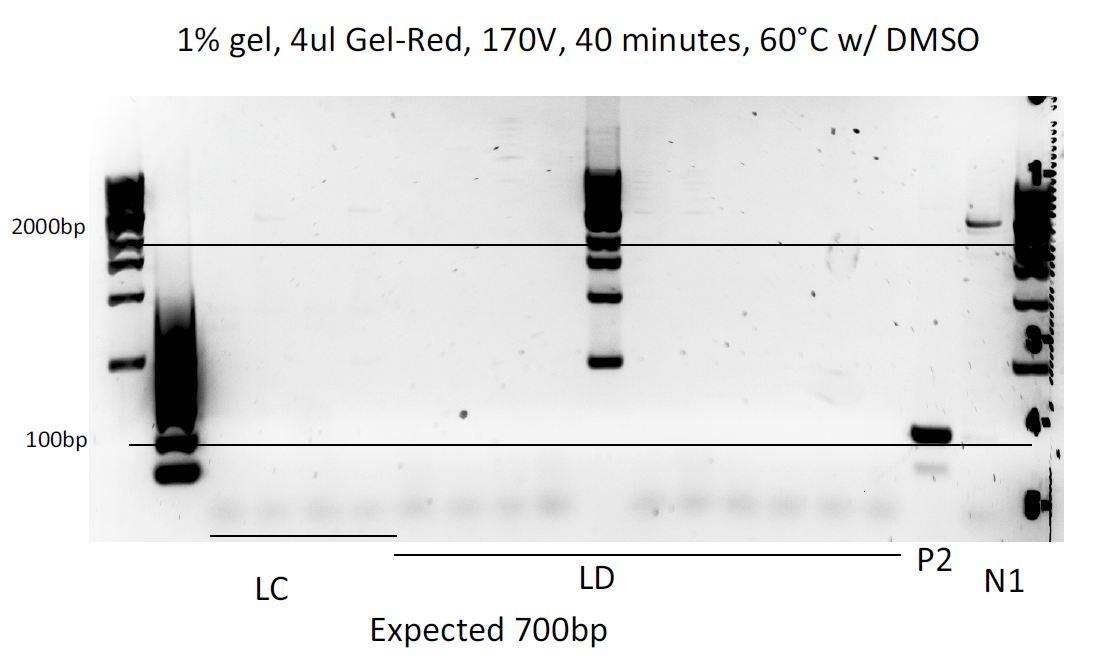
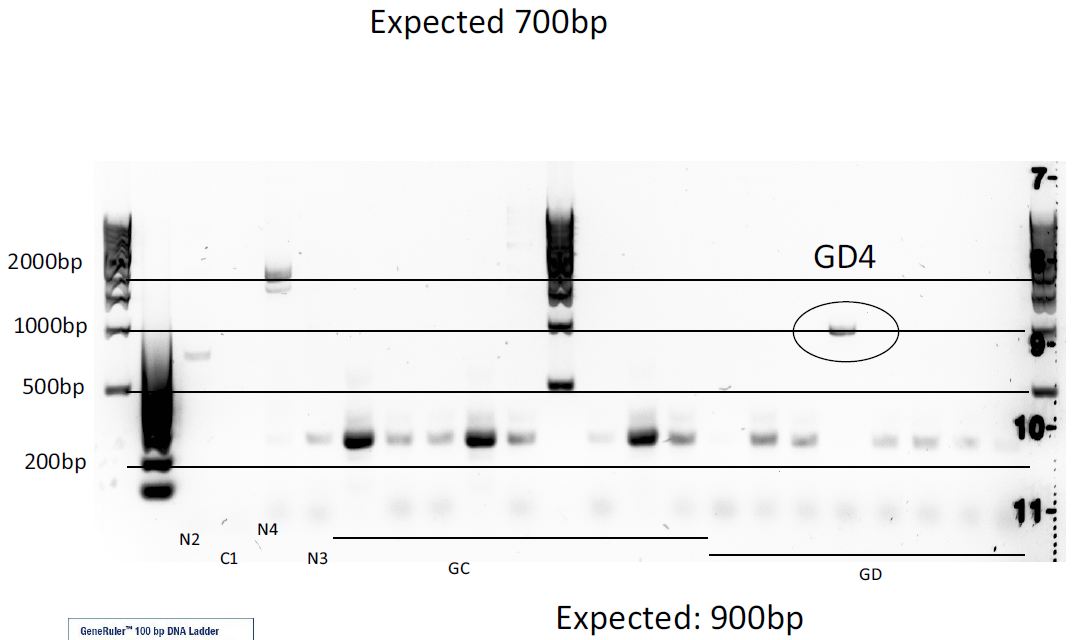
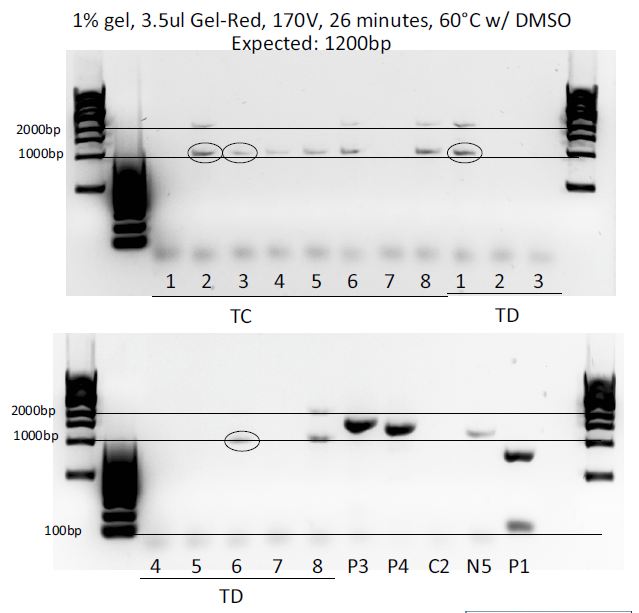
Colony PCR of the 3 ligations (each in a dirty (D) and clean (C) way, meaning more or less purified) to test which colonies integrated the right fragment and contain the plasmid we want.
Results:
The GD4 colony was used for transfection after mini and maxipreping. Unfortunately pMP-LovTAP was unsuccessful, but at least pcDNA3.1(+)-LovTAP worked so at least one of the two possibilities to clone LovTAP into a mammalian vector worked out.
Western Blot result - VP16 antibody detection check
Protocol: Western Blot
Gel Ingredients (choose percentage according to the size of the protein)
| 4-40 kDA | 20% |
| 12-45 kDA | 15% |
| 10-70 kDA | 12.5% |
| 15-100 kDA | 10% |
| 25-200 kDA | 8% |
| Separating gel | |
| Gel percentage | 7.5 % |
| 30% Polyacrylamide | 10 mL |
| 1.5M Tris (pH 8.8) | 10 mL |
| 10% Ammonium persulfate | 0.4 mL |
| 10% SDS | 0.4 mL |
| TEMED | 0.038 mL |
| H2O | 19.2 mL |
| Total volume | 40 mL |
| Stacking gel | |
| Gel percentage | 5 % |
| 30% Polyacrylamide | 1.36 mL |
| 1M Tris (pH 6.8) | 1 mL |
| 10% Ammonium persulfate | 0.08 mL |
| 10% SDS | 0.08 mL |
| TEMED | 0.008 mL |
| H2O | 5.44 mL |
| Total volume | 8 mL |
Preparing Protein Samples
1. Centrifuge around 5 million cells (of any volume) at 2,500 rpm for 10 min.
2. Discard the supernatant with a vacuum pump.
3. Resuspend the cell pellet with 1x PBS and centrifuge it at 2,500 rpm for 10 min.
4. Discard the supernatant with a vacuum pump.
5. Add appropriate amount of lysis buffer depending on the pellet size (for a 20 mg pellet, 150 µl of IP lysis buffer).
6. Keep the lysed sample on ice for 10 min - flick every 3 minutes.
7. Add 3x SDS lysis buffer (for a 20 mg pellet, 75 µl).
8. Incubate the sample for 5 minutes at 95 degrees, to denature proteins.
Preparing loading samples
1. Load the ladder (7 µl is the recommended volume).
2. Complete sample volume to 50 µl.
3. Load the samples.
I. SDS Gel electrophoresis
1. Prepare the separating and stacking gel solutions without APS and TEMED.
2. Add APS and TEMED to the separating gel solution only when the SDS kit is ready to be used, they are time-sensitive. Move the solution inside of the setup. Add some distilled water on top of it.
3. After 20-30 mins, remove the water and check whether the gel has solidified. Don't move to the next step until it does.
4. Add TEMED to the stacking gel solution, pour it on top of the solidified separating gel.
5. Insert a stack carefully and leave it for 20-30 mins.
6. Take the stack out and fill the kit with SDS loading buffer.
7. Load the samples.
8. Add more loading buffer, set the voltage to 80 Volts. Leave for 1.5 hours.
II. Membrane transfer
1. Prepare a membrane transfer kit.
2. Take the gel out of the SDS kit and put it on the membrane paper.
3. From bottom to top, assemble the components in the following order: 1) Sponge - 2) Blot paper - 3) Membrane - 4) Gel (Pour some M-transfer buffer on the gel) - 5) Blot paper again - 6) Sponge again.
4. Close the sandwich, set the voltage to 20 V. Leave for 30 mins - 1 hour.
5. Discard the gel. Leave the membrane in 5% skim milk with 30ml of TBST buffer (blocking buffer, to achieve the 5%, add 1.5 g of skim milk powder to the buffer) for one hour.
III. Antibody tagging
1. Discard the blocking buffer, leave only 5ml of it. Add primary antibody with a ratio of 1:1000 or 1:2000 (5 µl of antibody in 5 ml of buffer gives 1:1000)
2. Leave the mix overnight at 4 °C.
3. Wash 3 times with 1x TBST (5 minutes on shaker for every wash).
4. Dilute the secondary antibody (for example, goat anti-rabbit antibody) to 1:2000 in 5% skim milk buffer. Add it. Leave at room temperature for 2 hours.
5. Wash 3 times with 1x TBST (5 minutes on shaker for every wash).
6. Reveal the protein bands in the dark room.
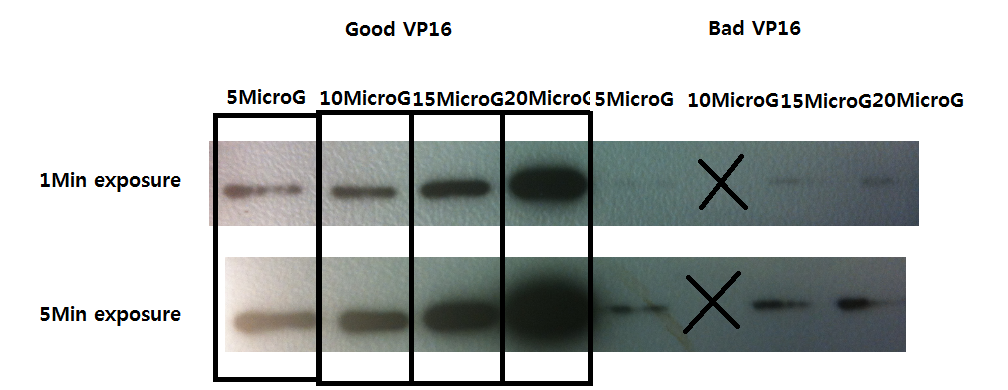
- Exposures were 1 min and 5 min, and the dilutions are of 50 ng, 100 ng, 150 ng, and 200 ng (from the left to right).
We observe detection of VP16 with the antibody.
 "
"


